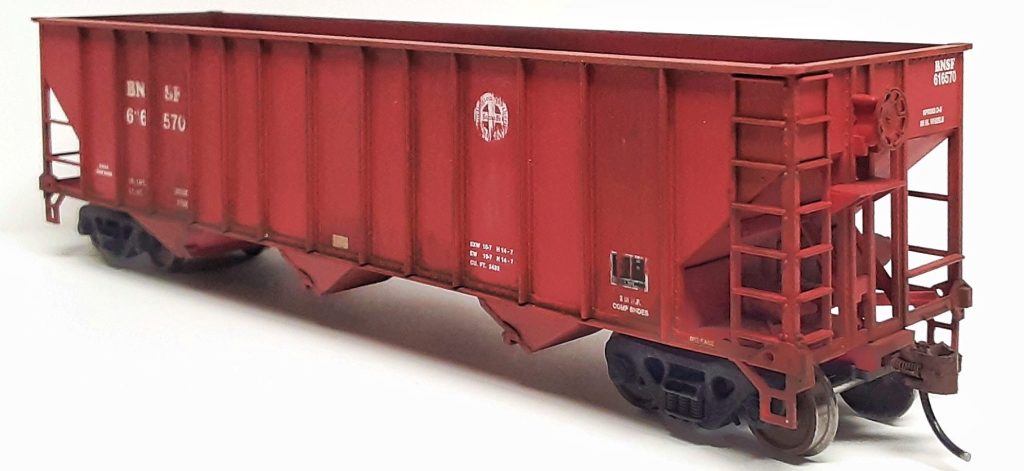
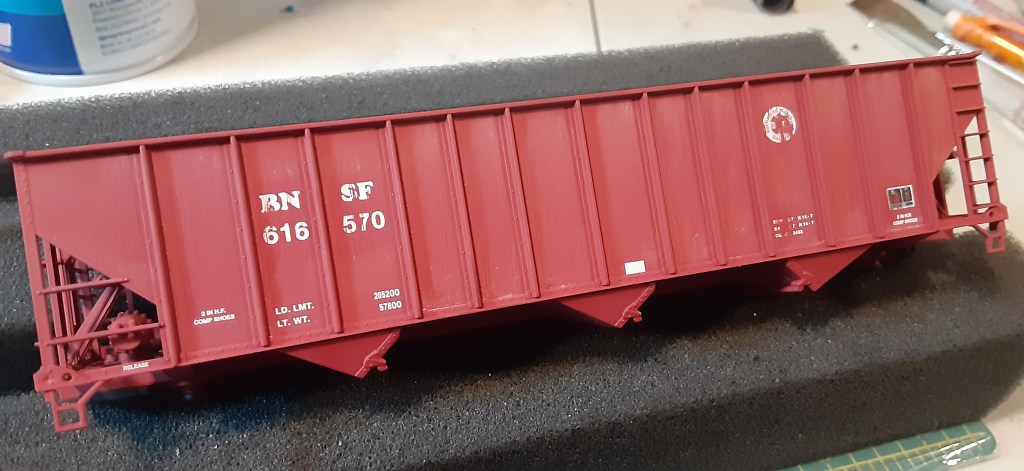
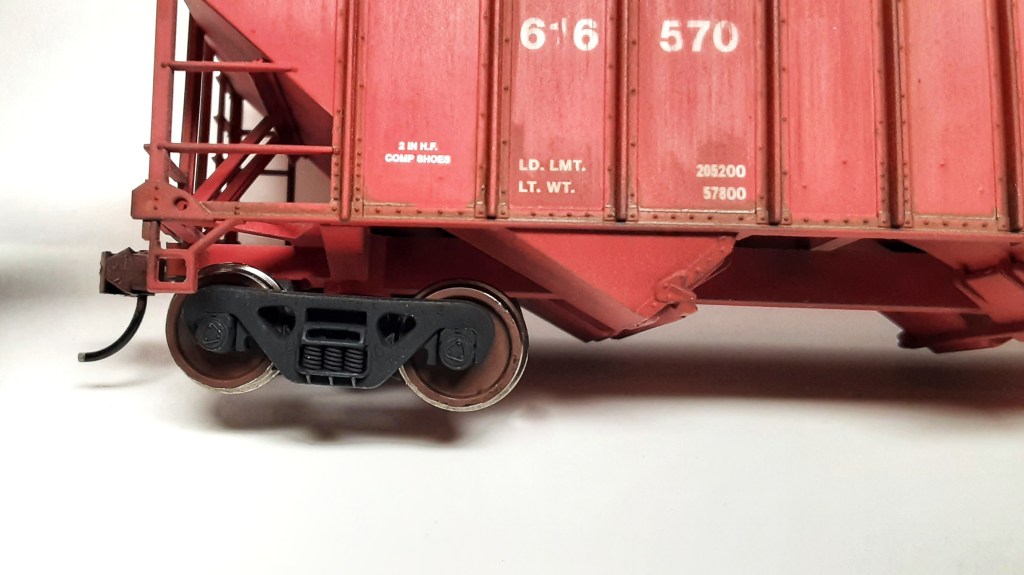
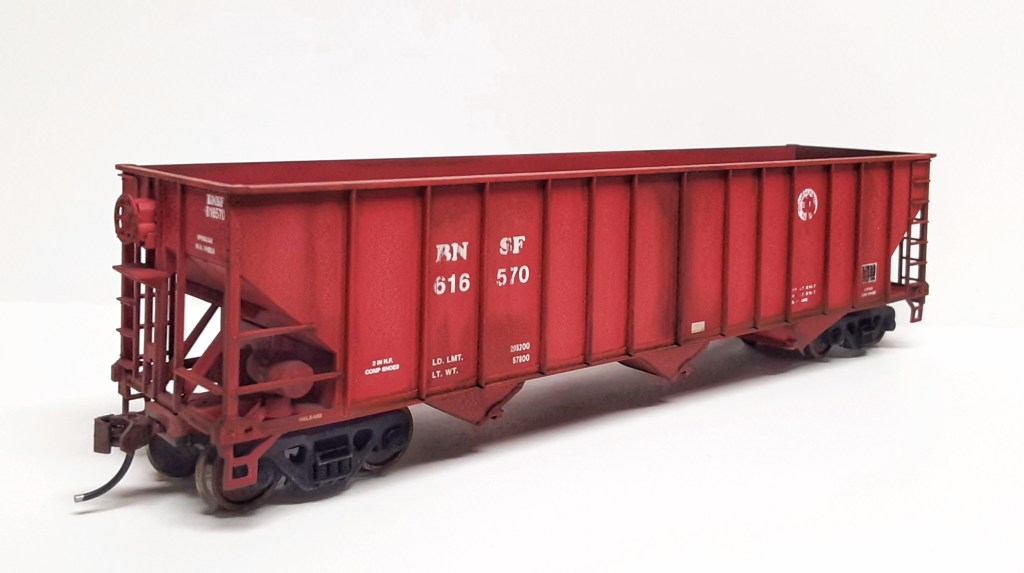
Weathering rollingstock can be a challenge sometimes, and one of those challenges are open cars. This HO scale weathering project uses a Bowser 100-ton hopper as the subject for an open car.
MY PROCESS:
To achieve the ultra flat and smudgy look of the BNSF oxide red paint I used a combination of Bragdon and AIM powders with Tamiya paint, panel wash and flat clear.
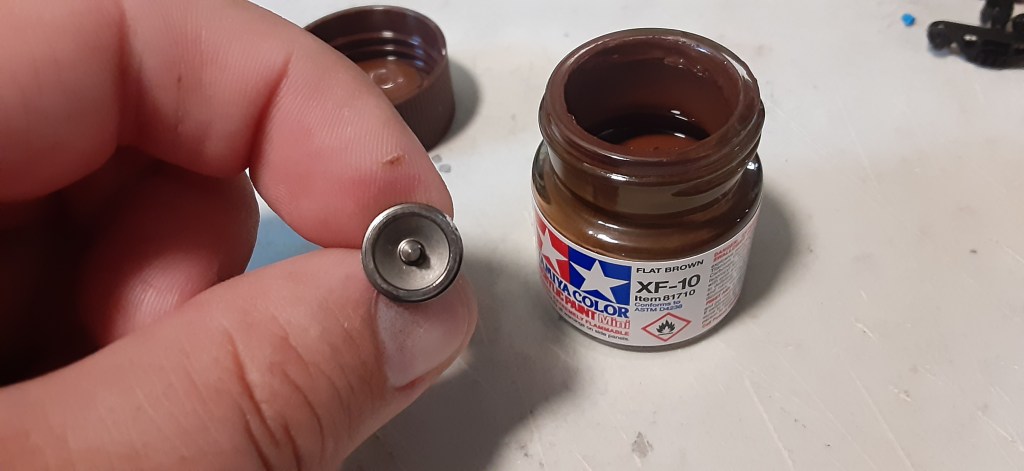
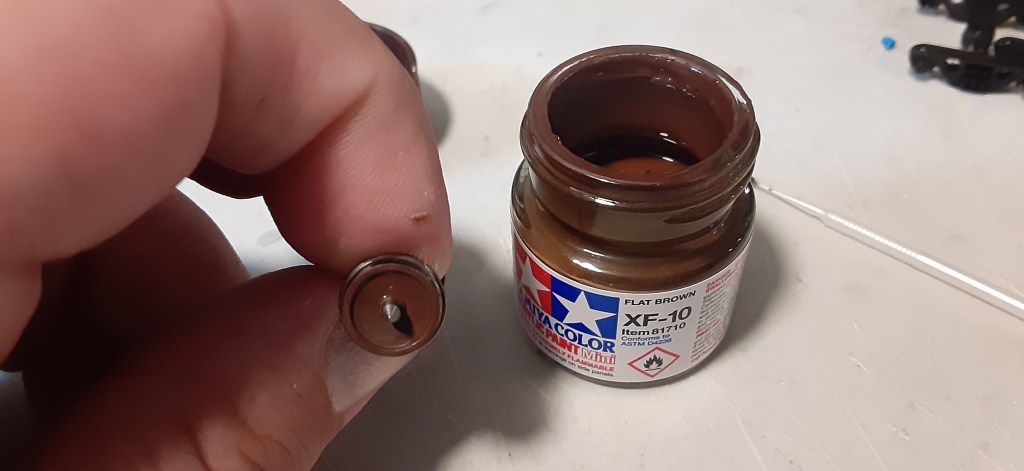
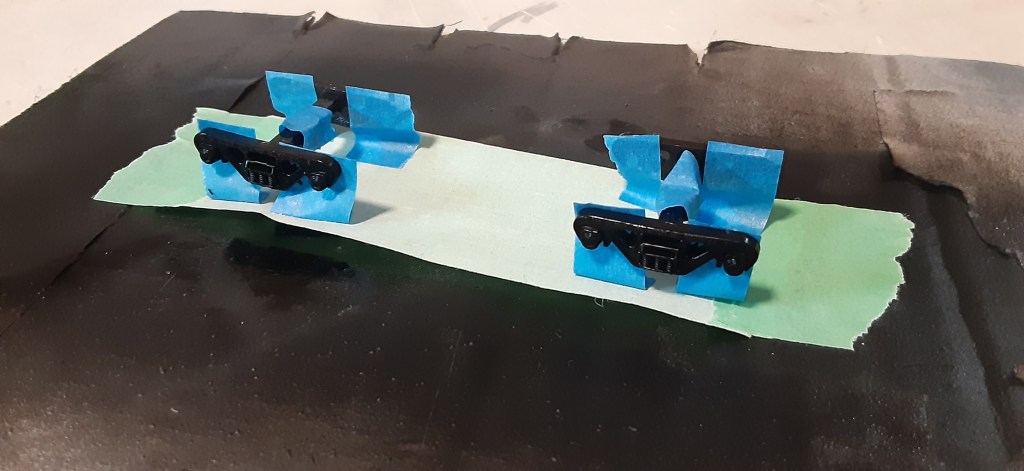
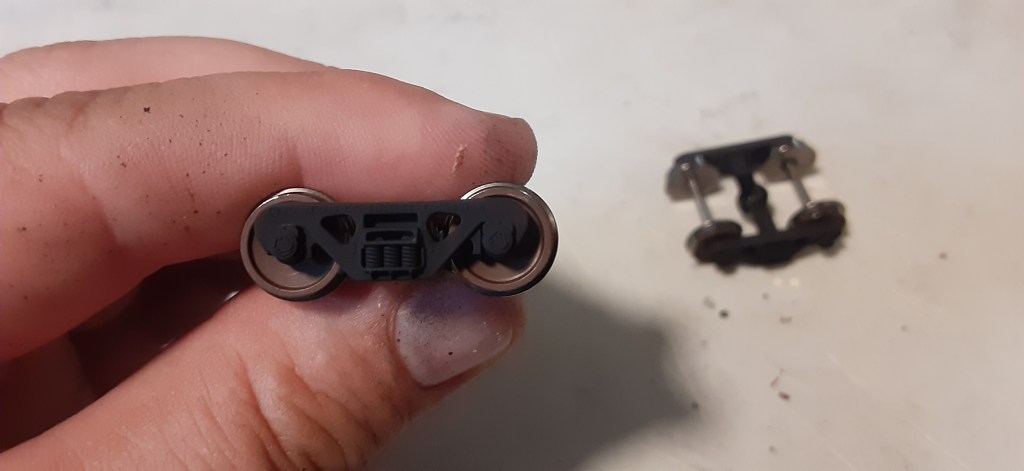
Starting out, disassembling the car is the easiest route. Using a micro brush to paint the wheel faces with flat brown makes this process a little quicker. I then masked off the back of both trucks and sprayed them with RustOleum ultra flat black from the camouflage line. While these smaller parts were drying I sprayed the entire car body with Tamiya flat clear and let dry. This was just about the right amount of time for the trucks and wheels to dry, I reassembled them and set aside.
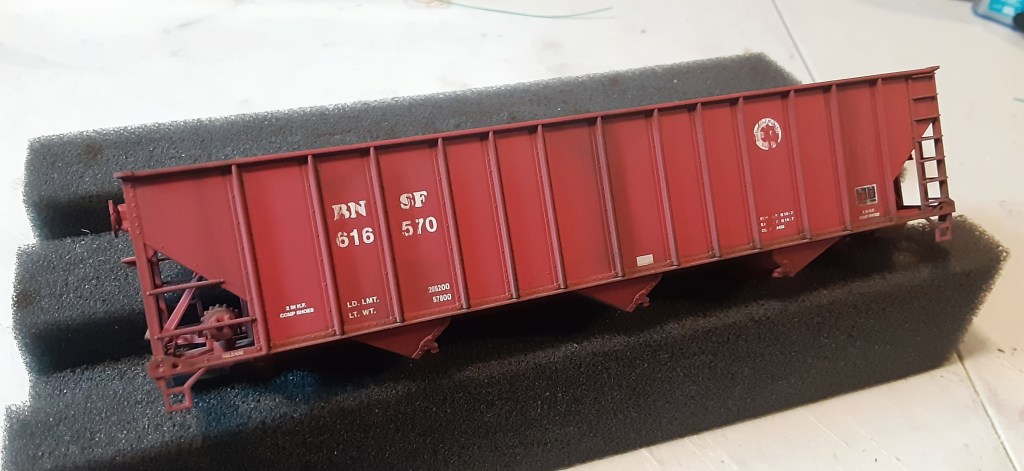
Next step was to use 600 grit sandpaper over the reporting marks and herald. I prefer to do this after spraying the clear, it gives a slightly softer chalky appearance versus doing before.
I followed the light sanding with brown panel line wash from Tamiya applied to both sides of each side rib and end braces as well. Once mostly dried, I highlighted the ribs by brushing dark earth powder by AIM horizontally across the car sides and ends to darken the ribs.
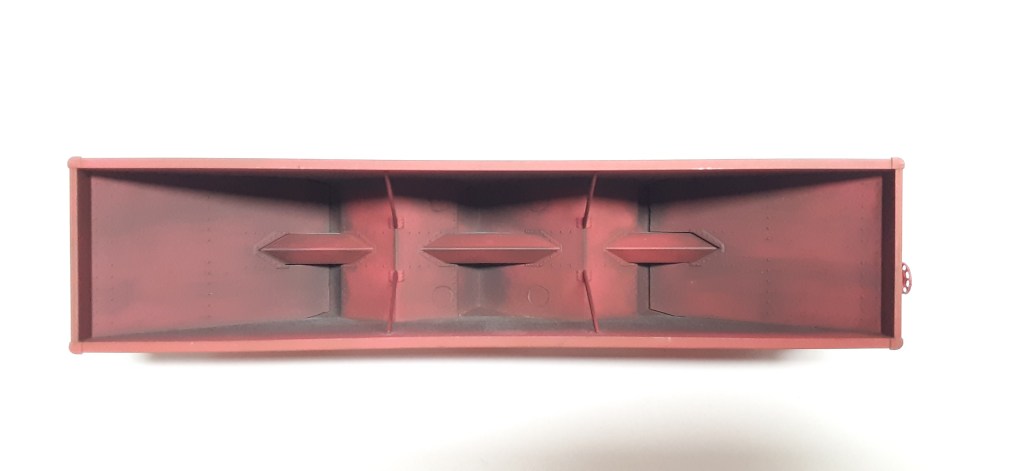
I then used a soft blush brush to darken and highlight the car interior with AIM dark earth and grimy black. Flipping the car over I used the same brush to highlight the hard edges around the 3 bay doors. I sealed the car by using more Tamiya flat clear and setting it aside to dry.
FINAL TOUCHES:
The last step was to paint the couplers. To do this I mixed a few drops of Tamiya flat brown with TruColor oxide red, grabbed a super fine Microbrush and painted the coupler head and shank. I also used a silver Sharpie paint marker on the trip pin ends, simulating the glad hands.
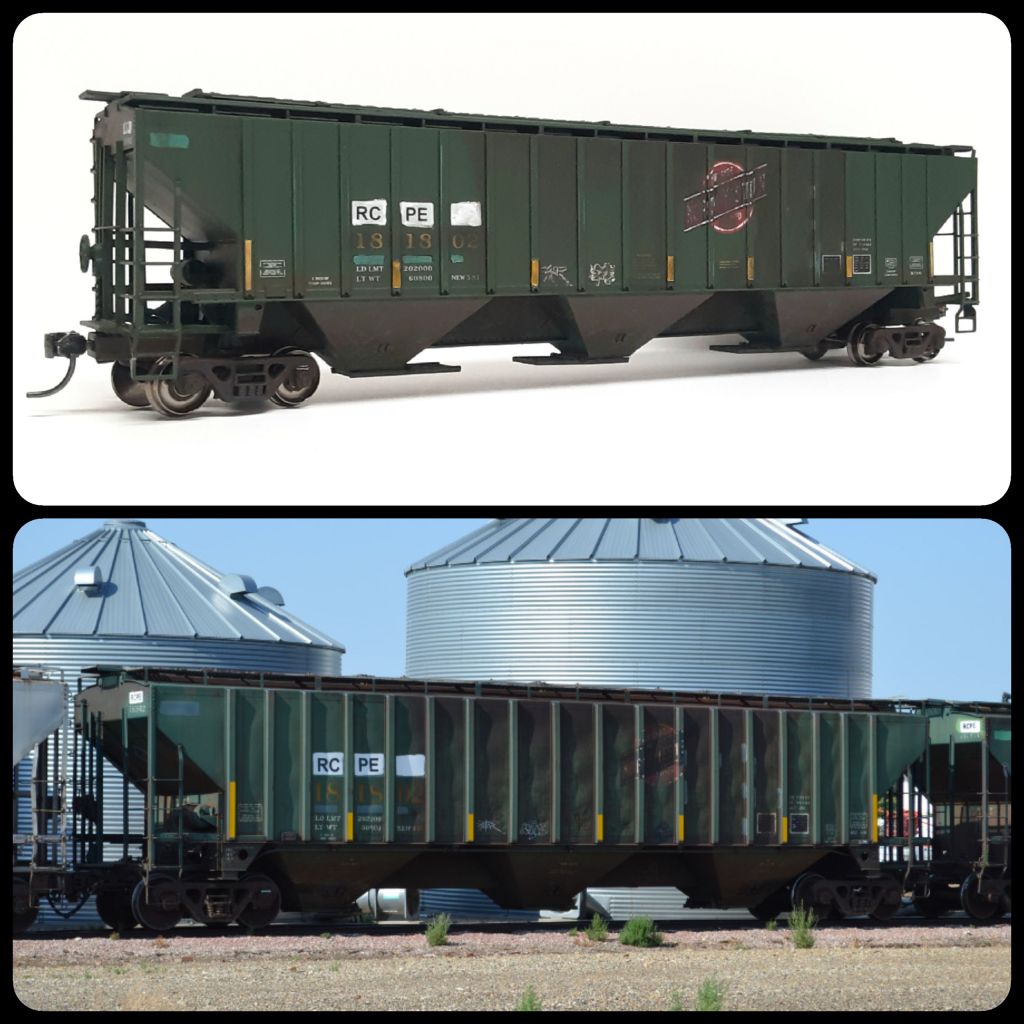
This assembled Accurail kit was begging to be weathered prototypically.
I was asked to weather this car for my local hobby shop train guy. Since it’s a local road to us, he asked to go as prototypically as possible.
OVERVIEW:
A quick backstory on these Accurail cars – A few of my local modeler friends and fellow club member put in the time to have Accurail produce a minimal run of these hoppers in ex-CNW factory patched for RCPE (Rapid City, Pierre & Eastern – formerly DME) which is our local road. Knowing the folks behind this made this project a little more special.
My process:
I looked for a prototype photo because the end goal was to get as close as possible. Thanks to rrpicturearchives I found one before the site became wonky. There was something off between the cars but I couldn’t figure it out until I finally noticed the conspicuity stripes differed than the factory printed ones. That had to change, at least on the one side.
My first step is almost always the same, I sprayed the car with Tamiya TS-80 flat clear to give the surface some tooth to hold powders.
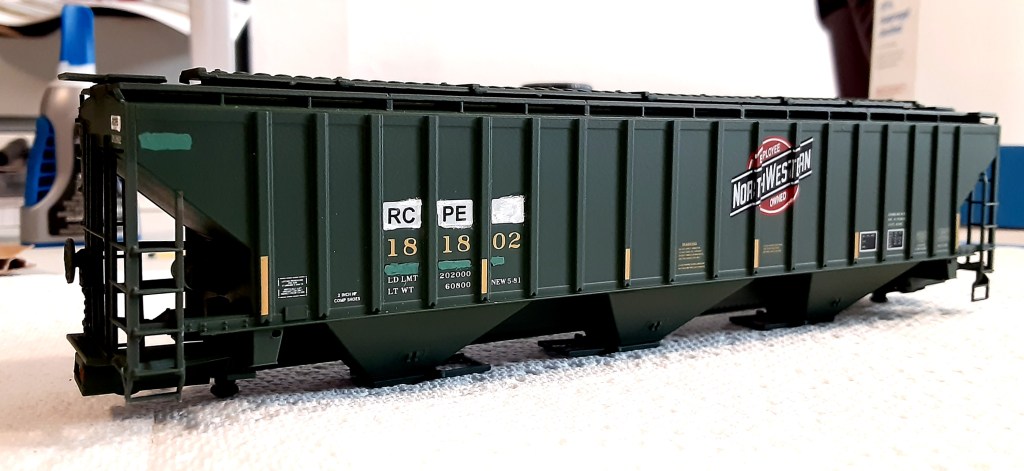
To remove the printed stripe I used 600 grit sand paper and slowly sanded them off. I used a super fine microbrush to apply some thinned Testors yellow enamel to replace the stripes. If I was to do it over, I would use Humbrol 99 matte yellow to get a closer match with the factory stripe color. However, the shade is virtually not noticeable after powders were applied.
I next mixed up a small amount of an off-green color for the small patches below the road numbers and top corner of the side panel ends on each side. I used basic white and dark green acrylic craft paints to make the color. To apply the small patches I used a super fine microbrush, that had been previously used and I was able to remove the bristles easily to make a very fine point plastic applicator. Steady hands helped paint the patches. When they dried I used a #11 Xacto blade to gently scrape the edges square.
I cleaned up my plastic applicator made from the microbrush and applied a sheer coat of white craft paint around the reporting mark letters on the factory RCPE patches to create the imperfect look from the prototype image. Patience is definitely key while building up the paint to get the effect.
While I had the white paint going, I used the same applicator to hand draw the two small tag marks along the lower sill. I initially went too heavy, to correct that I went over the paint slowly with a #11 Xacto blade until I was happy. The second is just a bit taller than the prototype.
Wanting to let the paints fully dry, I turned to the hoppers next. I sprayed some RustOleum ultra flat camo brown on a cottonball and into a small paint cup for use later. I used the paint saturated cottonball to blot on some of the dark brown flat paint, this creates a randomized splatter pattern. I went around the hoppers then followed up with a Q Tip dipped in the paint cup of the same paint. I applied more in random blots where my cottonball couldn’t reach.
Once the applied paints had dried, I used A.I.M. dark earth powder and stippled in on the hoppers over the dry paint. This resulted in a layered effect with some texture. I worked the powders until satisfied with pattern and look. I also used the A.I.M. dark earth powder to create the wheel spray up the car ends.
I went back to the prototype image and began with the CNW logo, it needed to be faded. I used 600 grit sand paper to slowly take away the printed layers until it resembled the prototype image look. Then I started adding Bragdon soot powder to the car side in a similar pattern to the image. I had to use soot because the brown looked too brown against the dark CNW green. I was cautious to keep the powders off tge patches as the image shows they are relatively clean.
Now that the sides and ends were done I moved to the hatches and top. More Bragdon soot was applied along the flat surfaces, while the hatches received a medium dusting of Bragdon green grunge powder along with dark earth powder accents across the hatches. Unfortunately the green looks good in person as a subtle sun faded look, but the effect does not come across in photos well.
Now that I was happy with how the car looked I sealed everything with another medium coat of Tamiya TS-80 flat clear.
FINAL TOUCHES:
While the car body dried, I masked the back sides of the trucks and sprayed the faces with the same ultra flat camo brown RustOleum paint used underneath. This helps pull the trucks and underside together. I did not paint the wheels per the request of the car’s owner.
I reassembled the couplers and trucks then mounted them on the car and I called it good. Overall I’m happy with how this car came out, I always find a couple things to do differently on the next project and some new ideas will come to the surface too.
The first rule of model railroading is have fun. This is a hobby, after all, and so it makes no sense to turn something fun into difficult work. With that in mind, the second rule of model railroading is that it’s your railroad and you can do whatever you want with it. I suppose if we added a third rule it would be to treat others with respect (looking at you, Modeler’s Life), but beyond that there really isn’t too much in the way of rules to follow.
Naturally, a lot of people in the hobby have a dream of building a gigantic model train layout in their basement, a loft in their garage, or even a separate building. Many such layouts have been featured in printed and digital media and I can understand the appeal. Large layouts are a sign of discipline, education, and the accumulation of many years of knowledge about railroads, model trains, and a dozen other skill sets. However, most of us likely aren’t going to have the chance to build something that big and those who do get the chance might want to consider a few things before breaking out the wood saw.
The case for a modest train layout
The fact is most train layouts aren’t particularly large. The 4’x8’ layout in O scale or HO scale was the standard for decades, and while preferences have changed for how layouts are designed, the amount of space available really hasn’t. The average train layout today can comfortably fit in a spare room and that’s likely all the room most people have to spare for their hobby. A number of people have even less space, perhaps only one or two walls of one room that is used for other things, or maybe even a closet!
Some things we can’t change and space is one of them. Odds are that even if you move to a new house you and the family aren’t going to place high priority on finding as much space as possible for a train layout. I mean, you might, but that would be an exception rather than the rule. With that in mind, modest train layouts have plenty of benefits!
1. Cost savings
Train layouts that are on the small side are much more affordable than the basement empires we see in magazines or on Youtube. The fact is most people don’t have a lot of extra money these days to dedicate to leisure activities and at the same time model railroad equipment has gotten more expensive. By focusing on a smaller layout, overall costs of construction can be brought down in terms of raw materials and equipment.
2. Efficient Design
A smaller area to build a train layout requires an efficient track plan in order to maximize the utility of the space. Larger layouts have a tendency to turn into a “spaghetti bowl” or they end up having more track than necessary in order to fill out the space. This doesn’t happen all the time, but it is a noticeable trend that shows up in a lot of the more classic designs. Now, that doesn’t mean you can’t build a model railroad that way, but most people who are low on space are going to think long and hard about what they want to include on their layout. As a result, there is usually a minimum of track and turnouts, key industries that don’t waste space, and other layout design elements that do their job well without wasting materials.
3. Quicker Construction
There’s only so much time in the week to dedicate to building a model railroad. Between work, family, volunteer projects, and all the other things which occupy life, most people only find a few hours a week to enjoy a hobby. With that being the case, wouldn’t it be great to get a train layout up an operating quickly? Small train layouts are faster to build as a side effect of having less material to deal with. Laying fifty feet of track is quicker than laying two hundred feet or more! Building a dozen model kits is faster than building three or four dozen. Wiring two locomotives for DCC takes an afternoon. Wiring two dozen locomotives takes weeks to complete.
4. More Details
Model builders hold detail in high regard. In fact, behind the smoothness of rollingstock and locomotives, a model’s details are what model railroaders focus on when purchasing a new piece of equipment. If you only need to buy or kit bash a few items then you can invest more money into those items. Additionally, fewer square feet to add scenery means it is easier to add a higher level of detail to a train layout.
5. Comfortable Environment
This last one is often overlooked by magazines. Having a train layout is great, but if there is no place to sit and relax then people aren’t going to want to spend much time in the layout space. Model railroaders in the modern day are also often renters or are purchasing a home with fewer bedrooms. In such cases it is often unrealistic to expect a train layout to take up a large amount of real estate. Instead, a small train layout can open up enough space for couches, TV’s, spare chairs, a kitchenette or coffee maker, and all the other creature comforts that make the hobby more enjoyable.
Modest Layout Examples
Of course, the first rule in the hobby is, again, its your railroad and you can build it how you want. We’ve all taken this to heart by building layouts that meet our needs without taking up so much space that it intrudes on the rest of the household or spills into our day jobs. That, I think, is a key thing to keep in mind about hobbies. They are meant to be enjoyed, but in order to enjoy them to their maximum potential we also must be able to take a break and not have to think about our modeling projects for short periods of time. Just like everything else, model trains are best done in moderation That’s why a layout is generally not placed in the living room but is instead out in the garage, down in the basement, or even in a dedicated structure.
Anyway, in order to show what can be done in a modest space, I have a dedicated gallery of sample images from three train layouts. My own Black Hills and Fort Pierre, Jordan Schmieg’s Milwaukee Road Minnesota-Dakota Division, and Mike Thoreson’s TC&W Lakeville Sub. Each image has an included caption with information about what you are viewing so I encourage you to take a stroll through these digital galleries:
Mike Thoreson’s Lakeville Sub
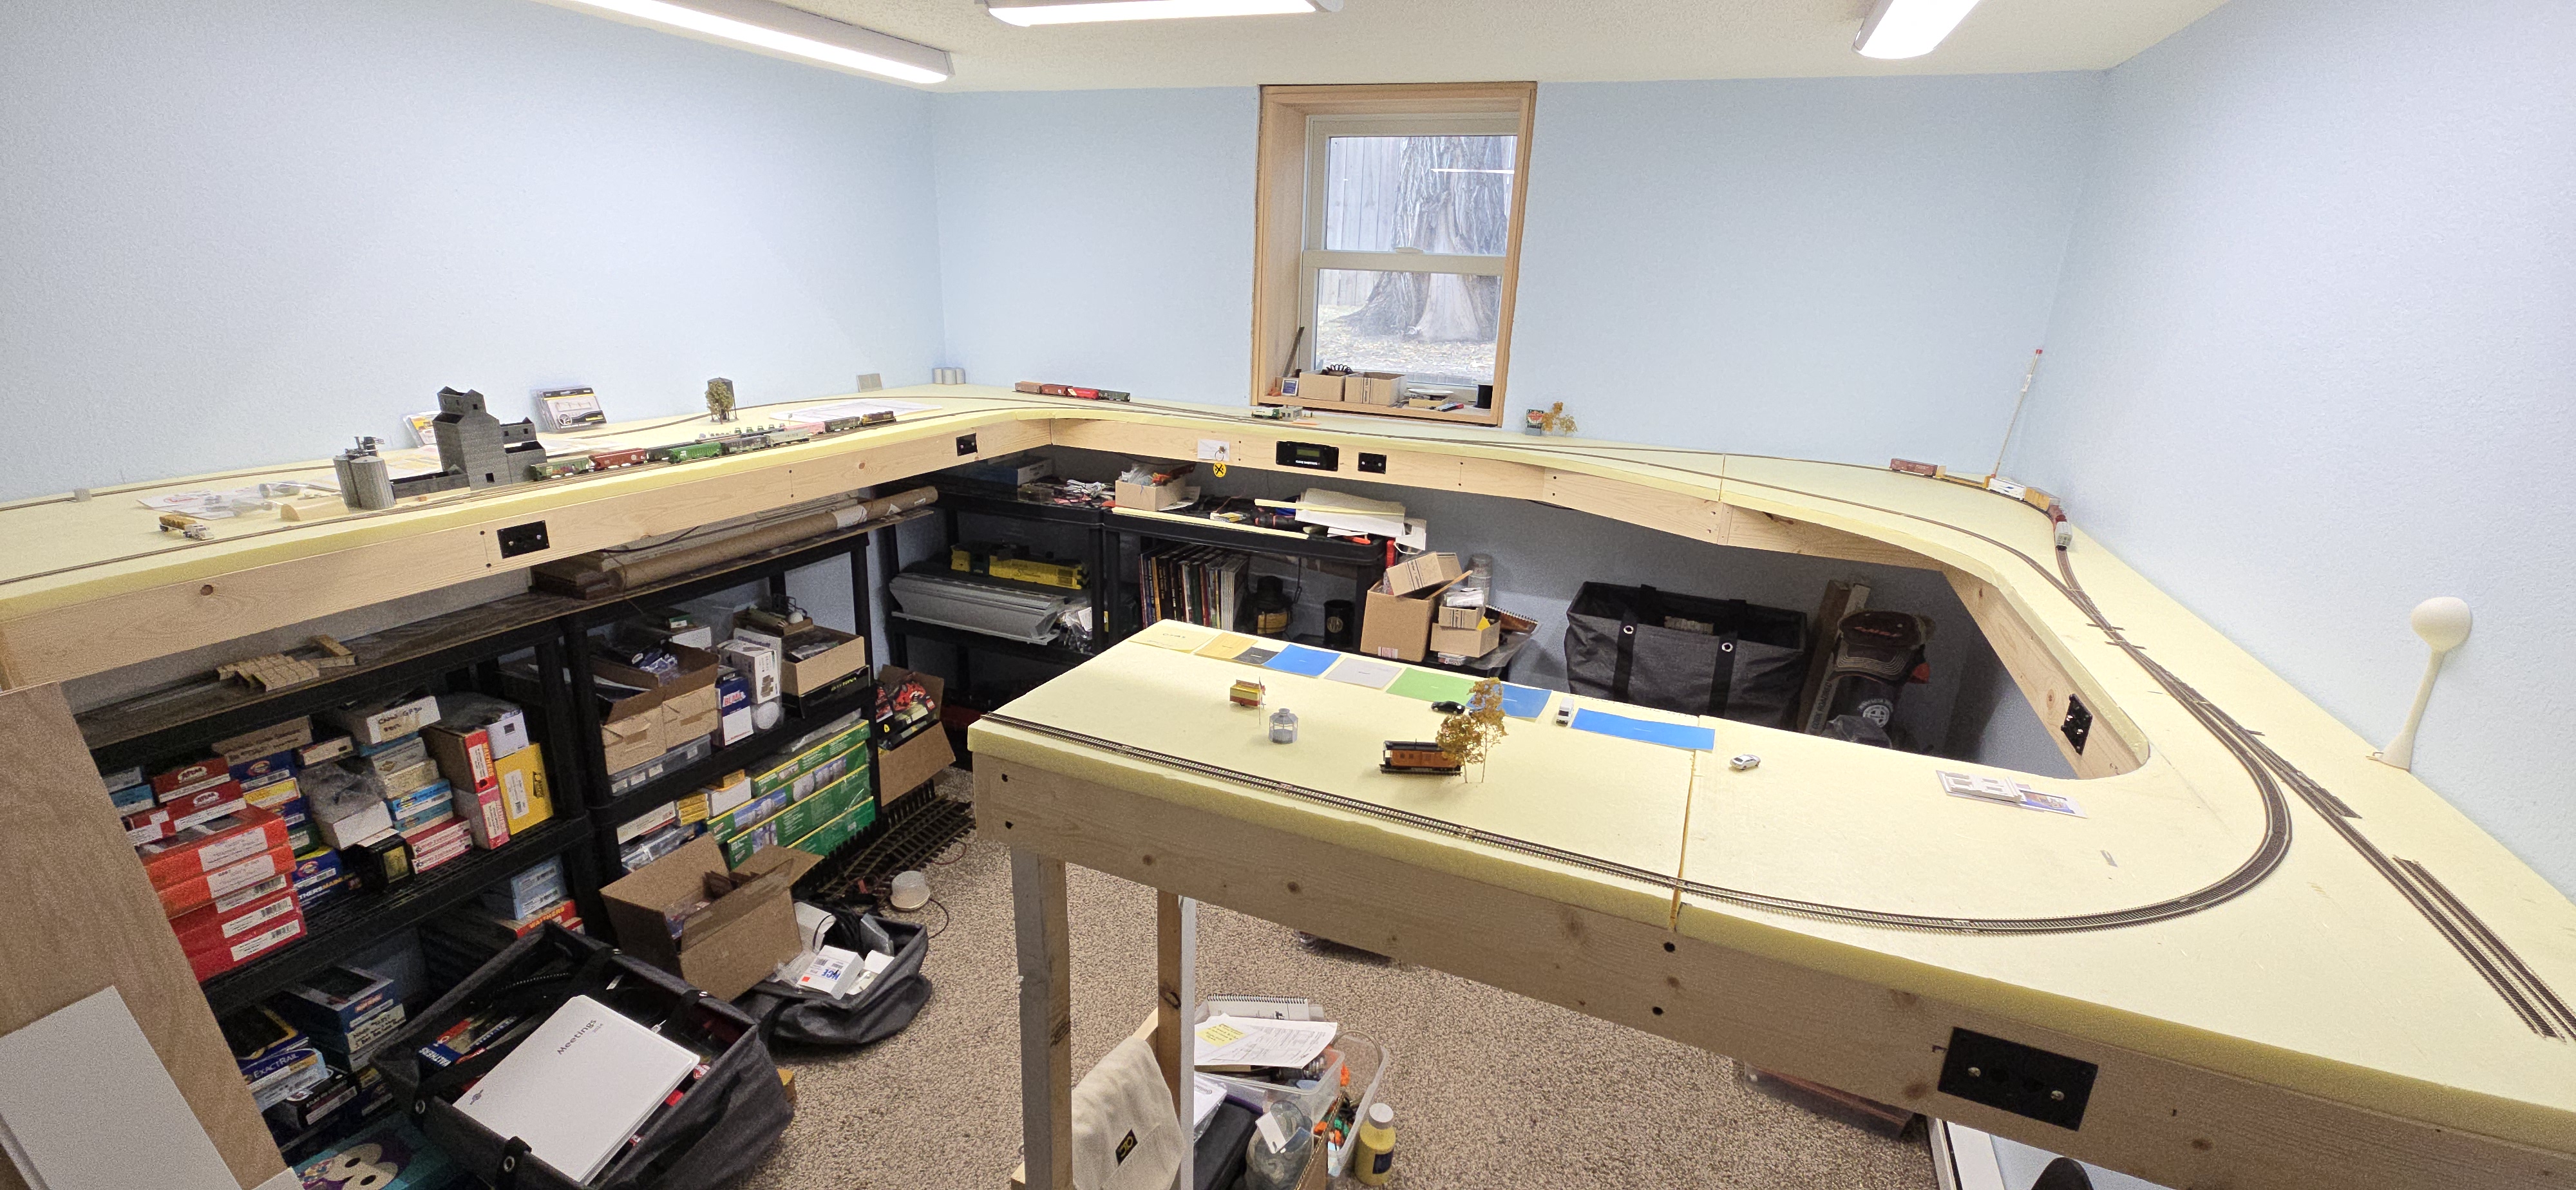
Mike is a busy guy. Between work, raising a family, and being the president of the Black Hills Railway Society, there isn’t much room in the schedule for model trains. However, he did find space in the back of his basement to build a small train layout that satisfies his needs, provides storage for his model trains, and a workbench from which he produces some fantastic models! The Lakeville Sub models a small section of Minnesota in the late 1990s and features equipment painted in BNSF and Twin Cities and Western (TCW). The layout is a walk-in shelf design which features a large operating pit and shelves around 3 walls plus a peninsula. It does not have continuous running, but for a one or two man operating crew that is hardly an issue.
Mike’s Layout feature’s its own “official” BNSF logo greeting visitors to the layout. Above the sign is the short peninsula which physically encloses the operating pit and provides extra operation potential.
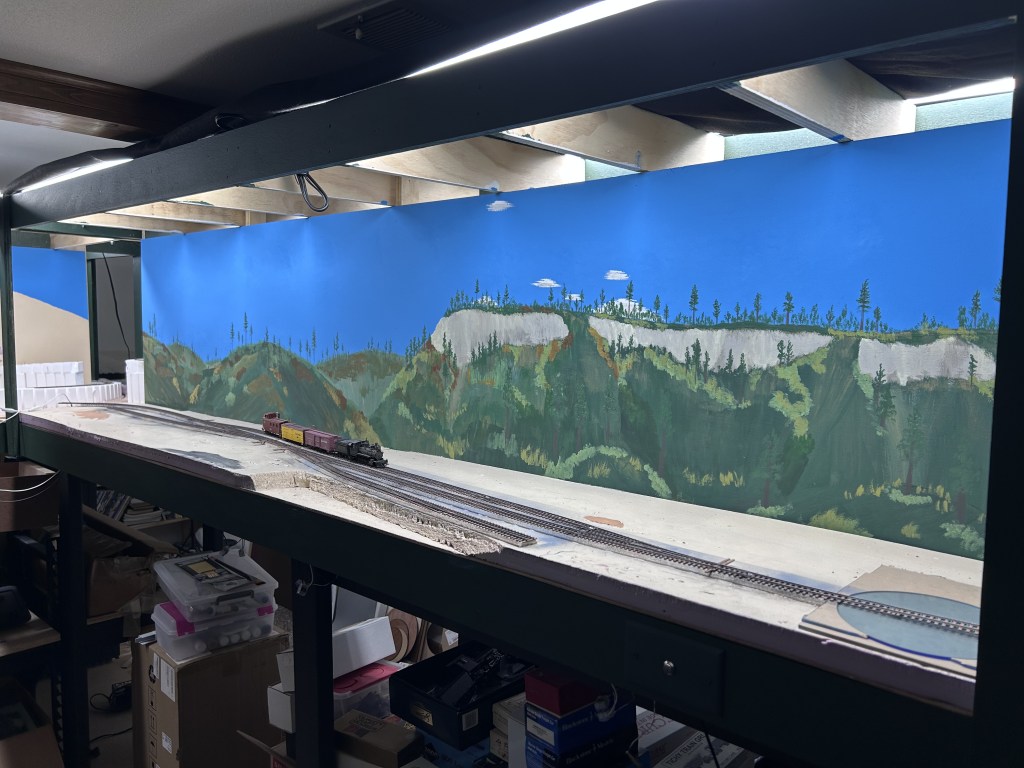
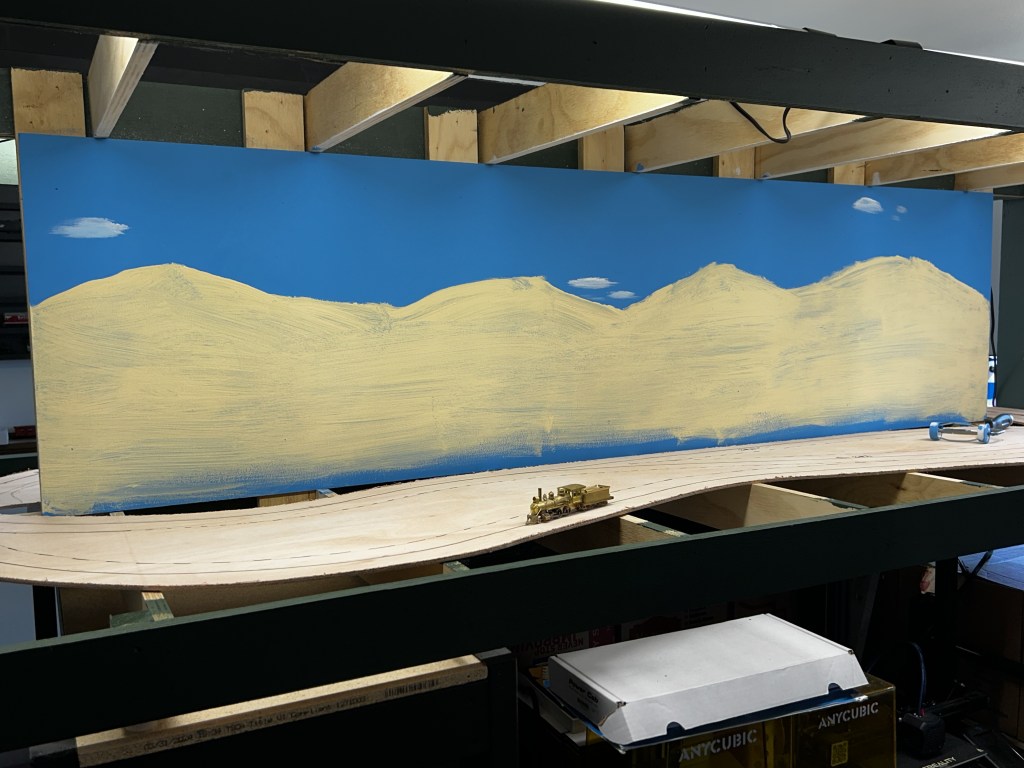
An overall view of the layout as it stands back in November, 2024. Mike made sure to do a lot of room preparations before building the layout itself. He now has a sky-blue backdrop ready to go and can make modifications to the lighting now that he knows where everything is going to be placed around the layout.
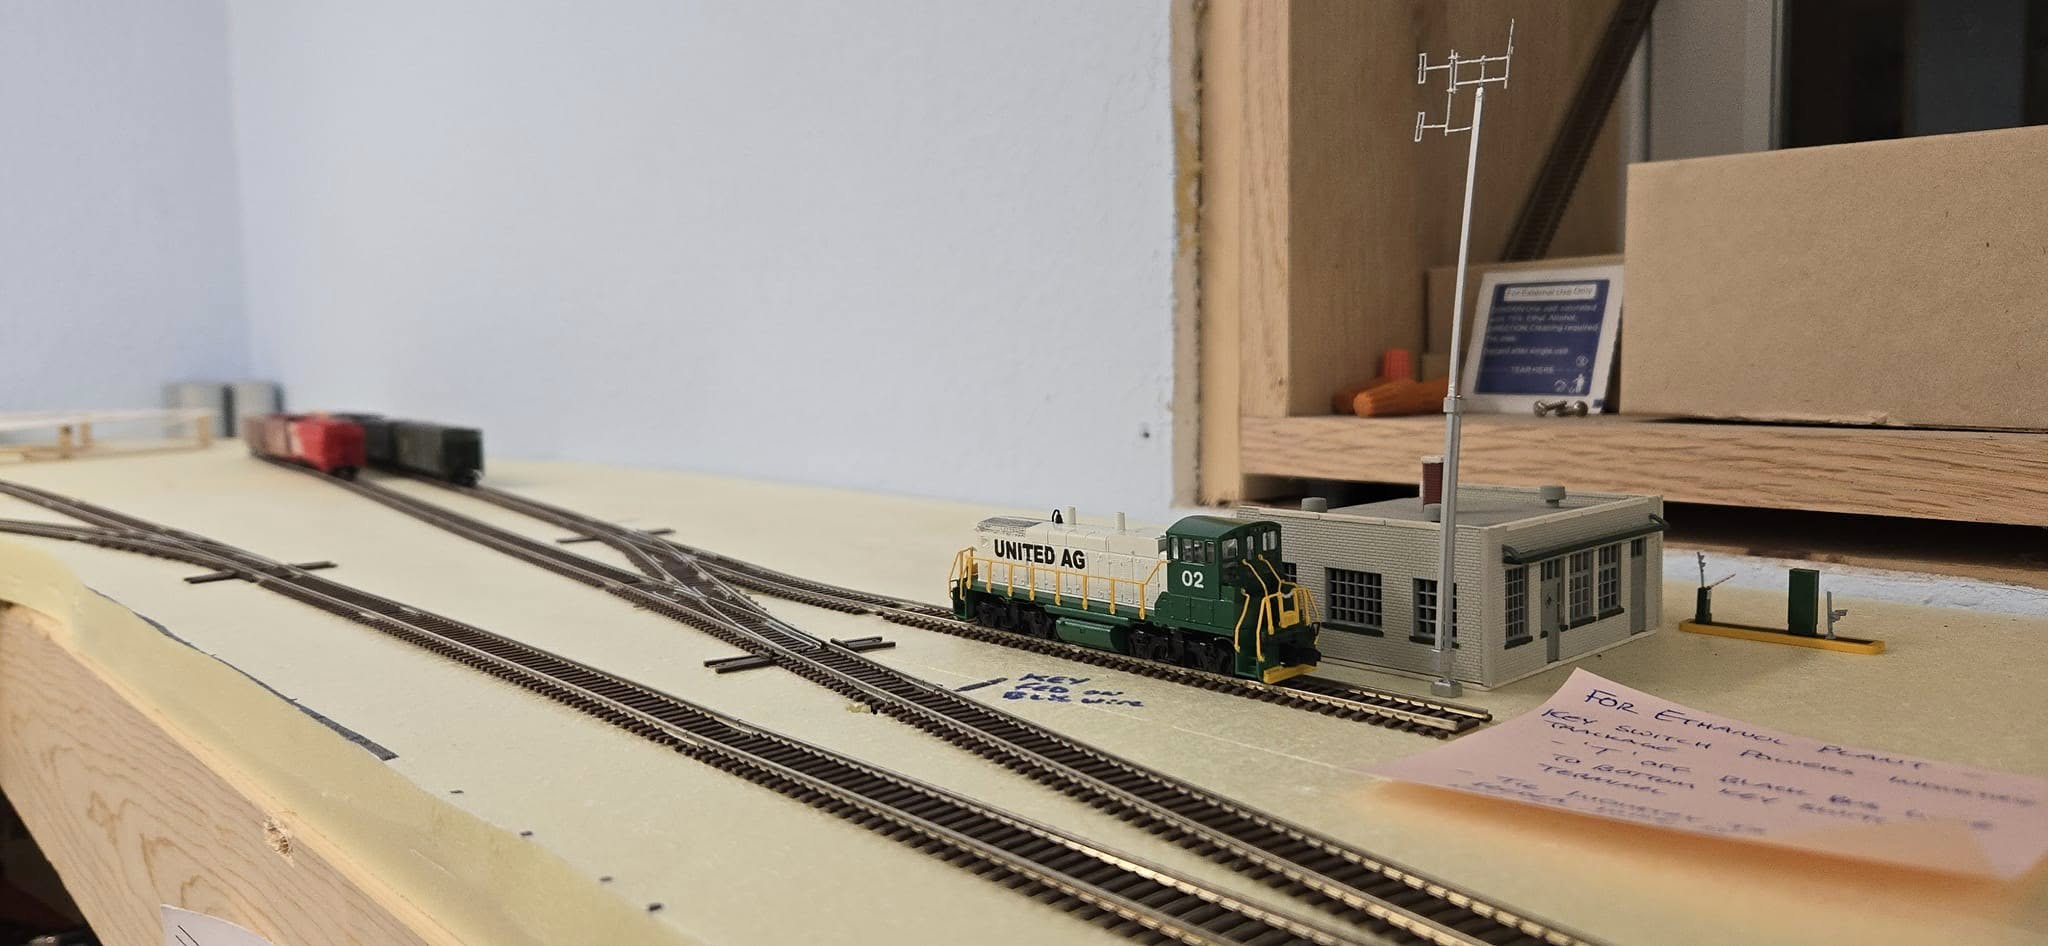
In addition to BNSF and TCW equipment, Mike’s layout also features some oddities such as this United Ag MP15DC switcher.
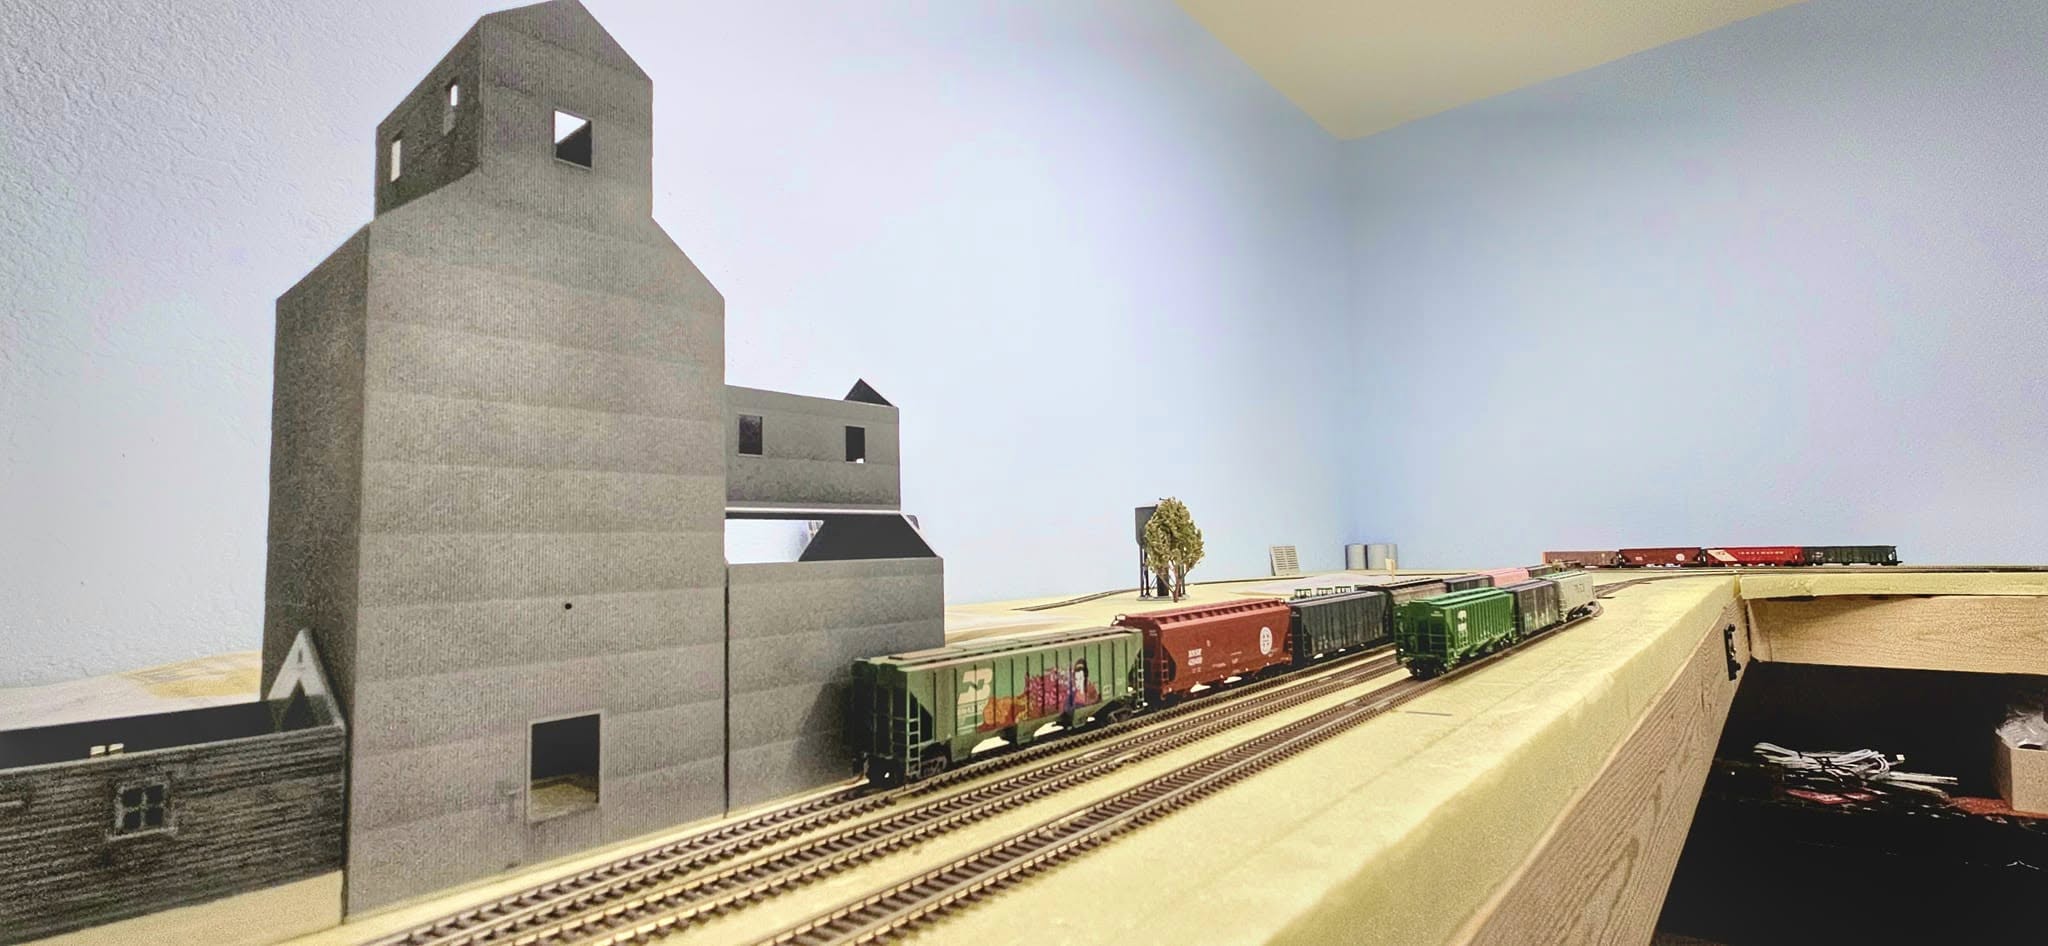
One of the larger industries on the layout will be a grain complex built around an old elevator. Such sights are common across the Midwestern prairie.
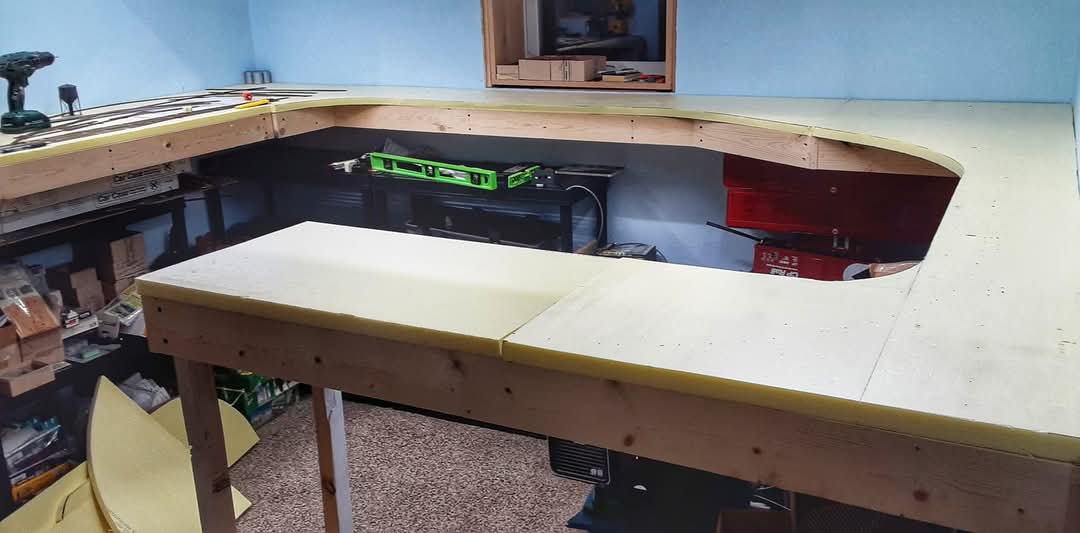
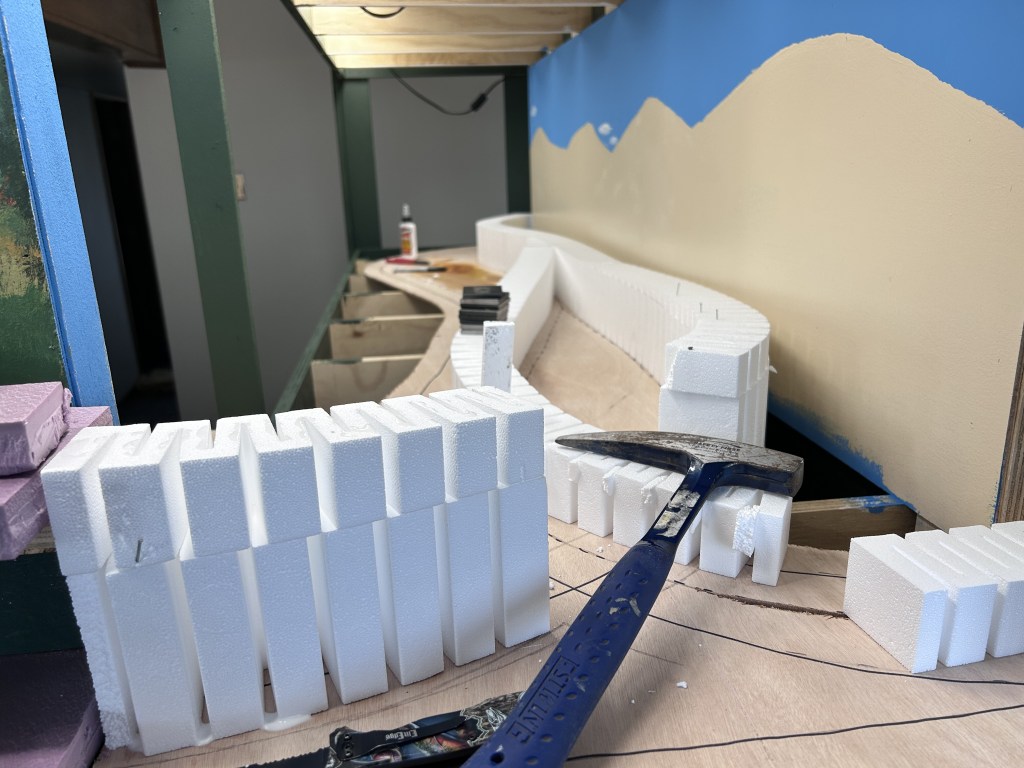
The “clean” look at the benchwork before Mike began laying track and placing structures. The benchwork is primarily made of 1x4s in an open grid pattern topped with 1 inch extruded insulation board.
Jordan Schmieg’s Milwaukee Road Layout
Jordan Schmieg also lives a busy life and his is just getting started! Graduating from the South Dakota School of Mines and Technology this spring, Jordan is looking forward to applying his degree in useful ways as well as finishing his home layout that depicts the Milwaukee Road transcontinental line in the 1970s. Like most model railroaders, Jordan prefers to model in HO scale since it gives him the opportunity to use prototypical equipment for his area and era. In this case, Jordan has a pair of SDL39s plus GP40s and SD40s. He also has some modern BNSF and steam locomotives on his roster as well. Jordan’s main operational interest is whole-train movements which presented him with a challenge in a 14×16 foot space. His solution was a double-track mainline that runs from staging at the back of the layout through the town of Andover, South Dakota where the layout is located. He also found room to model portions of a branch line that ran North to Britton, South Dakota. If you also prefer mainline train action but don’t have a lot of space, Jordan’s layout is proof that you can make it work!
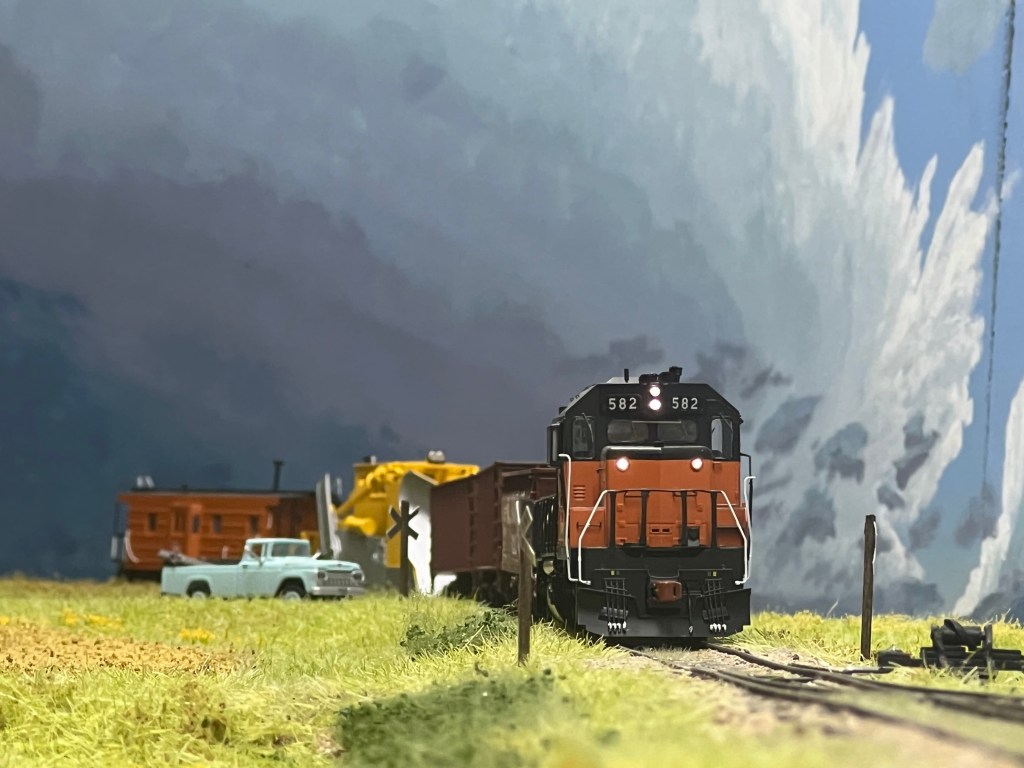
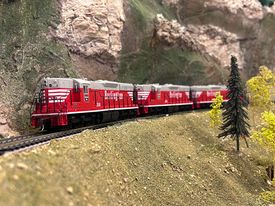
Engine 582 leads a northbound ballast train to fix a washout near Britton. This is one of the few times the line sees maintenance; most of the work done is to barely keep it open. In less than 5 years this line will be abandoned and the rails pulled.
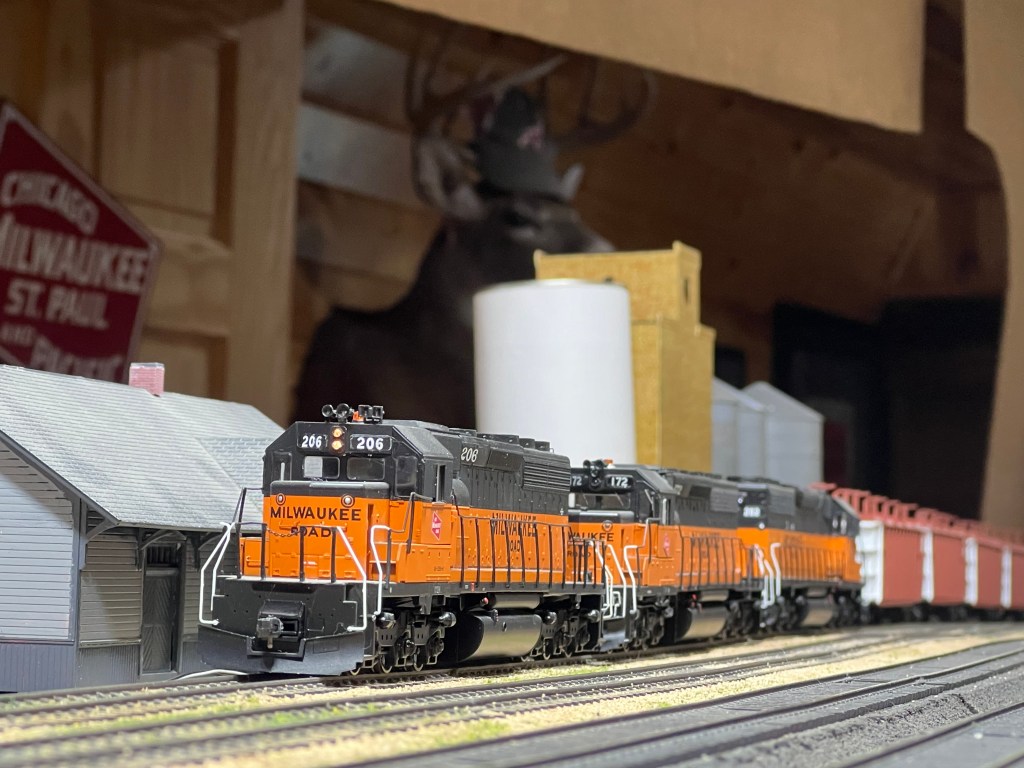
Engine 206 leads a loaded coal train eastbound through Andover. It is bound for the power station in Big Stone City, SD, on the Minnesota border.
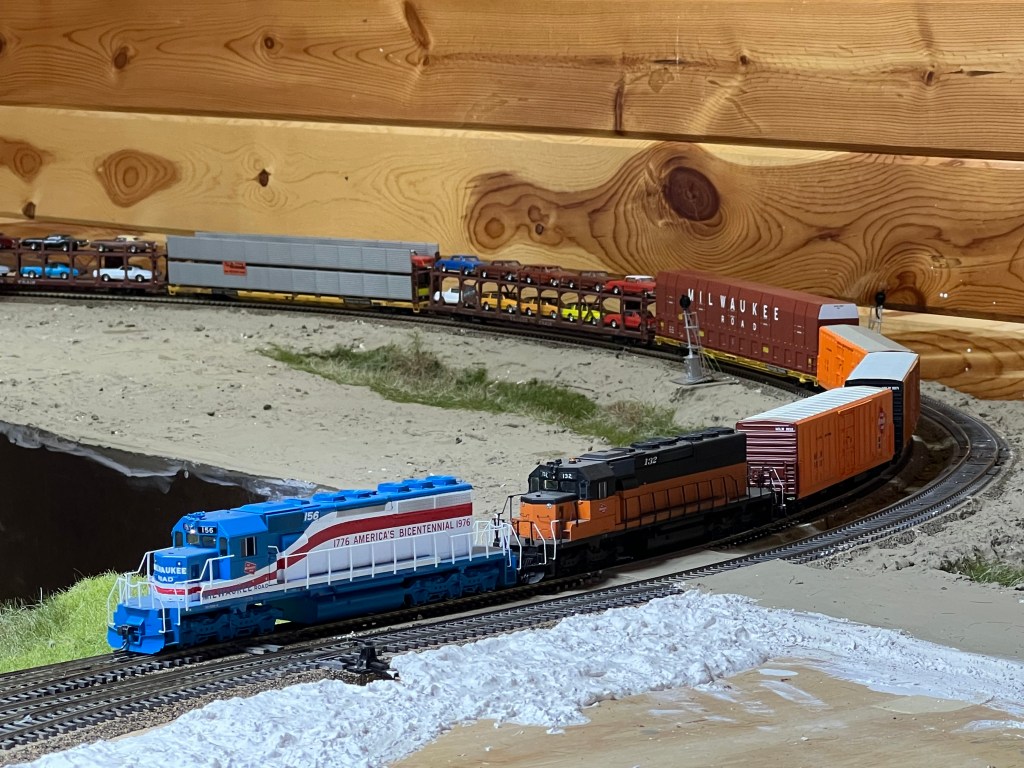
Milwaukee Road Bicentennial Unit 156 leads westbound hotshot #201 from Chicago. It will stop in Aberdeen for a new crew and fuel before continuing west to Tacoma.
As the Milwaukee’s extensive network of branchlines across the Dakotas deteriorated, derailments became a common occurrence. Here, a wreck is being cleaned up just south of Pierpont on the Andover-Brampton branch.
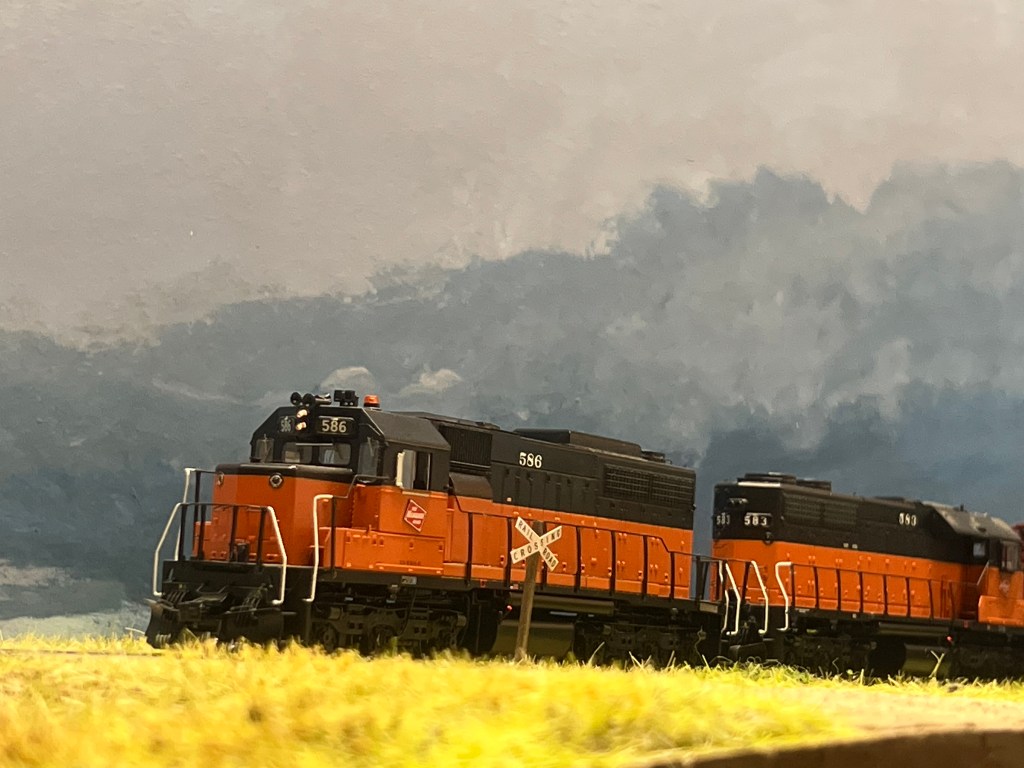
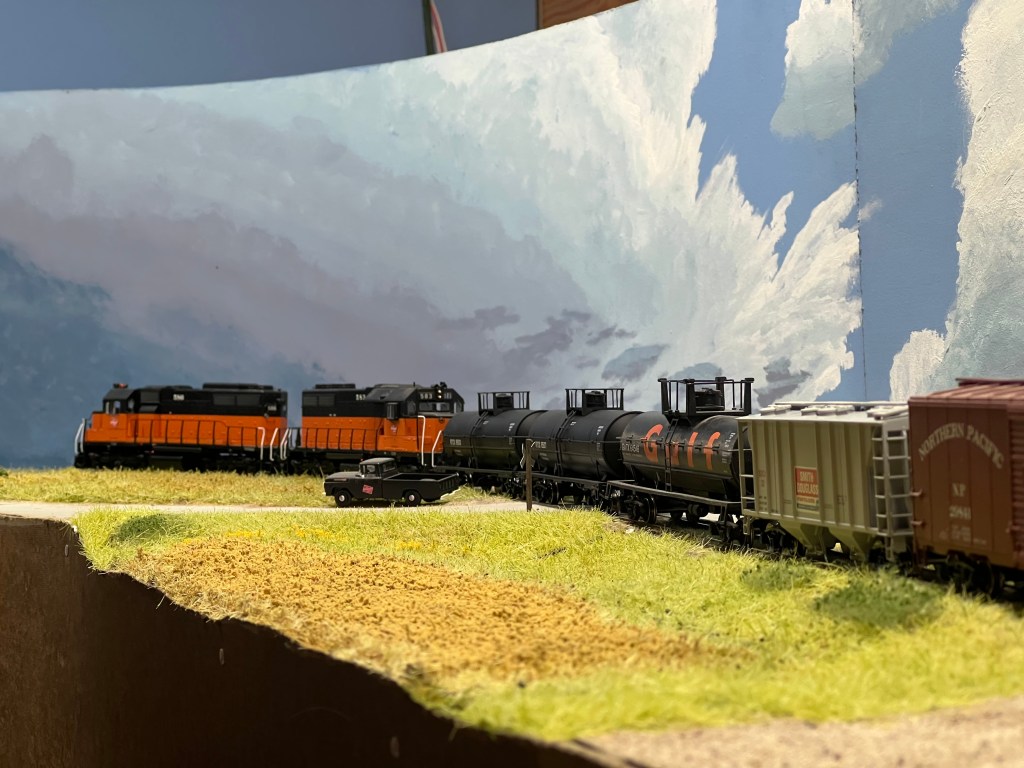
SDL39s 586 and 583 take the weekly branchline job south towards Andover.
After passing Pierpont Lake, the duo race a summer thunderstorm back to town.
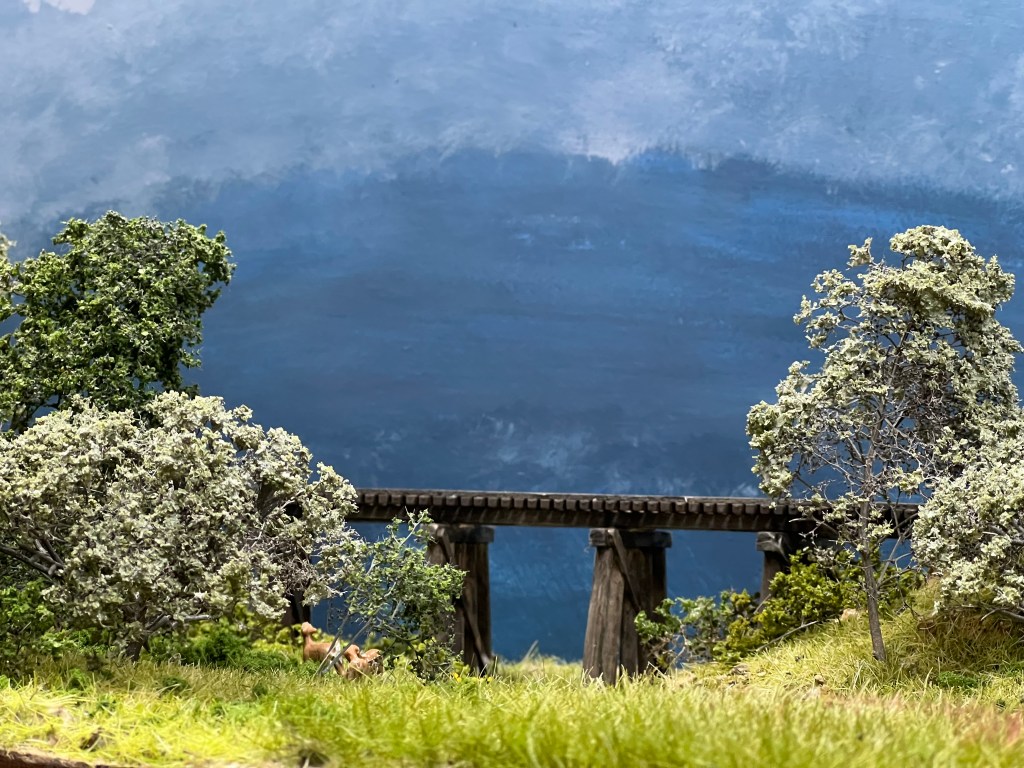
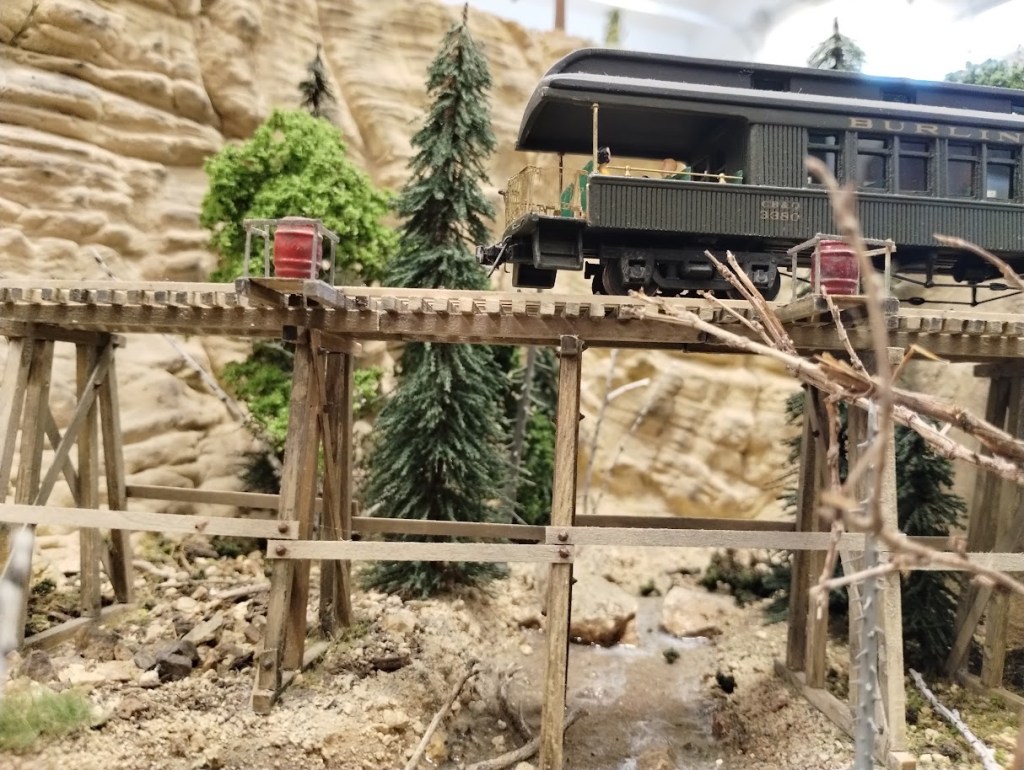
A doe and her twins take a quick glance at the trestle near Pierpont Lake. With the exception of the weekly train rolling over once each way, this spot is quiet most of the time.
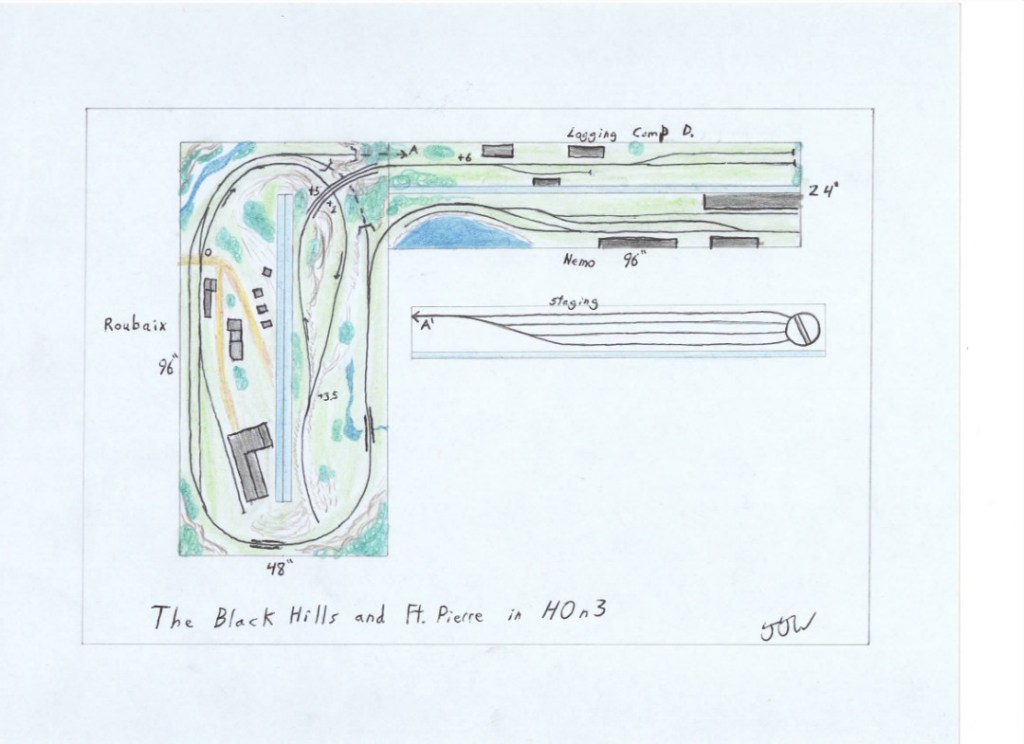
The Black Hills and Fort Pierre in HOn3
My own home layout takes yet another approach to building a model train layout in a small space. Unlike the other examples in this article I rent my house which excludes me from knocking down walls, painting, or making any hefty modifications. Due to the nature of the lease and the low cost of my rent I would rather not make my landlords angry by leaving them with a tremendous mess to clean up. Frankly, a lot of people find themselves in a similar position. The solution that I found was to design and build a sectional, free-standing layout in the middle of the room with its own integrated backdrop, lighting, and valence. After building four sets of shelves out of 2x4s and press-board, I went about constructing three boxes that work out to being 24 inches deep, 96 inches long, and 28 inches high. These three were then fed into the layout room through a basement window and bolted together. Building the benchwork saved me a massive headache in that I didn’t have to clean up sawdust in a carpeted basement. I am now at the stage where I am laying track and painting backdrops under temporary shop lights. Progress is slow but steady and as of right now I have the track 90% done on one section of the layout and half the backdrops painted!
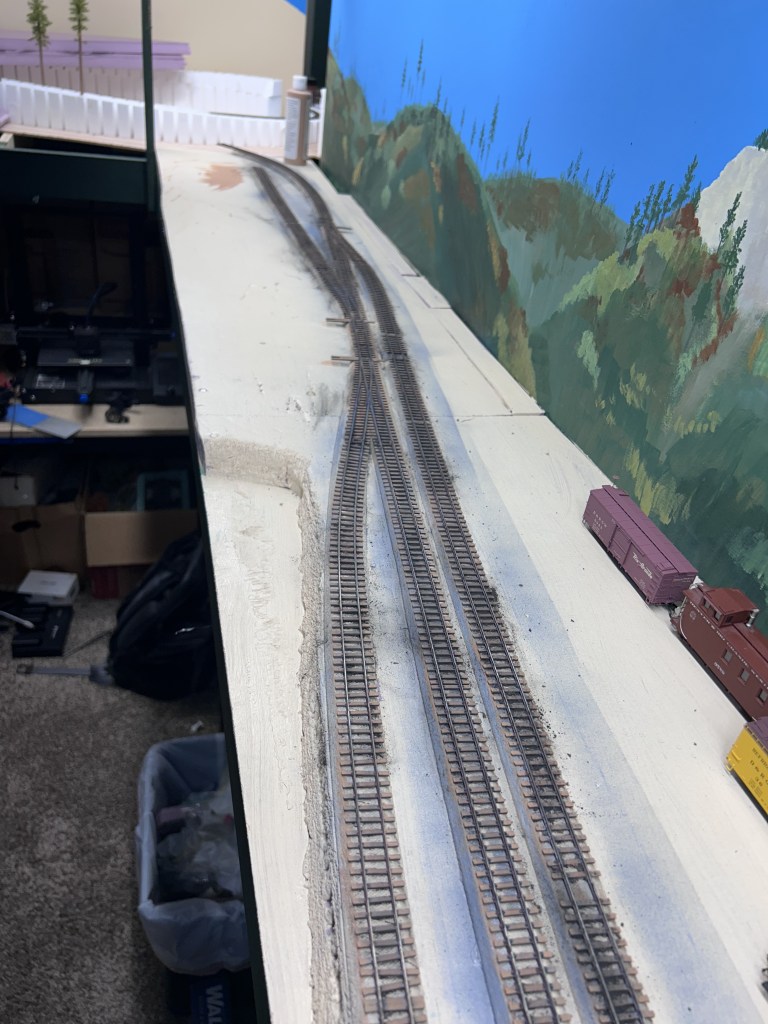
This section called “Nemo” has had the most progress in the last few months.
Here is the original track plan for the layout which features tight curves, steep grades, and a very narrow gauge feel to it.
I prefer slow speed switching to mainline train action and this layout is designed to meet that desire. Four turnouts make up an entire town and will serve a sawmill, general store, post office, and passenger station.
I’ve made substantially more progress from when this photo was taken, however it shows off the design of my benchwork quite well. It is composed of 3/4 inch plywood cut into strips then glued and nailed together into an open frame design that is (almost) square!
Steep grades and tight curves will be ever-present in the more mountainous sections of the layout. In this case, both the mainline and the lower leg of a switch back will cross under the upper leg of the switchback leading to the log landing out of frame to the left.
To go along with the compact nature of the layout is compact equipment. Narrow gauge trains are typically much smaller than their standard gauge counterparts. In fact, planning out the track for this HOn3 layout isn’t terribly different from N scale projects I’ve done in the past.
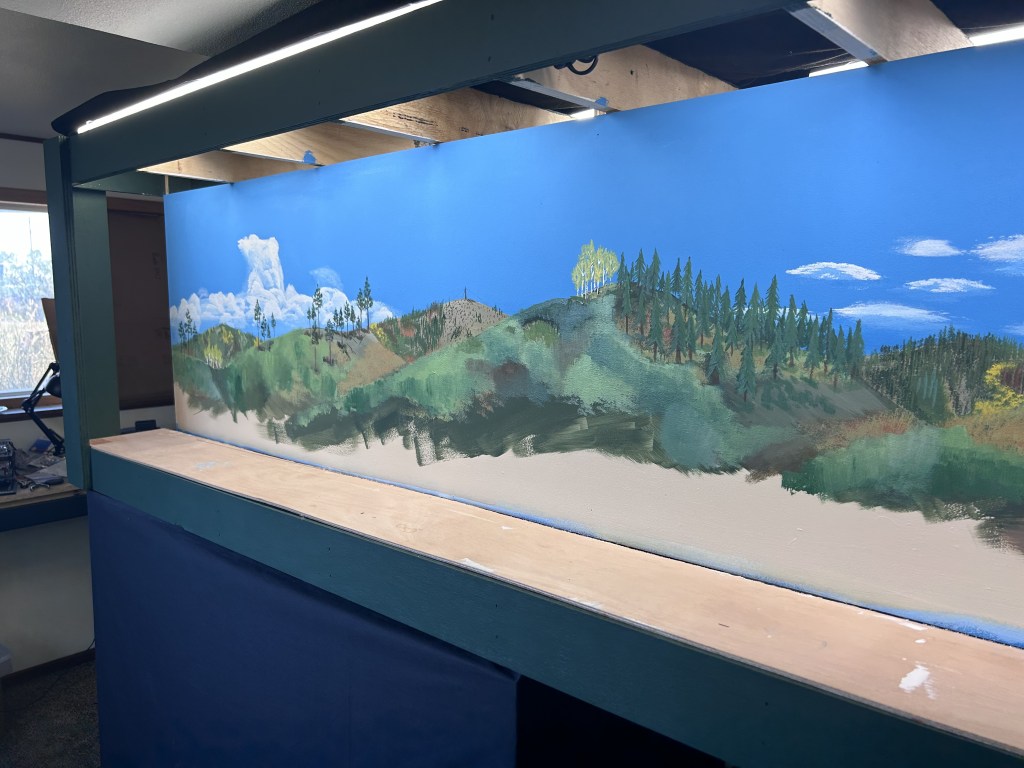
My layout features hand-painted backdrops which take time to finish. At the moment I have half the backdrops finished and this section is meant for the log landing that runs on a shelf about 5 inches off the lower deck, encasing the staging yard. My backdrops are depicting late summer or early autumn in the Black Hills right as leaves are beginning to turn.
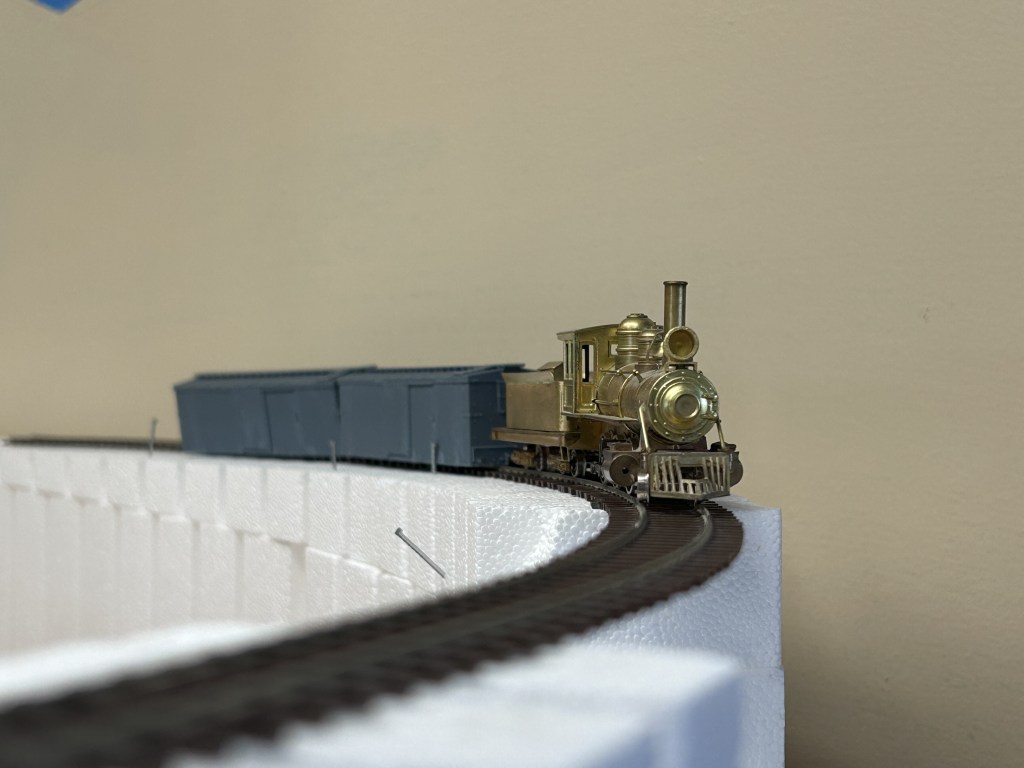
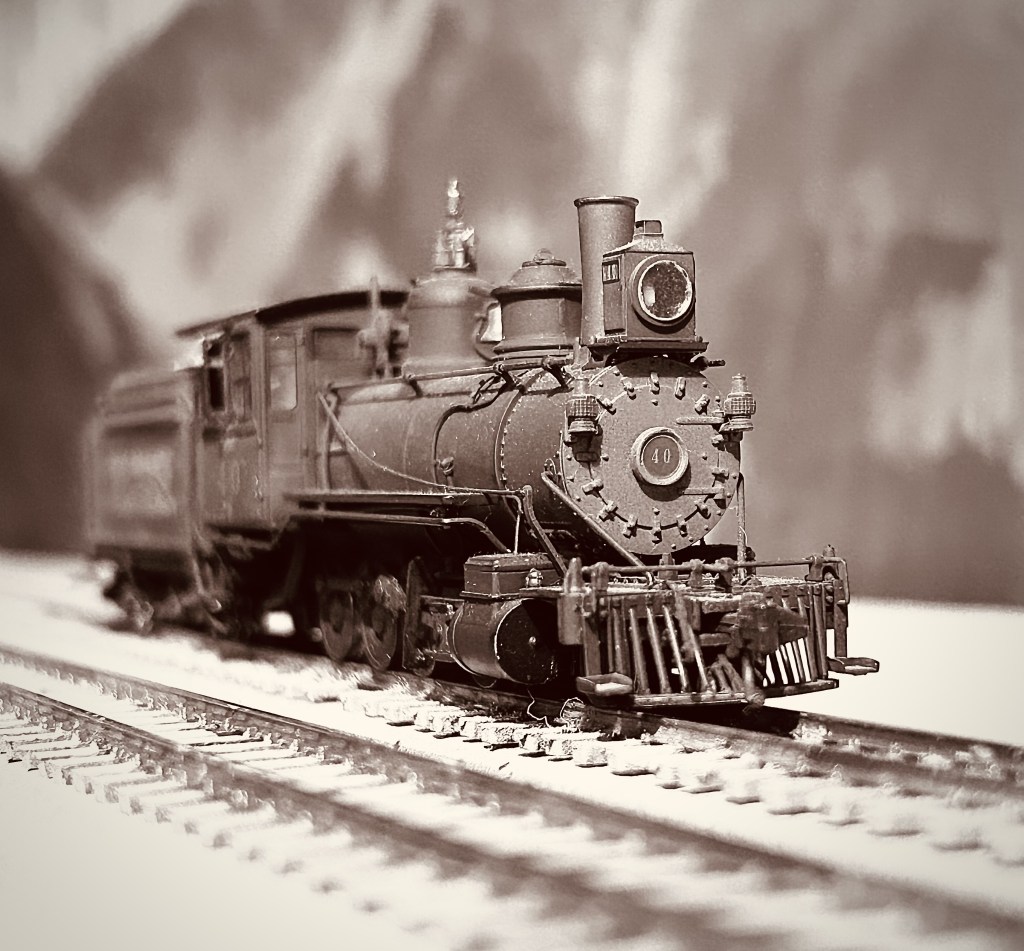
My one operating locomotive at the moment is a Blackstone RGS C-16. The Black Hills and Fort Pierre had a very similar locomotive but this one will be used for photography and testing out track. Things are starting to come together though as this photo shows.
Of all the different modeling scales that hobbyists can invest in, HO scale (1:87th) is by far the most popular. An aggregate of different polls conducted over the years shows that while HO scale isn’t quite as dominant as it was twenty years ago, today 60-70% of model railroaders still choose HO scale as their primary modeling scale. However, an increasing number of hobbyists are choosing N scale (1:160) to model in for a few reasons. If you are having trouble choosing, I recently made such a post discussing the issue which you can find here. But one thing I omitted from that article is that there is a third option available to hobbyists who prefer larger trains but don’t have a ton of room for a train layout.
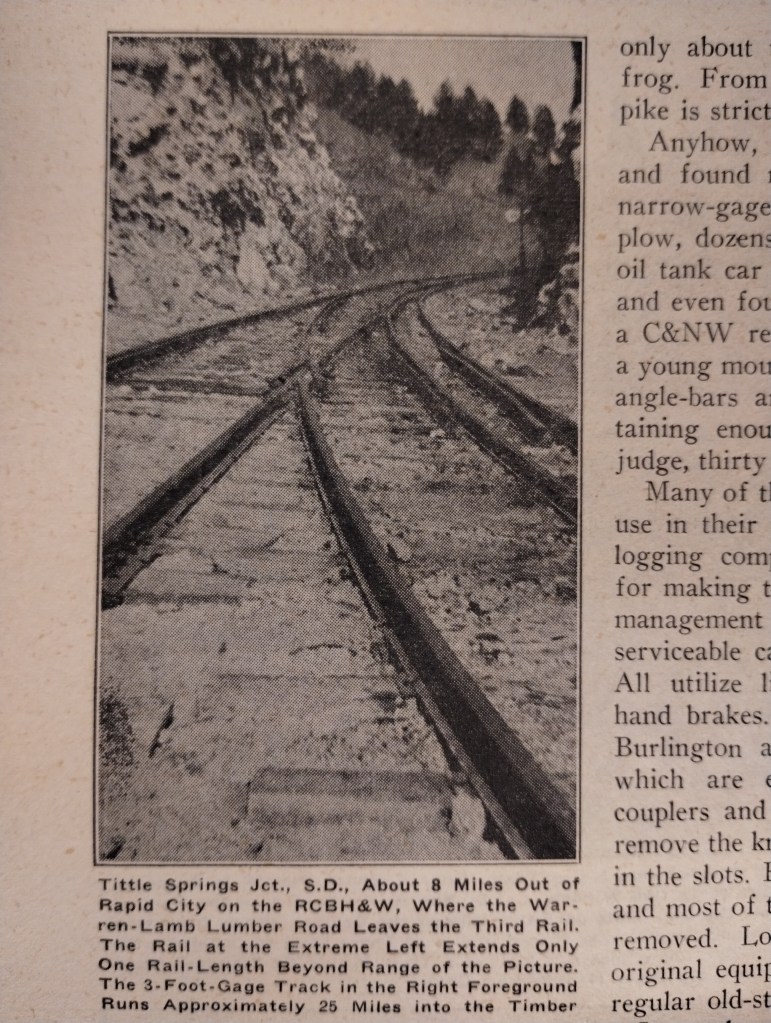
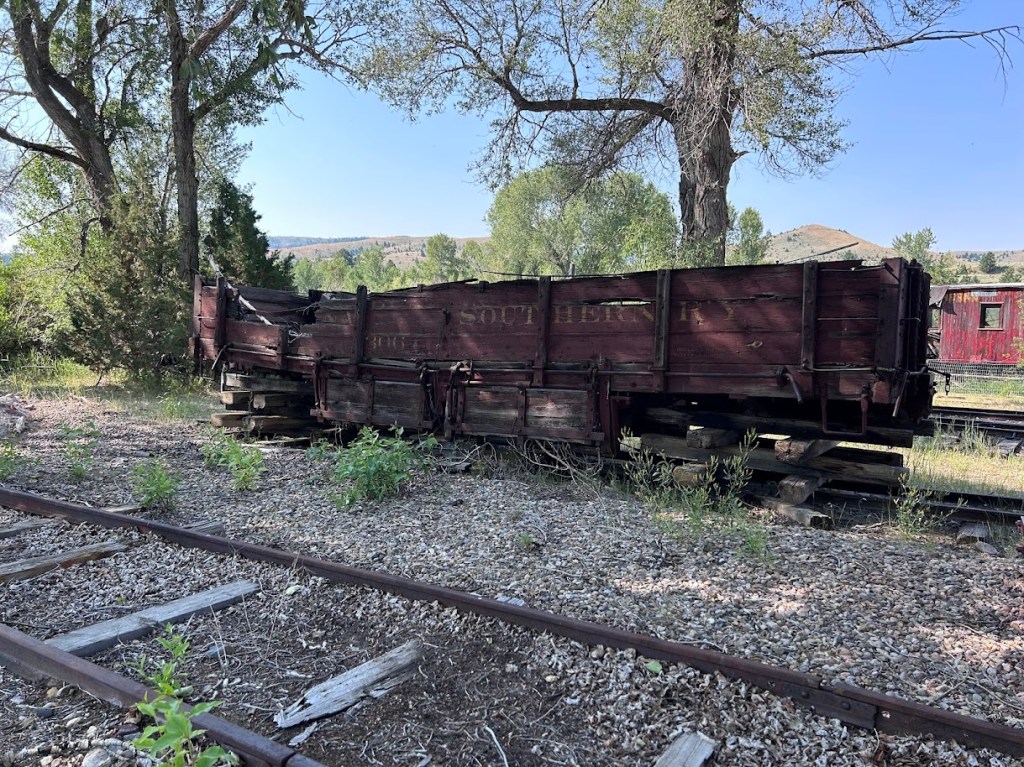
“Three rail” track with both 3ft narrow gauge and 4ft 8.5in standard gauge.
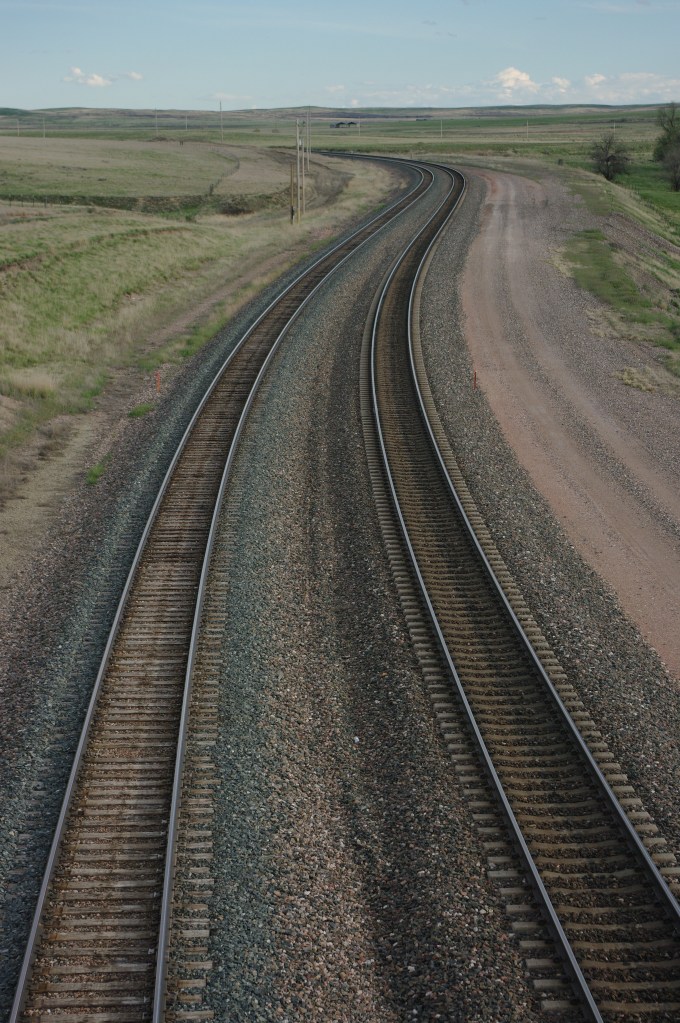
Modern standard gauge mainline near Edgemont, South Dakota.
That option is called “HOn3” or HO scale trains running on tracks that are narrower than standard gauge. In HO scale, standard gauge is 16.5mm, but HOn3 trains run on tracks that are a scale 3ft (914mm) apart at 10.5mm gauge. I left out this option because there are some caveats with modeling HOn3. For one thing, modeling narrow gauge railroads is a niche market within the hobby. Unless you are modeling Colorado narrow gauge, finding prototype information is more difficult, finding prototypical rolling stock and locomotives are harder still. Most narrow-gauge railroads also ran in the 1880-1910 era which isn’t as popular as modeling the 1950s, 1970s, or even present day. The learning curve is higher as well since many models are only available in kit-form or there may not be a commercially available product at all for certain locomotives or rollingstock. This requires a high degree of model-building skill that a novice is unlikely to possess. Nonetheless, HOn3 does have a few advantages.
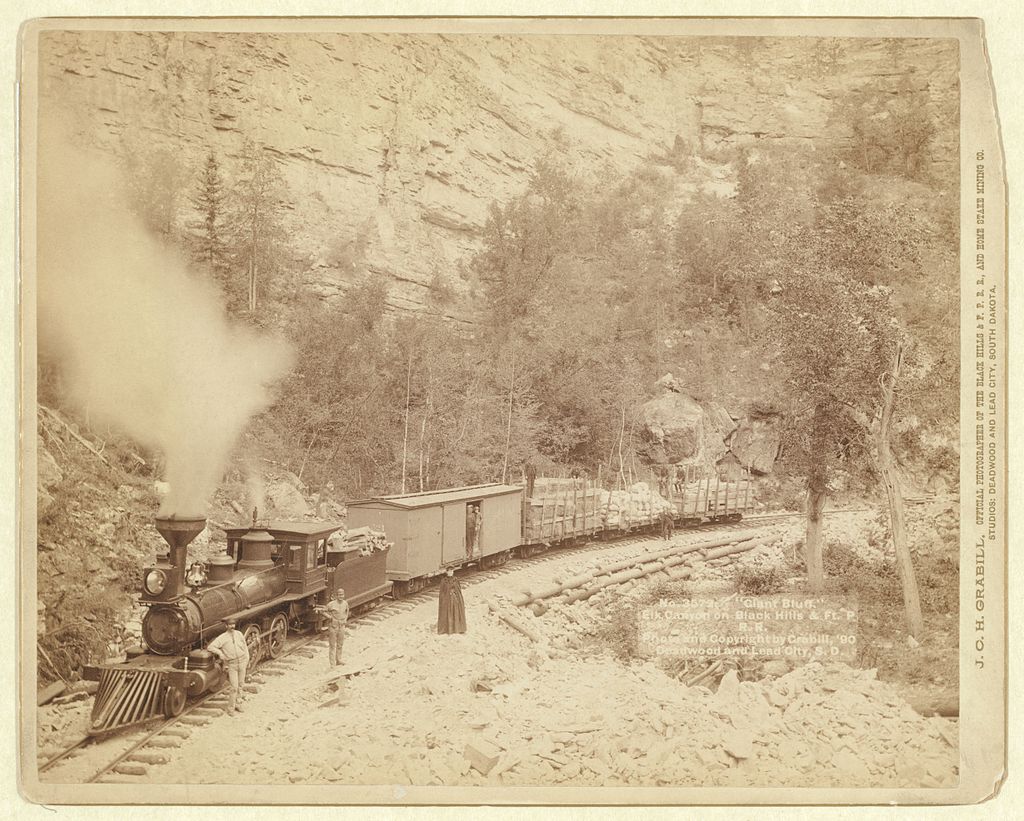
Narrow gauge railroads were most common from the 1880s to the 1910s.
Benefits of HOn3
1. Saving Space
HO scale is great for the high potential of detail fidelity found on model trains. Even budget-minded rolling stock and locomotives have a good amount of detail included which a lot of models in larger scales lack. Not to mention that the latest generation of HO scale models have separately applied details that rival or exceed what scratch builders were doing two decades ago. However, the size of the trains gets to be an issue when it comes to building train layouts. Americans in particular have always been fond of building circuitous train layouts where the train can travel endlessly on a loop of some kind. Only recently has there been a movement in the states to build train layouts that run point-to-point using as few turnouts as possible to serve all the industries along the route. Authors such as Lance Mindheim have been promoting this design philosophy for years now and it has now begun to manifest itself in new layouts being built.
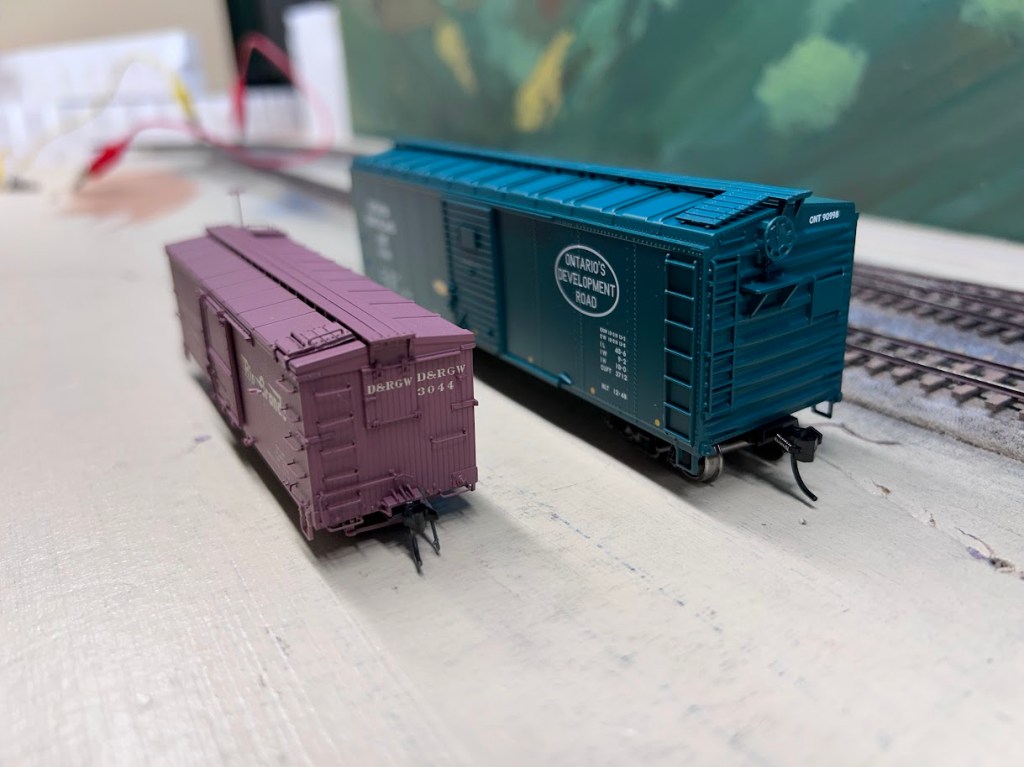
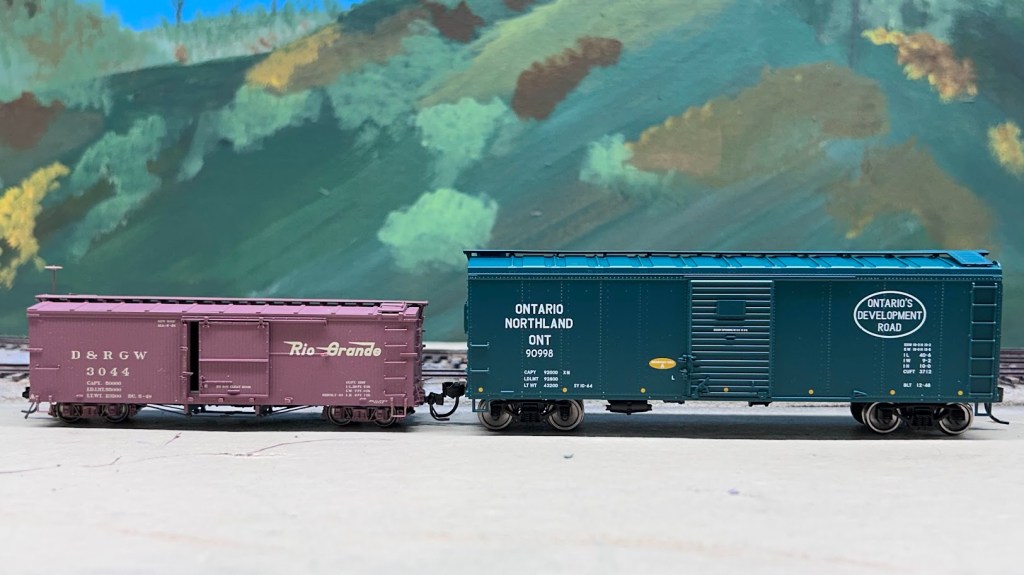
Same scale, very different sizes! Above: On the left is a typical 3ft gauge boxcar while on the right is a standard gauge 40ft boxcar. The 40ft boxcar can hold approximately twice the volume of the narrow gauge car. Left: Narrow gauge tends to have narrower and shorter equipment that rides on smaller wheels that are 24-28 inches in diameter.
Even so, turn radius is a problem. Realistic curves in HO scale would be tens of feet in radius and the practical curves people end up using typically fall in a range of 20-30 inch radius. Train length is also a problem. A cut of twenty 50-foot boxcars in HO scale takes up about twelve feet of space! HOn3 on the other hand can comfortably use 18-20 inch radius curves and require much shorter sidings due to the shorter train lengths involved. A long narrow-gauge train (DRGW not withstanding) might only be a dozen cars or so. The Black Hills and Fort Pierre, which I model, had locomotives that could only pull about ten cars. Obviously, structures are going to take up the same amount of space as will roads, but narrow-gauge railroads often operated in hilly or mountainous terrain that was decidedly rural. That means fewer structures, fewer roads, and as much green scenery as you have room for!
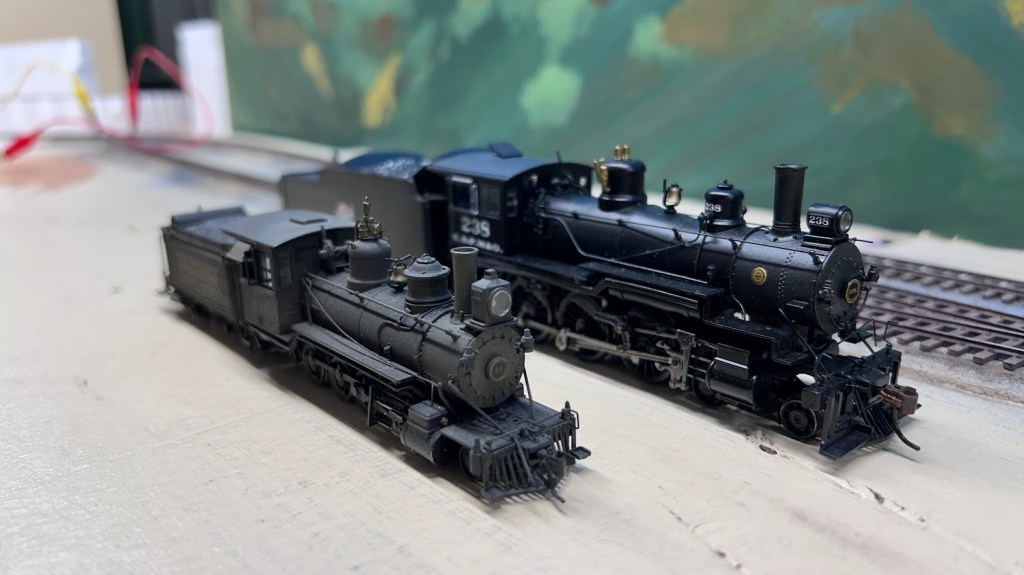
Locomotives have the same effect as the rolling stock. The narrow gauge engine on the left is a 2-8-0 while the one on the right is a 4-6-0 “ten wheeler”. Both are considered mid-sized locomotives on 3ft gauge and standard gauge track, respectively.
2. Unique Prototypes
Perhaps it’s just a personal problem, but I’ve never had much interest in modeling railroads everyone else is already familiar with. Modern class I’s like BNSF and Union Pacific as well as fallen flags like the New York Central or the Pennsylvania railroad just don’t appeal to me beyond a generic historical context. You know what is fun? Taking the path less-worn or even forging a new trail completely! HOn3 has a lot of opportunities to explore prototypes that few people have ever even heard of. Montana Southern? Burlington and Northwestern? Oahu Railway and Land Company? All three were narrow gauge railroads operating in the Pioneer Mountains of Montana, the cornfields of Iowa, and the Big Island of Hawaii respectively. There are literally hundreds of narrow-gauge prototypes in North America and most of them were 3ft gauge. Even the more popular railroads on the narrow-gauge scene like the Denver and Rio Grande Western or Westside Lumber Company have a much smaller fanbase than the standard gauge class I’s from the last sixty years or so.
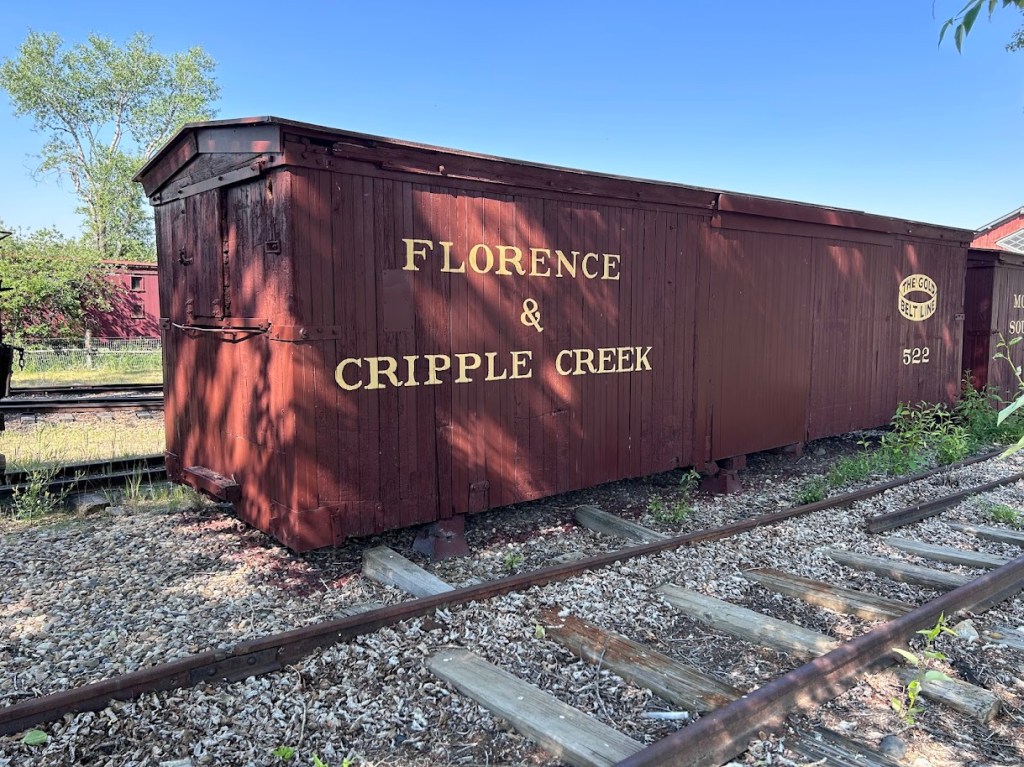
F&CC boxcar that was once used on the Montana Southern Railway.
Drop-bottom gondola still in Montana Southern lettering in Virginia City, MT.
3. Art of Model Railroading
Okay, now while it is possible to view standard gauge model railroads as being works of art (looking at you, George Sellios!), there is something about narrow gauge which challenges hobbyists to get more creative with the scenery and detailing. Perhaps it’s the higher learning curve or maybe a side-effect of attracting people who want to physically make the most on their layout, but some of the finest model railroads to ever be created are HOn3. A prime example is Harry Brunk’s famous Colorado & Southern model railroad that now sits on display in Cheyenne, Wyoming. The layout was constructed over several decades by a master modeler and the end result is a model railroad like no other. These days it is easy to purchase ready-to-run models right off the shelf and run diesel locomotives that perfectly match the prototype. Heck, even recently Athearn admitted to making the egregious error of having the wrong light arrangement on one of their diesel models! Fifty years ago people were happy just to have a model of a locomotive at all but now this is grounds for a recall. That’s not a complaint, by the way. I think it’s amazing that a company admits to such a mistake and does whatever it can to correct it, but I digress. With HOn3, you have to make most things yourself or modify commercially available products. Outside of a couple of manufacturers, you aren’t buying ready-to-run models. Most people see that as a huge negative, in which case HO standard gauge is waiting with open arms. But for those who want to create, HOn3 provides a lot of opportunity out of necessity.
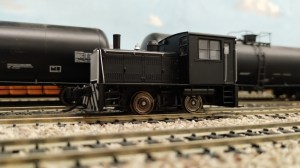
Local model railroader, Jack Afinson, is an avid HOn3 modeler. This particular diorama is three-railed with both standard and narrow gauge track, but it also shows the work that Jack puts into his work. This diorama isn’t just a window to the past, it is a work of art on display at the South Dakota State Railroad Museum in Hill City, SD.
So, how do I get started in HOn3?
Now ain’t that the million-dollar question? And yeah, that number isn’t as far off as you might think! Getting started in HOn3 is no doubt more difficult than HO standard. For one thing, the only ready-to-run locomotives out there with DCC and Sound are made by Blackstone. Problem is that this company hasn’t really been making any new runs in the last several years and their product line is almost exclusively Colorado-based. Ther companies like Micro Engineering make track and turnouts, but that too is sometimes hard to locate. Micro Trains even did some rolling stock runs but haven’t made anything recently. Are you noticing a theme yet? If you want to get started in HOn3 model trains, you can’t just pop on over to the local hobby shop and get a train set.
Unlike with HO standard gauge, the best place to get started with HOn3 is to begin reading about prototype railroads. Train shows are a great place to find old books nice and cheap but Ebay, Amazon, and other digital marketplaces will have books about narrow gauge railroads as well. You can supplement your reading with videos on Youtube or from production companies like Green Frog videos. Regardless of your medium of information, the goal is simply to find what you like. The next step then is to figure out what products are available for your chosen prototype or for what matches the aesthetic you want to go for. You’ll be able to quickly put together a list of models to be on the lookout for.
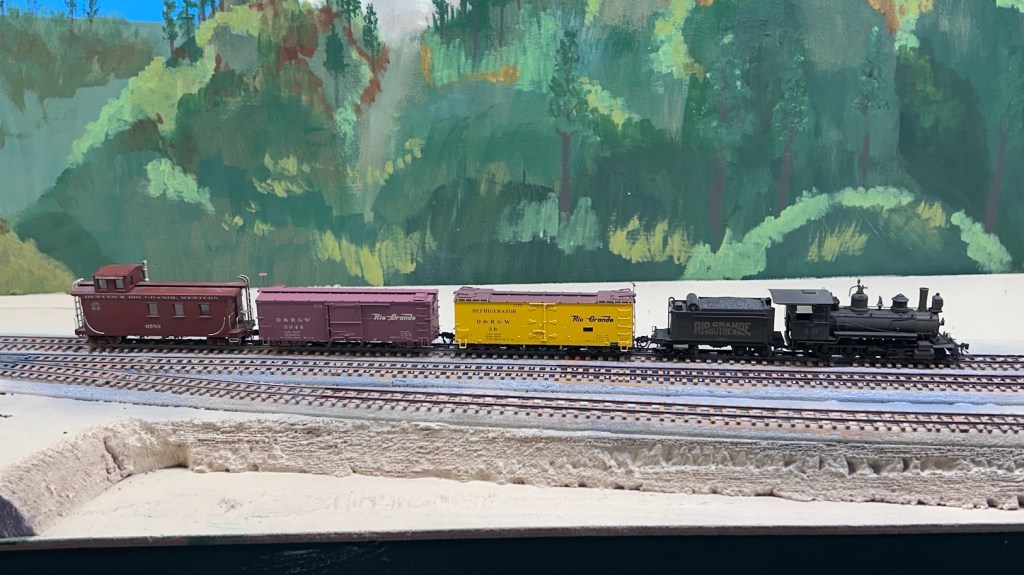
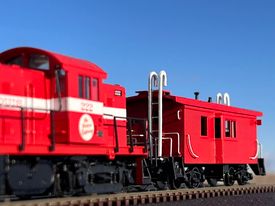
This particular train cost… drum roll please… $800! Expensive, right? Except that’s about the same price as a BLI Big Boy direct from the factory. This consist is more useful in my opinion because now I have a smooth-running test train that is also quite photogenic. Included in the image are, from Blackstone; an RGS #40 C-16, a Rio Grande 28ft reefer, and a D&RGW 30ft boxcar, and a brass Westside Models D&RGW long caboose.
After that, my next suggestion is to save a bit of money to purchase a bit of track plus a Blackstone locomotive and a few cars that are either commercially made or have been built for you already. Throw in a DCC system as well. Why? Because at least this way you’ll have a nice-looking and smooth-running train to run while you accelerate up that learning curve! Now, the price tag for such a thing isn’t going to be cheap. In today’s dollars, expect to spend somewhere between $1200 and $2000. Yes, that’s quite the entry fee! The good news is that relative to other scales, you really aren’t spending more money. In fact, if you build most things yourself you’ll be coming out ahead in the long run because you need less equipment, less track, less buildings, and less space. On my home layout, almost everything is going to be built from scratch or from kits. Even my trio of brass 2-6-0’s only cost me an average of $250 each. The issue is I need to invest another $400 apiece to get them running smoothly with a modern can motor along with DCC, Sound, painting, weathering, and custom decals. The point is that you’ll be spending more time to save money after that initial plunge and in the end you’ll be a better modeler for it. To elaborate further and show my suggestions in action, I am actually planning a build series that focuses on this set-up as a starting point for someone new to HOn3. A simple layout with a minimum of equipment at a budget that most people can afford if they save money for a few months or a year.
Conclusion
You might be a bit disappointed with my sales pitch for HOn3, but if I’m honest that is kind of the point. There are advantages to HOn3, but several challenges as well. You can’t just go to a train show and pick up a bunch of five-dollar freight cars out of the bargain bin. Even if you do manage to find such a score, they will all be old kits that you have to build, paint, and make run reliably. Good engines are hard to come by, but when you find one you will cherish it and you’ll want to make the investment to make sure it runs better than anything a standard gauge modeler can get their hands on directly from a manufacturer. You’ll need to do some research as well, but this too will make you a better modeler and an amateur historian. And to supplement these high-quality models you’ll be building, you’re going to want to construct a more detailed, museum-quality layout. So really, HOn3 modeling and narrow-gauge modeling isn’t for the faint of heart. It requires money, time, and dedication to improving your craft. I’d say that for most people, this will be what turns them back toward standard gauge modeling. But for an intrepid few, HOn3 is a brand new canvas upon which they can create a masterpiece.
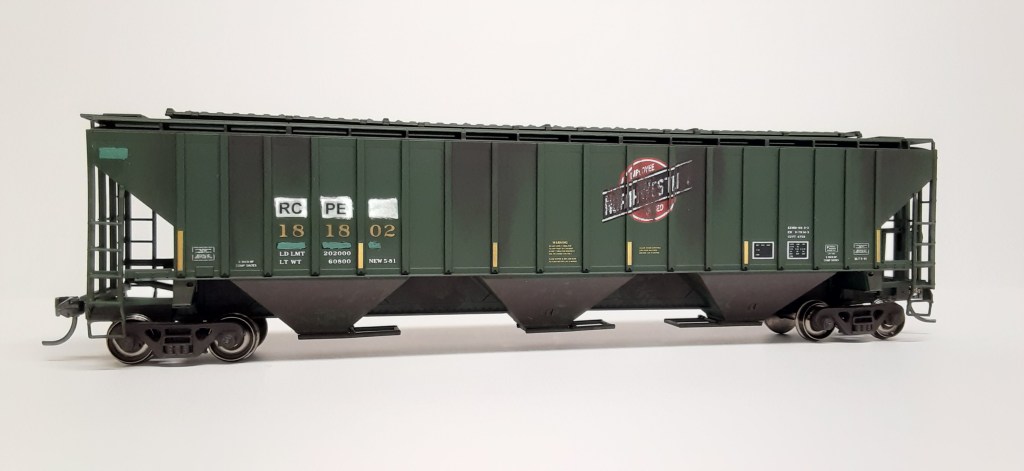
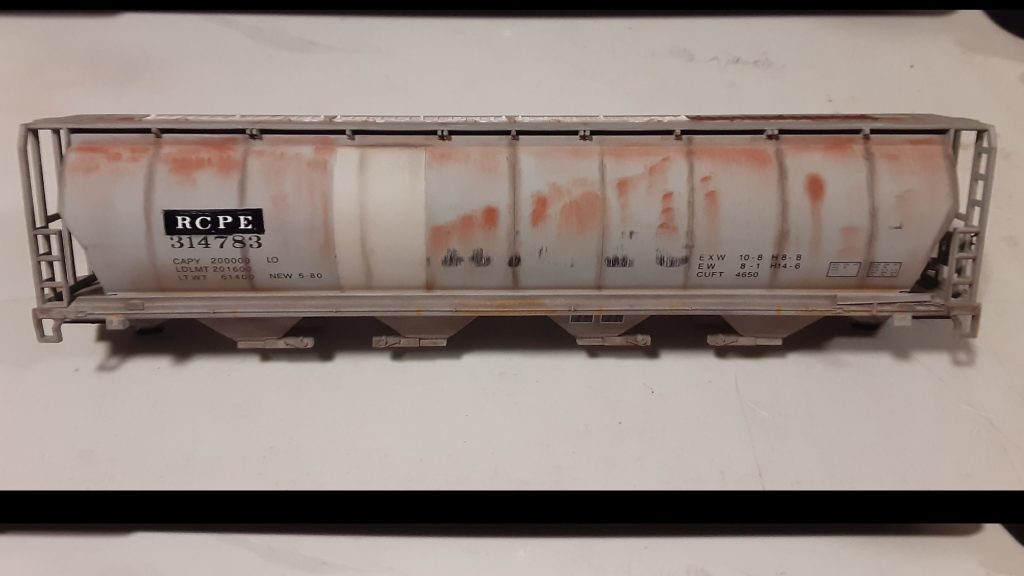
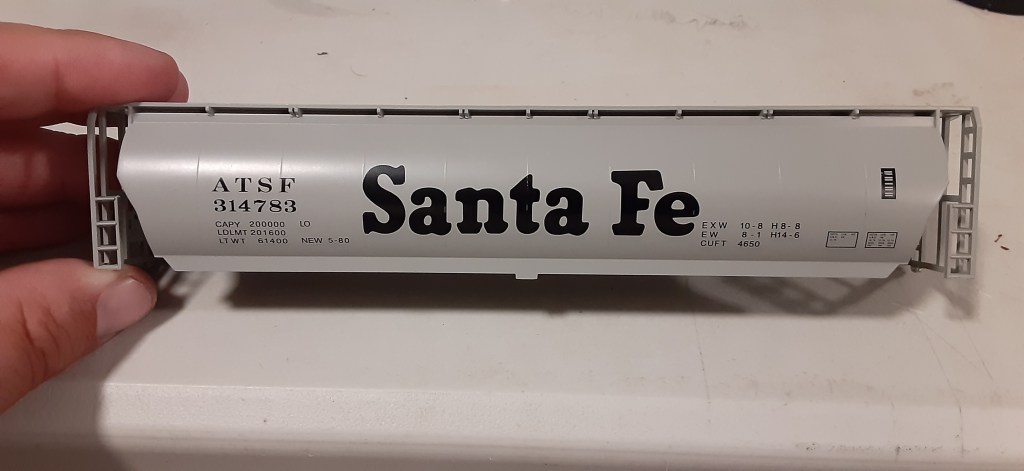
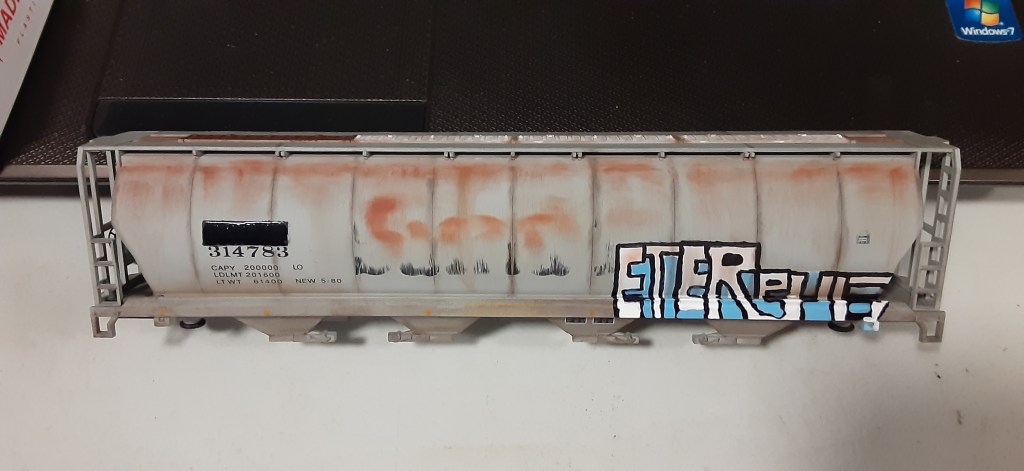
Here’s an overview of how I weathered and patched a basic Bachmann cylindrical 4 bay hopper as a local RCPE (Rapid City, Pierre & Eastern) road car for my club’s HO scale layout.
TOOLS AND MEDIUMS:
While not everyone likes powders, I think they can be some of the best products for weathering. I choose powders because I personally don’t like using airbrushes. This is mostly due to the associated cleaning and the need for a dedicated booth or area which I do not have.
My powder assortment includes products from A.I.M. (now Monroe Models), Bragdon Enterprises and Tamiya. I also use an assortment of Tamiya X and XF line paints, Humbrol and basic craft paints for highlights, patches and tagging. I have been using Tamiya spray paints and their TS-80 flat clear almost exclusively with excellent results for the past few years now. The TS-80 flat clear is lacquer based but does not wash out the powders like Testors dullcote or others I’ve used previously. Model Master lusterless clear used to be my go-to.
I also use an assortment of brushes from Hobby Lobby or Michael’s Crafts, specifically the Royal & Langnickel brand with a cushion above the bristles. I have also acquired a few ELF brand cosmetic brushes such as their concealer and foundation brushes. I use micro brushes of various sizes in conjunction with the cosmetic brushes to create varying effects on the car body.
FIRST STEPS:
Before doing anything, I found a few cars that were close to what I had in mind. I decided to drive the 3 miles over to the RCPE yard in town for more inspiration. The local road has a large fleet of these ex-Santa Fe cars but there weren’t any exact. I ended up spotting a few cars close enough and went home. I also use images found on rrpicturearchives, where there is typically an assortment of angles.
My first step on this and nearly all my projects is to disassemble the car as much as possible. If doing a locomotive, the disassembly is subjective to how much I plan to weather it. This specific Bachmann car took me a bit of time to take it apart without damage. The end ladders are also stuck into the car floor and are tricky to remove.
Getting to the disassembly, I try to make a plan before starting to weather. This helps determine how much I need to disassemble the model or not. As mentioned above, locomotives are more finicky for a variety of reasons. If I can weather a locomotive with the handrails on even better.
PREP FOR WEATHERING:
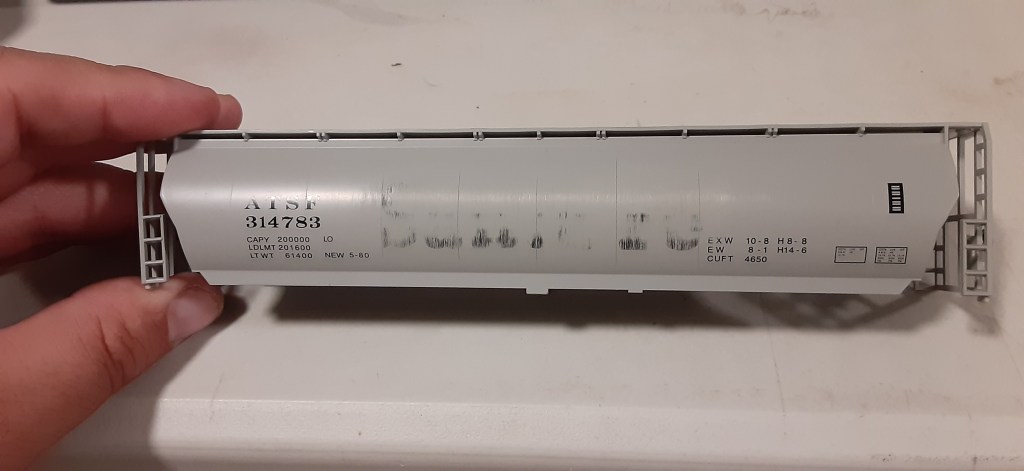
I started by using 800 grit sandpaper to sand down the large Santa Fe lettering. It didn’t take long to get through the lettering as Bachmann’s printing on their cars is thin. Working from the top down, I sanded off most of the lettering and in some areas went through the gray base paint which left random patches of the raw plastic car body in an off-whiteish color.
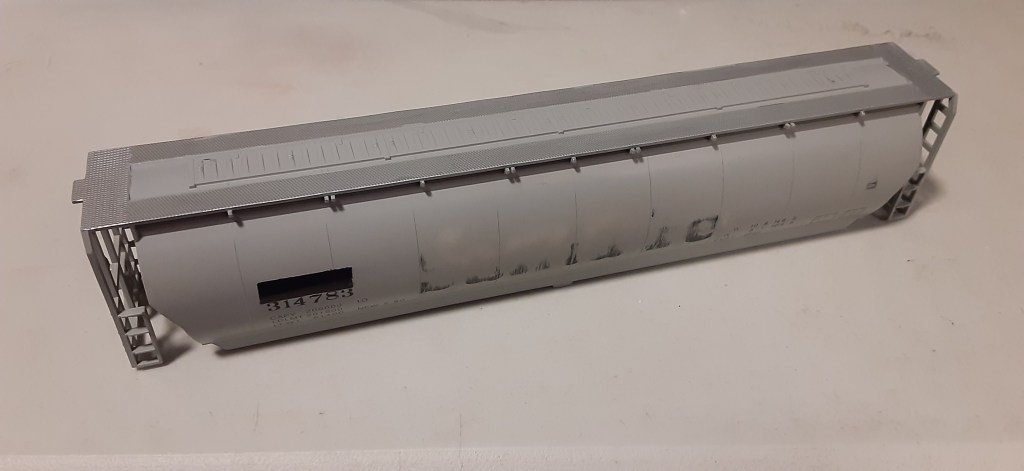
Once I was happy with the fade and a few other areas that were faded, I masked off the car and left a single panel exposed. Many of these cars have had a panel or two repaired/replaced and I wanted to create that look. To emulate the look, I selected a shade of gray spray paint just a touch lighter than the car body. I sprayed the panel by slowly building up the color over 4 light passes then let it dry overnight.
Once dry, I unmasked the car side and gently sanded the edges of the panel to knock down the thickness and keep powders from accenting the hard edge.
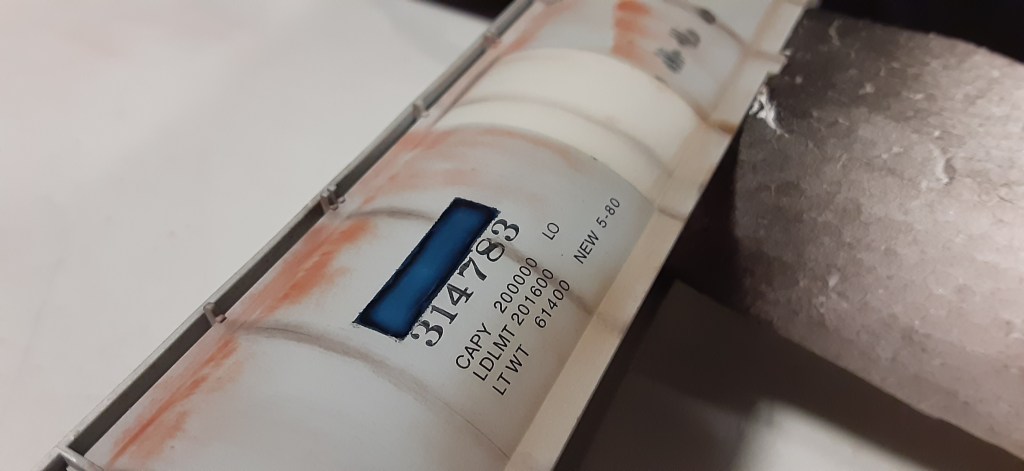
For the reporting mark patch, I sanded off the factory printing and using scraps of 3M blue painters’ tape, I masked around the original ATSF markings. A basic black Sharpie was all I needed to color the area and fill the inside of the small mask. This creates a faded paint appearance without additional work, I did the same for both sides.
The final step to prepare the car for applying powders was to spray the entire body with Tamiya TS-80 flat clear. Doing a base coat of flat clear provides tooth for powders to grab, it also helped blend in the previously sprayed panel. I wait about 30 minutes at a minimum before applying any powder or wash.
WEATHERING:
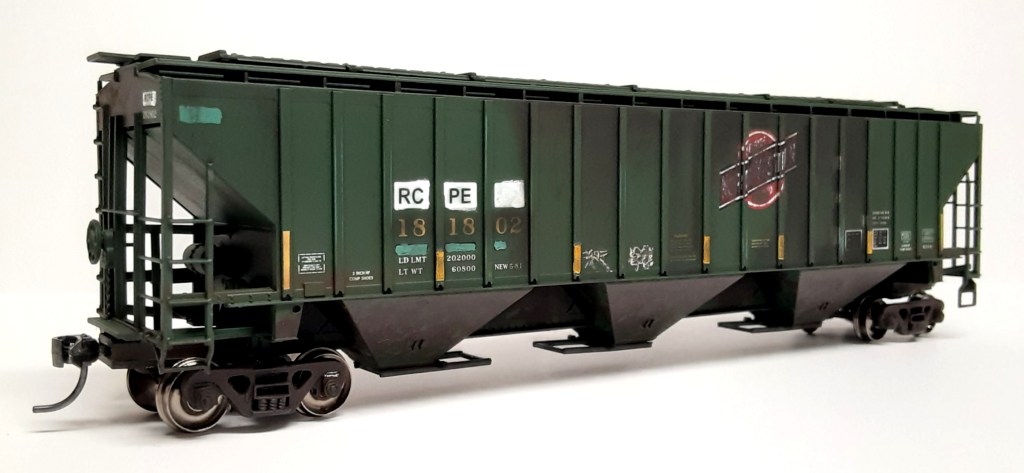
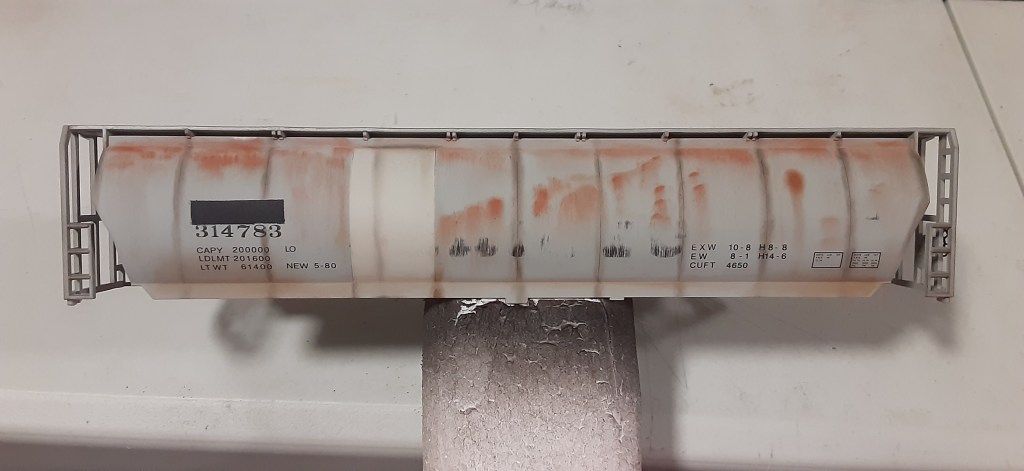
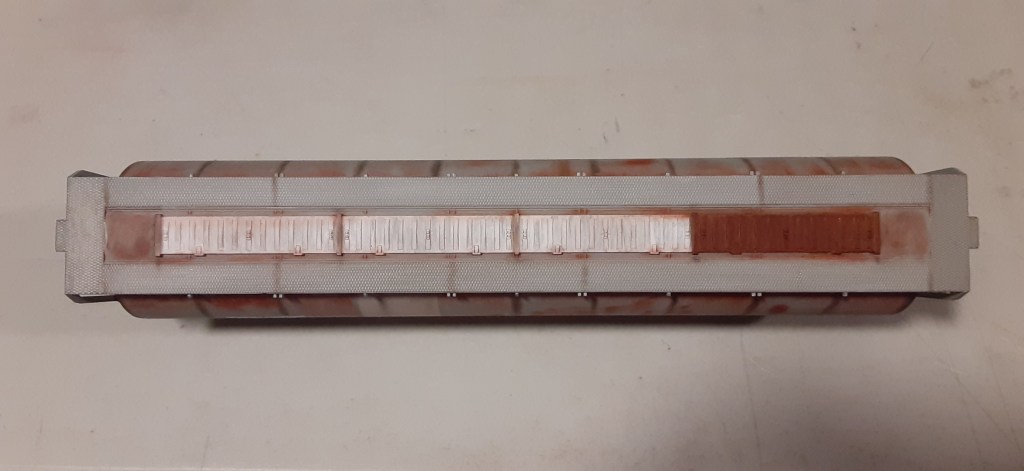
I mostly used Bragdon medium rust and a touch of dark rust on this car. The rust was applied with the ELF cosmetics concealer brush in a soft side-to-side motion while dragging downwards to create a random look. I built up the color in 3 layers with the top third being darkest and fading lighter to the bottom third.
The panel lines, lower sill and underside got a gentle dusting of A.I.M. dark earth powder. I used a regular size microbrush on the panel lines to keep the lines thin. I also chose a ¾” standard brush to dust the underside and afterward dusted the sill.
I hand painted the graffiti, while not based on any prototype image it’s just a basic arrangement of random large block letters. I used a pencil to draw an outline, traced the outline with an ultra-fine black Sharpie and filled them in with white craft paint on a fine microbrush. I used a sky-blue chalk marker to accent the letters. After about 20 minutes everything was dry enough to clean up the black Sharpie outline. I used the same ¾” brush to dust over the graffiti and soften the colors some.
PATCHING:
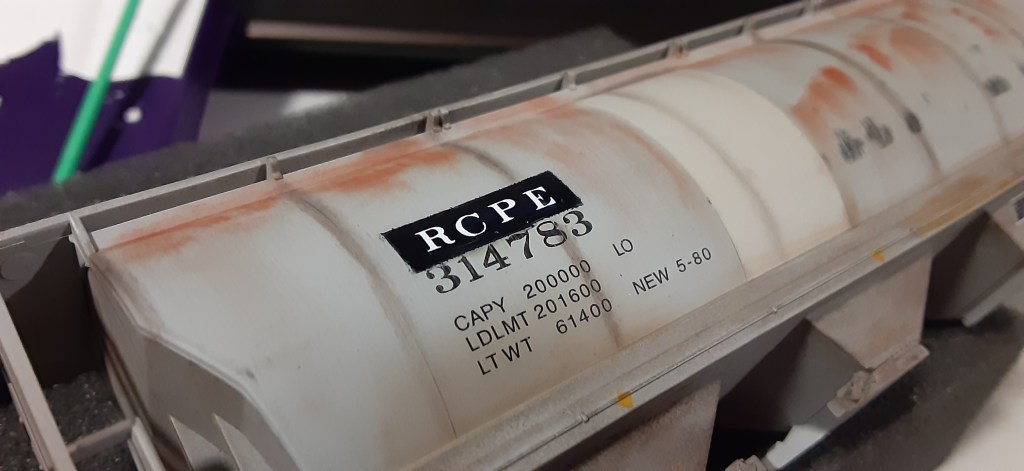
For the new reporting marks, I brushed Micro Gloss over both black patches and let it dry for around 12 hours. Using individual Microscale white letters I applied the RCPE reporting marks. This step offered an opportunity to more closely match the prototype where the stenciling is not square. Once the decals were placed and blotted, I brushed them with Solvaset and let the area cure for about 24 hours. I sealed the new lettering by brushing them over with a light coat of Micro Gloss then let dry for another 12 hours.
FINAL TOUCHES:
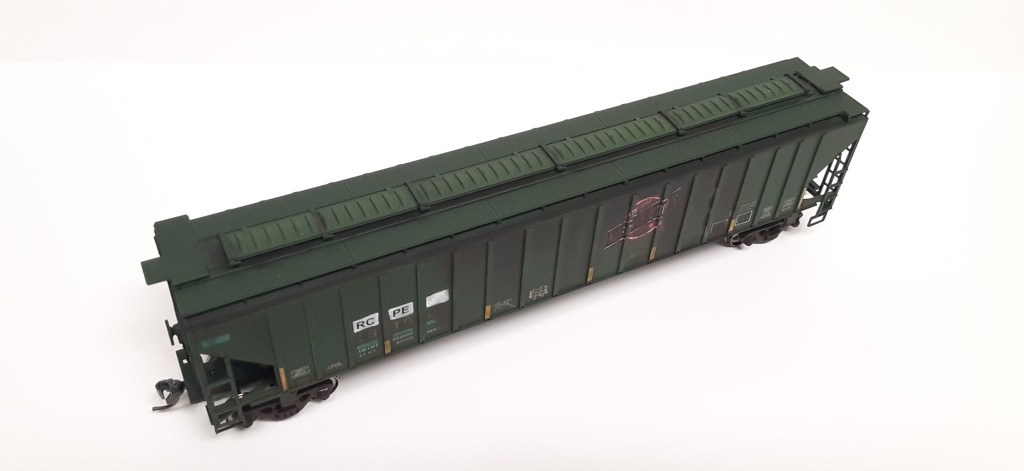
The hatches were painted with a brush using white craft paint. I kept one clean and painted it with matte Humbrol signal red colored over with non-metallic gold to duplicate the oxidized red look other Santa Fe cars have. Before these paints were completely dry, I used a ¾” standard brush to dust them and obtain a grimy effect. I also touched up the walkways with some to accent them as well.
Making the trucks blend in was straight forward on this car. I masked the bolster top flange and backs of each truck where the wheels fit. I then sprayed them with RustOleum ultra flat black and highlighted the faces with light gray powder from A.I.M.
To complete the project, I sprayed all parts with 2 light coats of Tamiya TS-80 flat clear to seal everything, waited overnight then reassembled the car adding metal wheels and Kadee #5s.
The two most popular model railroading scales in North America are HO (1:87) and N (1:160). HO scale still dominates the market but in recent years N scale has been growing substantially in popularity. If you are new to the hobby then it is likely that you are trying to decide which one of these scales to invest in. This article will provide a brief description of both scales as well as key questions to ask yourself in deciding between N and HO scales.
HO Scale vs N Scale
Sized at 1:87th and with a standard gauge of 16.5mm, HO is the most popular model railroad scale on the market today. Almost every locomotive and car that rode the rails from the 1890s to present day can be found in this scale which makes finding and purchasing models that match your prototype straightforward. Many modelers find 1:87 to be in the “goldilocks zone” for modeling short lines and branch lines in a modest space. However, one disadvantage to HO scale is that for a lot of modelers the scale is too large to realistically model mainline running on Class I or Class II railroads. Because of this, there has long been a desire by model railroaders to fit a longer mainline run into a given space and this is where N scale really shines.
Sized at 1:160th scale, N scale is roughly half the size of HO scale. Structures take up one fourth the area and layouts can be built in very small spaces. Alternatively, N scale can be used to model a much larger section of a railroad than HO scale if the space remains the same. This makes running mainline class I trains much more accessible. A big gap between the two scales used to be in the detailing possible. HO scale had a reasonable level of detailing on equipment yet N scale was traditionally too small to achieve the same amount of detail. This gap has narrowed significantly in recent years and now N scale detailing rivals that of HO scale.
N scale modelers were slower to adopt DCC due to the size of the electronics needed to be fit inside locomotives, but today that is no longer an issue. One area that is still troublesome is in the lack of coupler standardization. Truck-mounted couplers are quite common still on rolling stock even though such designs are almost extinct in HO scale. Additionally, most manufacturers have their own N scale coupler which may or may not be compatible with other brands.
Deciding on a Scale
It is wise to pick a scale to model prior to purchasing a large amount of equipment. If you already have a strong preference for one or the other, then roll with it. But if not and you are stuck deciding between N scale and HO scale, considering the five following questions:
What is my prototype? If you like running long trains on a mainline then N scale’s smaller size has several advantages. However, if you like to run trains at slow speed and switch out industries, then HO scale tends to run smoother, slower, and more realistically.
How much space do I have? Equally important is the amount of space available. Do you have one or two walls to build a switching layout or can you use the whole bedroom? How about the whole basement? The garage? If you have the space to model what you want in HO scale, then it will be more convenient to do so. However, if you have some space constraints then N scale will adapt better to tight spaces.
Are the models I want available? This is also an important one. The good news is that just about every 2nd or 3rd generation mainline diesel locomotive that runs on US rails can be found in both N scale and HO scale. The bad news is that N scale model availability isn’t as good as HO scale for unique models. Check out what’s available to model your prototype before making a decision.
Can I see and work on the models? Everybody is different when it comes to eyesight and dexterity. Someone with nimble fingers and keen eyes will likely do just fine in keeping their N scale fleet running well. However, not everyone has perfect vision and with age comes a tendency for eyesight and hand-eye coordination to deteriorate. If you want to be modeling in the same scale 30 years from now, would be wise to invest in a larger scale now.
What is my budget for building materials? The amount of benchwork, foam, scenery supplies, light fixtures, and more that are required to build a model railroad is determined by the type of layout being constructed and the scale being selected. Smaller scales will use less materials overall, so if you are on a budget it might be wise to build the layout that you are envisioning but in a smaller scale.
Conclusions
Remember that these questions are what I consider to be important. While I hope you will also take these points into account when deciding on which scale to use, it is ultimately personal preference. One of the site’s contributors, Jordan Schmieg, has built a fantastic layout of the Milwaukee Road in his area. I personally still feel that N scale would have given him certain advantages to replicating the town of Andover and mainline operations, but Jordan wanted to stick with his HO scale because that’s what he had and the availability of unique models to the Milwaukee Road just isn’t there in N scale. So he built himself a model railroad that he is happy with and that’s the important thing.