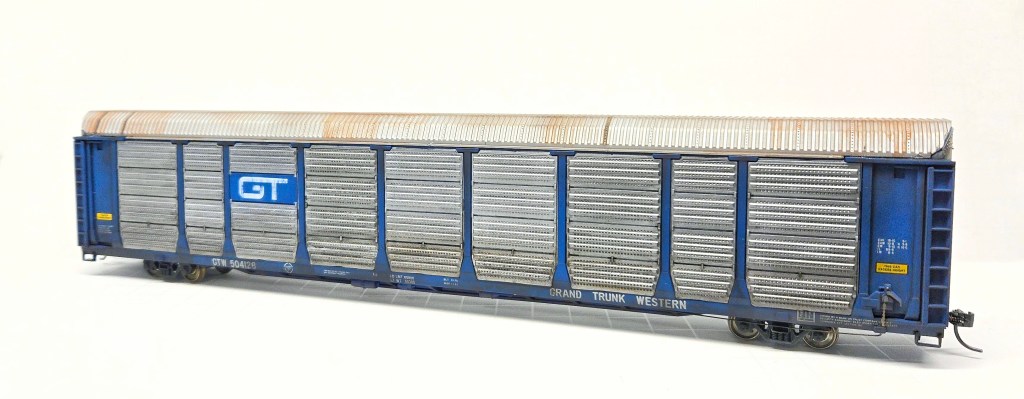
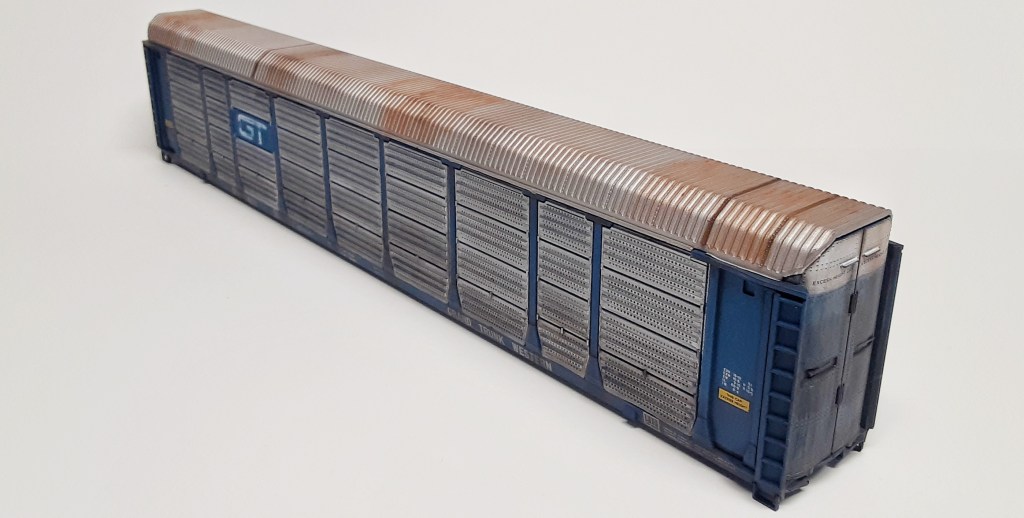
Here’s how I weathered this older Walthers autorack HO scale kit during the assembly.
OVERVIEW:
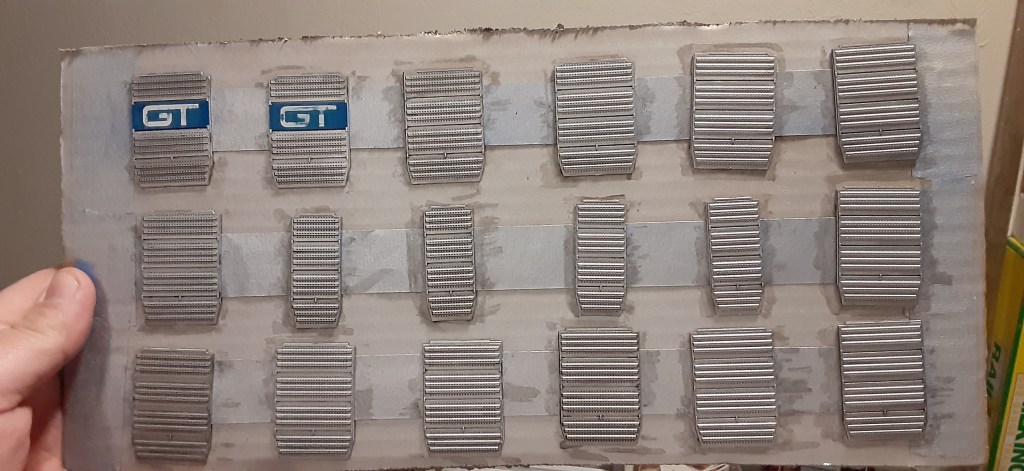
This older Walthers kit was still shrink wrapped when I found it second hand, talk about new-old-stock! I find these older kits to be conducive for weathering candidates because you can weather them in much smaller pieces versus handling the whole model. This generally reduces the chance of breaking off detail parts or leaving fingerprints that only show up when applying powders.
I used an assortment of techniques on this project because I wanted to try washing the brighter metallic parts to match the look of a prototype photo I found.
PREP FOR WEATHERING:
My first step was to select side panels that matched the prototype photo I had and remove them from their casting sprues. Thankfully there wasn’t much flash clean up resulting in a nice fit and finish. The panels in the kit were blue and that needed to be changed.
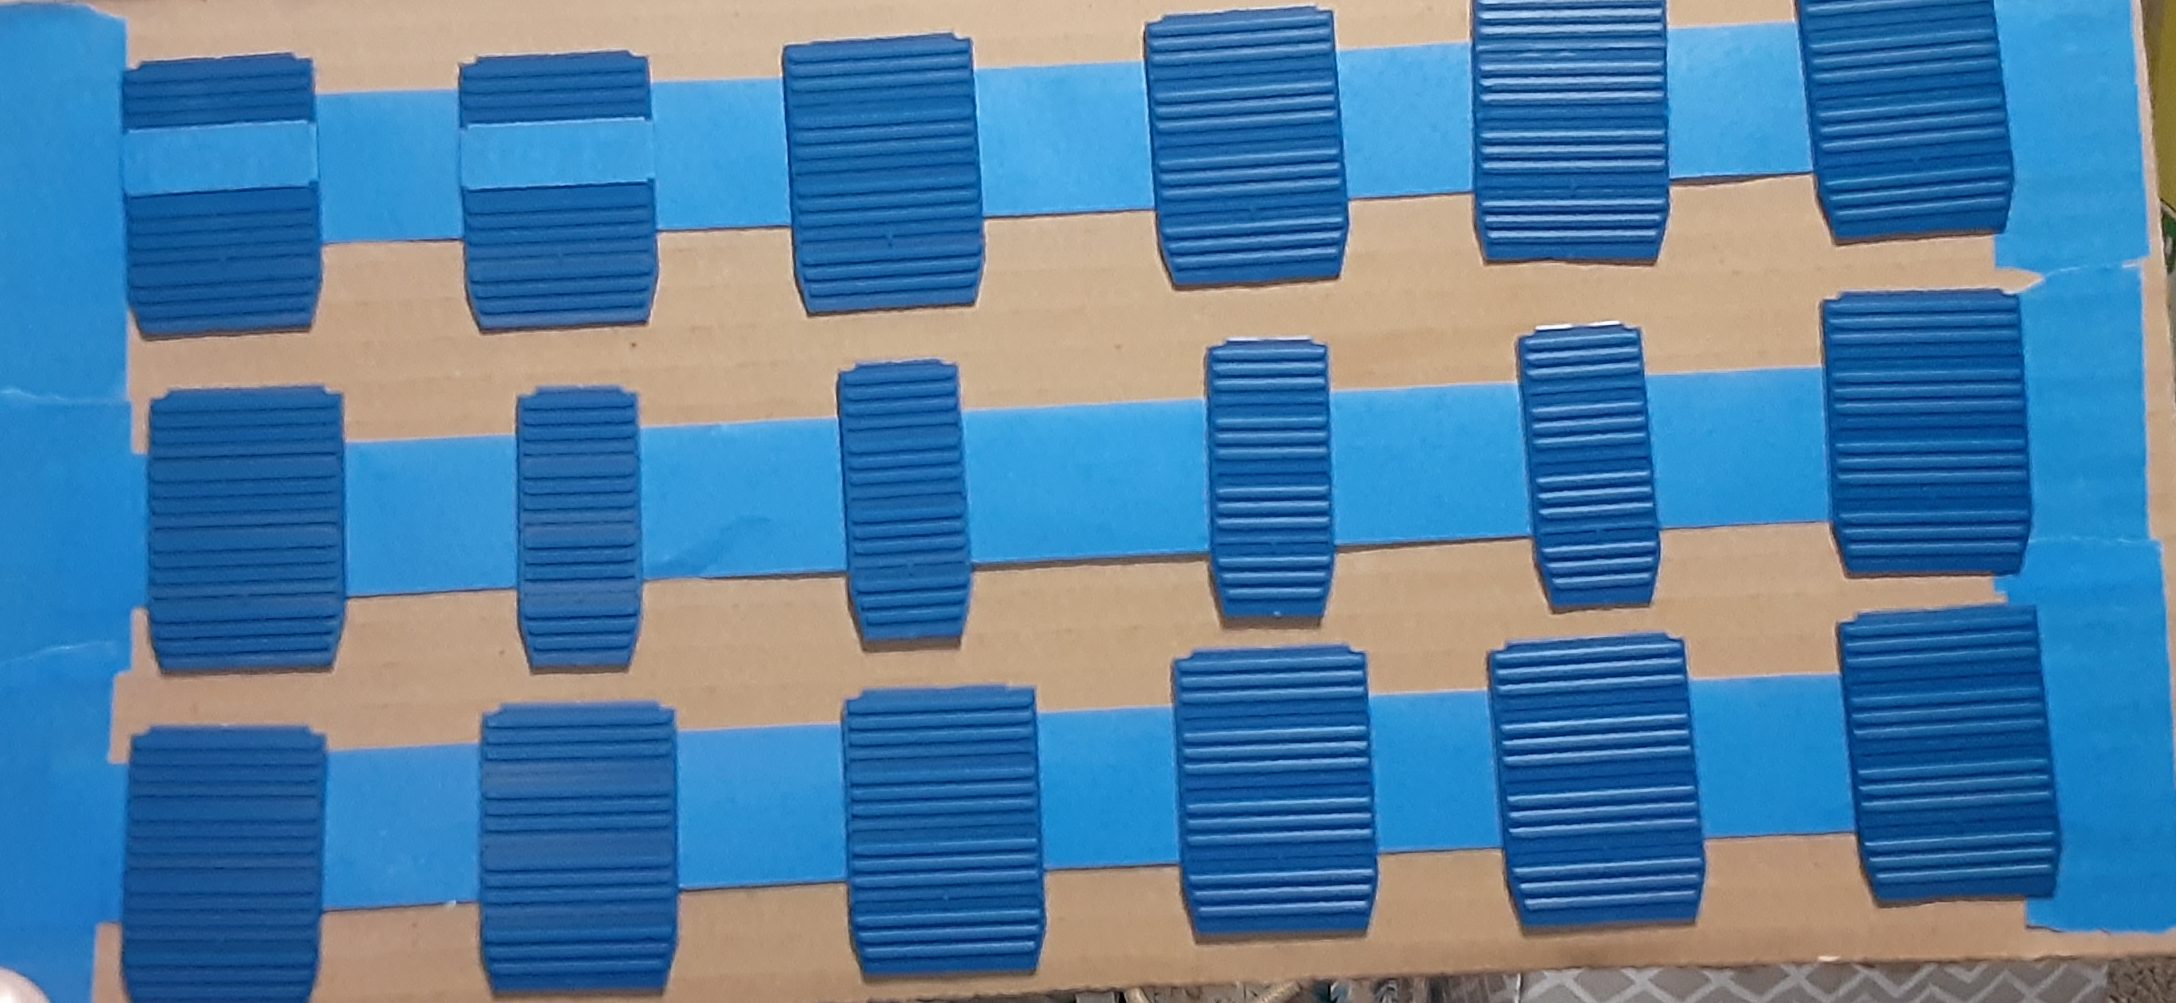
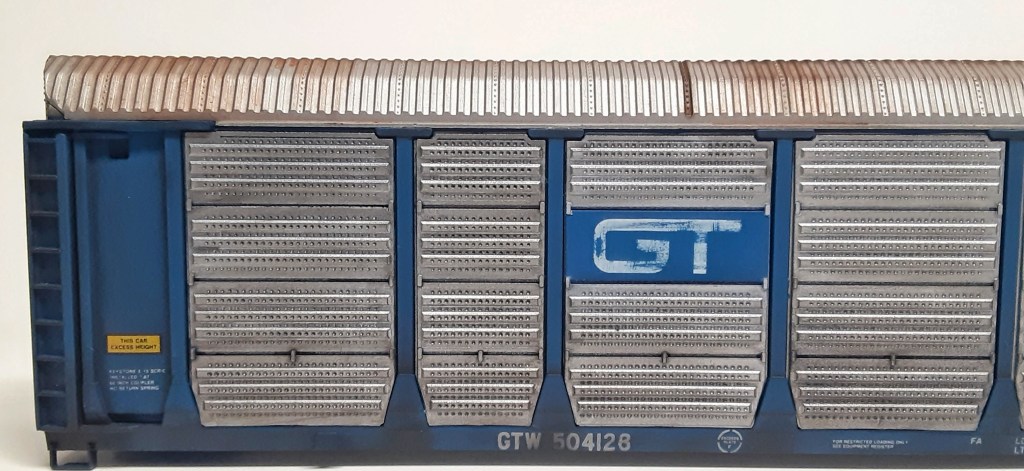
Using a sturdy piece of cardboard, I laid out some masking tape adhesive side up and stuck the panels down for painting. I only had to mask off where the herald was printed before spraying. I sprayed only the outside faces of the panels with Tamiya TS-76 mica silver for a good base color then followed up with Tamiya TS-80 flat clear.
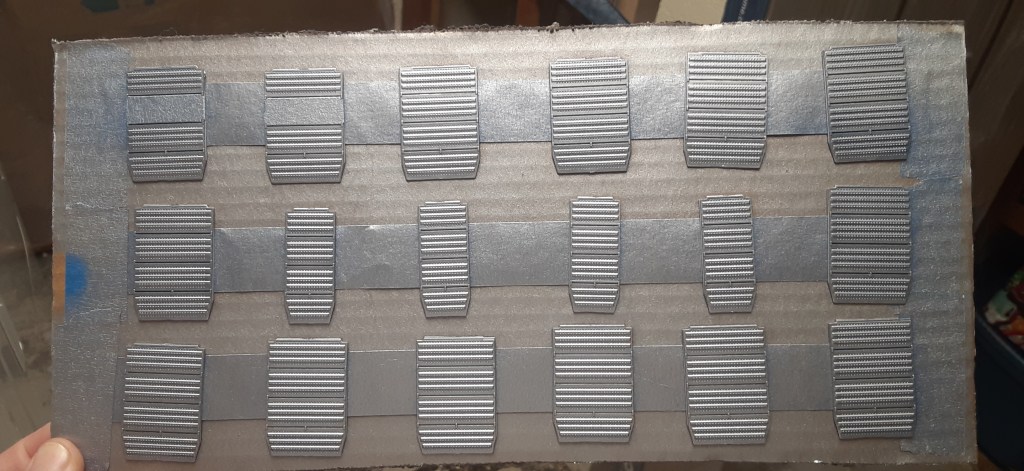
The flat clear knocks down the original bright silver and gives a good tooth for weathering powders.
Using Tamiya black panel wash as a starter, I dipped a Q-tip the wash and randomly applied it across each panel starting along the bottoms and working upwards to fade it out. I found that keeping all the panels stuck to the cardboard while I did this made things much easier to keep everything contained to the cardboard.
WEATHERING:
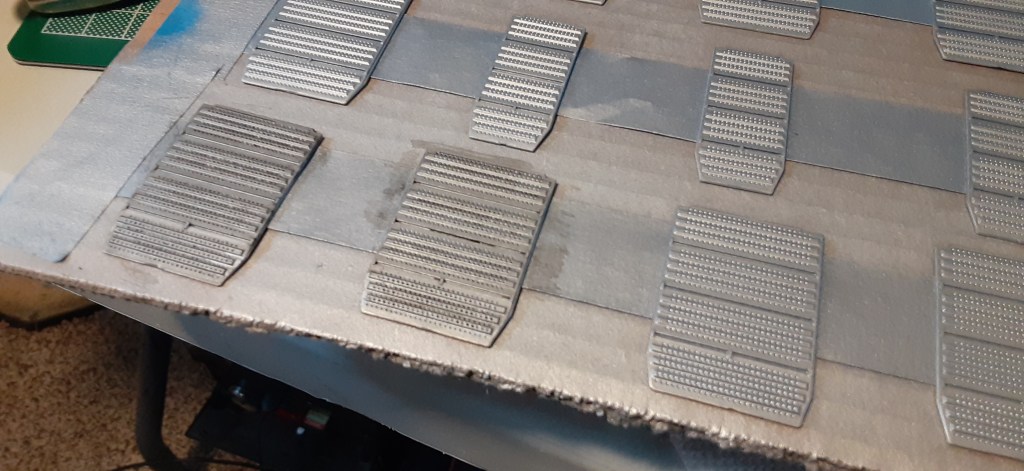
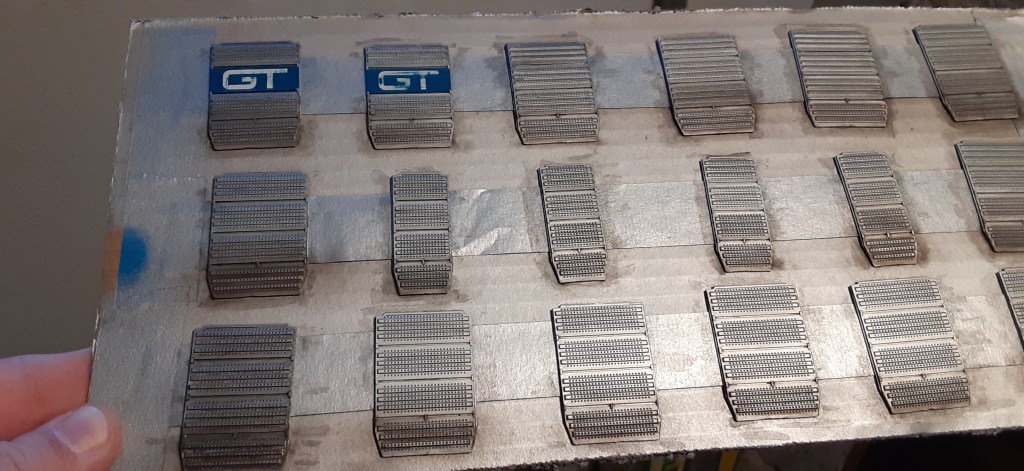
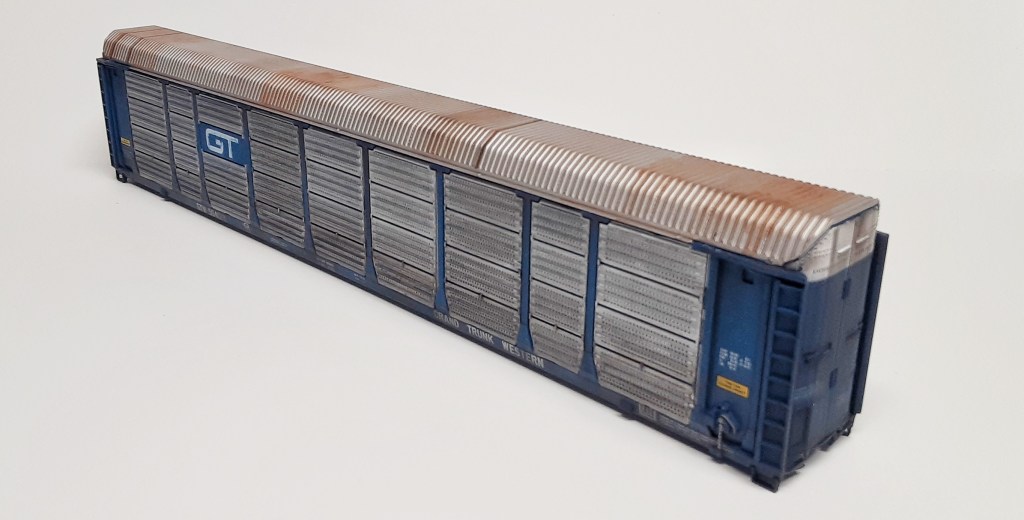
When the wash dried overnight, I came back with a 1/2″ medium brush and lightly applied Bragdon soot powder across the panel, again starting at the bottom and fading towards the top creating the road grime effect. Once I was happy with how the panels looked a coat of Tamiya TS-80 flat clear was sprayed to seal them.
I started out wanting to fade the blue to a more sun bleached baby blue shade, but the method I planned on was not going to work. I chose to skip that step, instead sprayed the entire car body with a medium-heavy coat of Tamiya flat clear and let it dry to a point where it was not tacky, but still had a lacquer odor (about 3 minutes). I then gently rubbed my thumb over some of the smooth surfaces, this lightly frosts the flat clear and created the sun fade I was wanting.
Working on the car frame I decided to re-numbered it as well. For this car, I pulled the bristles off an old microbrush creating a fine pencil tip, dipped it in some white craft paint and carefully applied paint to change the factory printed 3 into an 8.
Using a 1/4″ short bristle angled brush I lightly applied A.I.M. dark earth powder along the lower edge along the frame. This step took longer because the frame is narrow and I tried to keep the powder in place. Once happy I used the same angled brush upwards to drag the powder up the frame sides. I used the same powder for the car body and ends. applying it more heavily in lower areas where road grime spray would build up from various cars over years.
For both panels that have the herald I used 600 grit sandpaper and gently worked the letters randomly until I achieved the worn look.
ASSEMBLY, part 1:
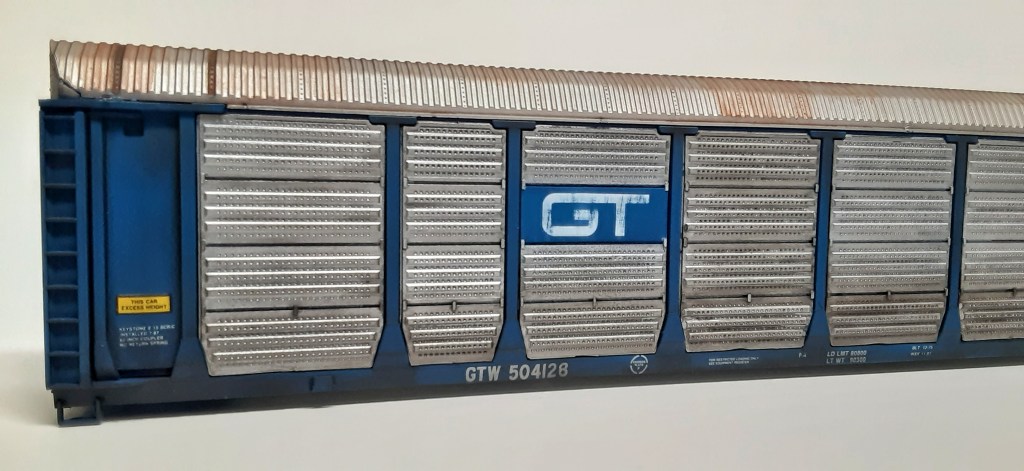
When the frame and car body were done, I used Loctite CA gel sparingly across the back of each panel to glue them in place. Before applying any glue I test fit each panel to ensure fitment. Starting with panels that had a herald and were end or side specific I glued them in their proper placement, then randomly selected remaining panels from my cardboard palette for the empty spaces. I let the CA cure for about an hour then came back with my Tamiya TS-80 flat clear and sprayed the entire car (minus roof).
FINISHING THE ROOF:
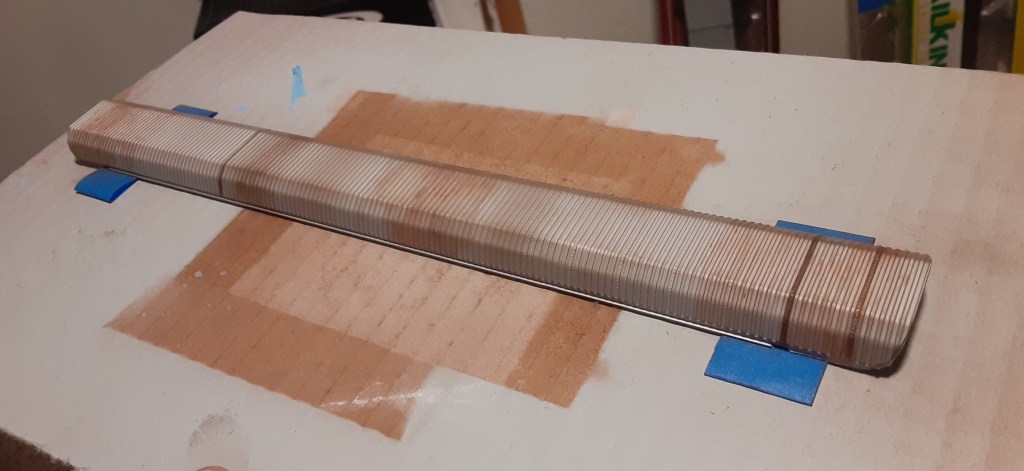
The roof was an opportunity to use a new to me product. To start I sprayed a light mist of Tamiya TS-80 flat clear over the factory silver finished roof. Next, using an ultra soft blush makeup brush dipped in Bragdon medium rust powder, I gently brushed across the part, staying parallel to the ribs and from one end to the other. It took a total of 4 passes to get the desired effect. Take your time when building up powder, the harder edges will create a highlighting effect that a contrasting color will appear unrealistic.
ASSEMBLY, part 2:
These older cars tend to warp and some can bow inwards badly, this car was bowed inward. To remedy this I cut a couple pieces of heavier styrene the proper inside width of the car to use as braces. Doing this step was not really needed as the roof ended up taking out most of the bow, but it sure gives the car sides a solid feeling when handling it. I ended up adding extra weight before attaching the roof with gel type CA.
Once the car sides were good to go, I applied CA along the roof edges where it sits down inside the car body. It took a little persuasion to fit the roof to the car, but it made a big difference going slowly. Once in place, the only way to keep it from popping was to weight the roof down using my six 1-2-3 blocks. Nearly 30 hours later and the full weight of six blocks the roof was in place without any gaps.
FINAL TOUCHES:
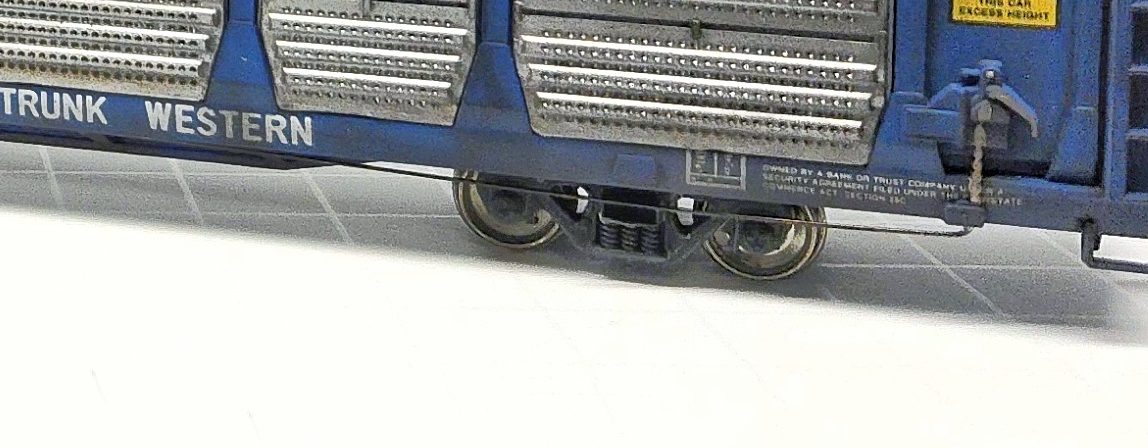
On the underside did a quick brush of A.I.M. dark earth and grimy black then sealed it. Most of these details can’t be seen when on the tracks unfortunately. For the trucks, I masked and sprayed them with RustOleum ultra flat Camo black and while tacky dusted over each side frame with A.I.M. light gray powder then sealed with flat clear. I did not have any metal wheels on hand during this project initially, otherwise they would have been included. The car has wheels now, but they are not weathered as of this writing.
As seen in the photo above, the molded and separately applied brake detail isn’t much, especially when molded in the same color as the car body. To make this small detail pop, I used a silver Sharpie paint marker and highlighted the chain and lever. I touched it before the marker paint fully dried to dull it slightly.
The last thing I added was a short piece of .010″ brass wire to finish out the brake equipment from the lever to frame. I painted it black before gluing it in place and called this car done.
After passing Pierpont Lake, the duo race a summer thunderstorm back to town.
The first rule of model railroading is have fun. This is a hobby, after all, and so it makes no sense to turn something fun into difficult work. With that in mind, the second rule of model railroading is that it’s your railroad and you can do whatever you want with it. I suppose if we added a third rule it would be to treat others with respect (looking at you, Modeler’s Life), but beyond that there really isn’t too much in the way of rules to follow.
Naturally, a lot of people in the hobby have a dream of building a gigantic model train layout in their basement, a loft in their garage, or even a separate building. Many such layouts have been featured in printed and digital media and I can understand the appeal. Large layouts are a sign of discipline, education, and the accumulation of many years of knowledge about railroads, model trains, and a dozen other skill sets. However, most of us likely aren’t going to have the chance to build something that big and those who do get the chance might want to consider a few things before breaking out the wood saw.
The case for a modest train layout
The fact is most train layouts aren’t particularly large. The 4’x8’ layout in O scale or HO scale was the standard for decades, and while preferences have changed for how layouts are designed, the amount of space available really hasn’t. The average train layout today can comfortably fit in a spare room and that’s likely all the room most people have to spare for their hobby. A number of people have even less space, perhaps only one or two walls of one room that is used for other things, or maybe even a closet!
Some things we can’t change and space is one of them. Odds are that even if you move to a new house you and the family aren’t going to place high priority on finding as much space as possible for a train layout. I mean, you might, but that would be an exception rather than the rule. With that in mind, modest train layouts have plenty of benefits!
1. Cost savings
Train layouts that are on the small side are much more affordable than the basement empires we see in magazines or on Youtube. The fact is most people don’t have a lot of extra money these days to dedicate to leisure activities and at the same time model railroad equipment has gotten more expensive. By focusing on a smaller layout, overall costs of construction can be brought down in terms of raw materials and equipment.
2. Efficient Design
A smaller area to build a train layout requires an efficient track plan in order to maximize the utility of the space. Larger layouts have a tendency to turn into a “spaghetti bowl” or they end up having more track than necessary in order to fill out the space. This doesn’t happen all the time, but it is a noticeable trend that shows up in a lot of the more classic designs. Now, that doesn’t mean you can’t build a model railroad that way, but most people who are low on space are going to think long and hard about what they want to include on their layout. As a result, there is usually a minimum of track and turnouts, key industries that don’t waste space, and other layout design elements that do their job well without wasting materials.
3. Quicker Construction
There’s only so much time in the week to dedicate to building a model railroad. Between work, family, volunteer projects, and all the other things which occupy life, most people only find a few hours a week to enjoy a hobby. With that being the case, wouldn’t it be great to get a train layout up an operating quickly? Small train layouts are faster to build as a side effect of having less material to deal with. Laying fifty feet of track is quicker than laying two hundred feet or more! Building a dozen model kits is faster than building three or four dozen. Wiring two locomotives for DCC takes an afternoon. Wiring two dozen locomotives takes weeks to complete.
4. More Details
Model builders hold detail in high regard. In fact, behind the smoothness of rollingstock and locomotives, a model’s details are what model railroaders focus on when purchasing a new piece of equipment. If you only need to buy or kit bash a few items then you can invest more money into those items. Additionally, fewer square feet to add scenery means it is easier to add a higher level of detail to a train layout.
5. Comfortable Environment
This last one is often overlooked by magazines. Having a train layout is great, but if there is no place to sit and relax then people aren’t going to want to spend much time in the layout space. Model railroaders in the modern day are also often renters or are purchasing a home with fewer bedrooms. In such cases it is often unrealistic to expect a train layout to take up a large amount of real estate. Instead, a small train layout can open up enough space for couches, TV’s, spare chairs, a kitchenette or coffee maker, and all the other creature comforts that make the hobby more enjoyable.
Modest Layout Examples
Of course, the first rule in the hobby is, again, its your railroad and you can build it how you want. We’ve all taken this to heart by building layouts that meet our needs without taking up so much space that it intrudes on the rest of the household or spills into our day jobs. That, I think, is a key thing to keep in mind about hobbies. They are meant to be enjoyed, but in order to enjoy them to their maximum potential we also must be able to take a break and not have to think about our modeling projects for short periods of time. Just like everything else, model trains are best done in moderation That’s why a layout is generally not placed in the living room but is instead out in the garage, down in the basement, or even in a dedicated structure.
Anyway, in order to show what can be done in a modest space, I have a dedicated gallery of sample images from three train layouts. My own Black Hills and Fort Pierre, Jordan Schmieg’s Milwaukee Road Minnesota-Dakota Division, and Mike Thoreson’s TC&W Lakeville Sub. Each image has an included caption with information about what you are viewing so I encourage you to take a stroll through these digital galleries:
Mike Thoreson’s Lakeville Sub
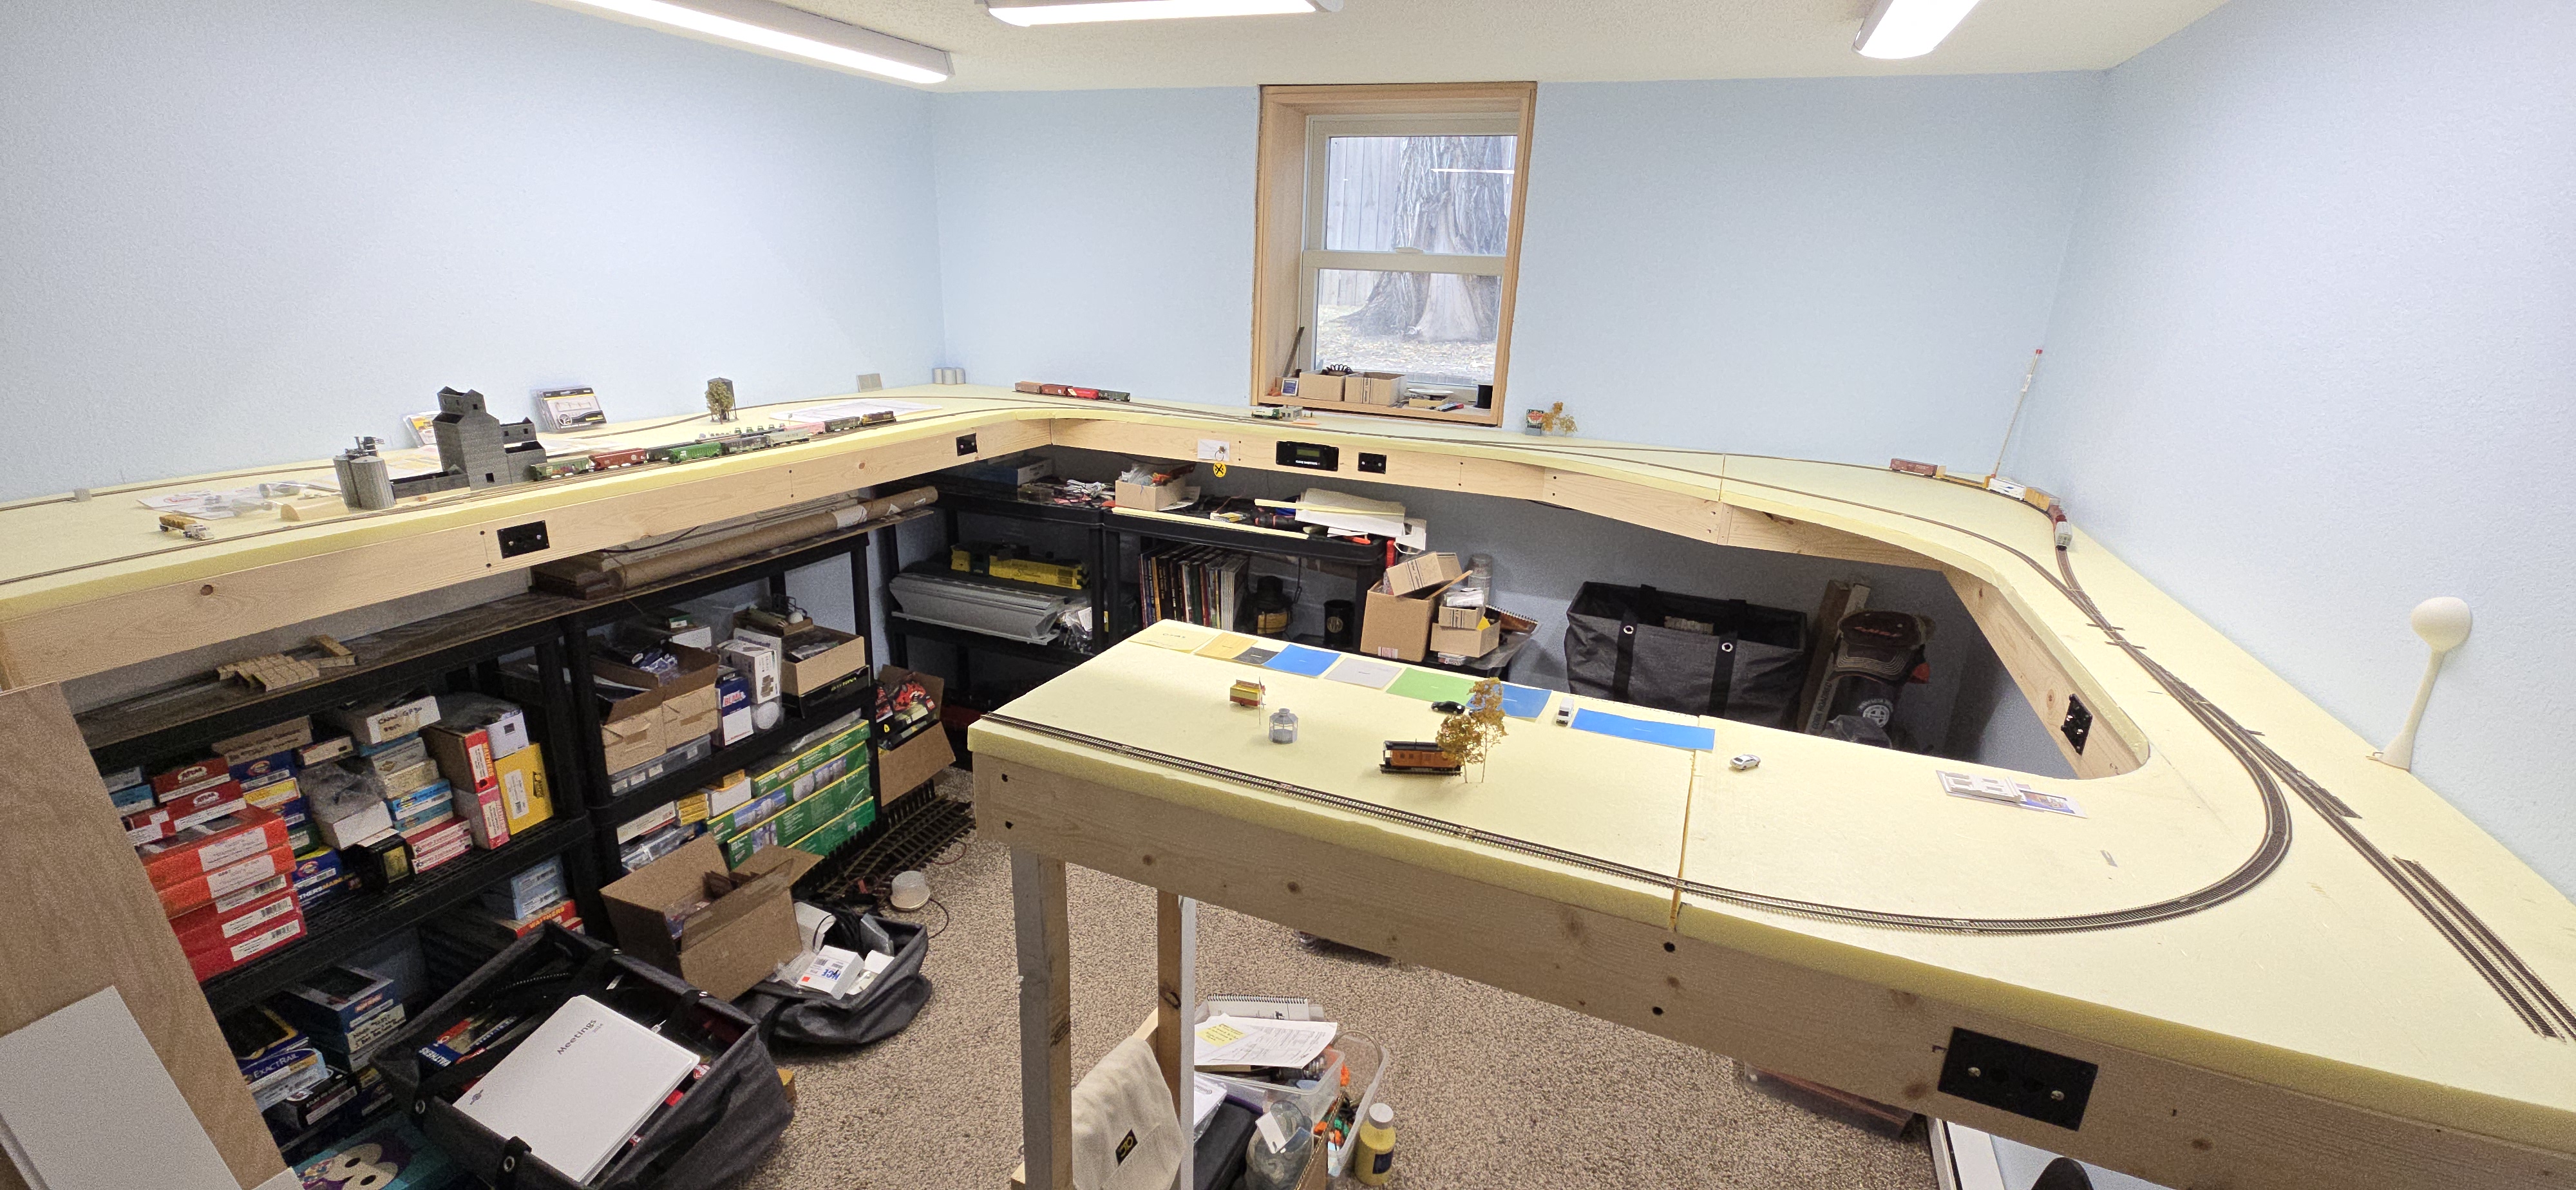
Mike is a busy guy. Between work, raising a family, and being the president of the Black Hills Railway Society, there isn’t much room in the schedule for model trains. However, he did find space in the back of his basement to build a small train layout that satisfies his needs, provides storage for his model trains, and a workbench from which he produces some fantastic models! The Lakeville Sub models a small section of Minnesota in the late 1990s and features equipment painted in BNSF and Twin Cities and Western (TCW). The layout is a walk-in shelf design which features a large operating pit and shelves around 3 walls plus a peninsula. It does not have continuous running, but for a one or two man operating crew that is hardly an issue.
Mike’s Layout feature’s its own “official” BNSF logo greeting visitors to the layout. Above the sign is the short peninsula which physically encloses the operating pit and provides extra operation potential.
An overall view of the layout as it stands back in November, 2024. Mike made sure to do a lot of room preparations before building the layout itself. He now has a sky-blue backdrop ready to go and can make modifications to the lighting now that he knows where everything is going to be placed around the layout.
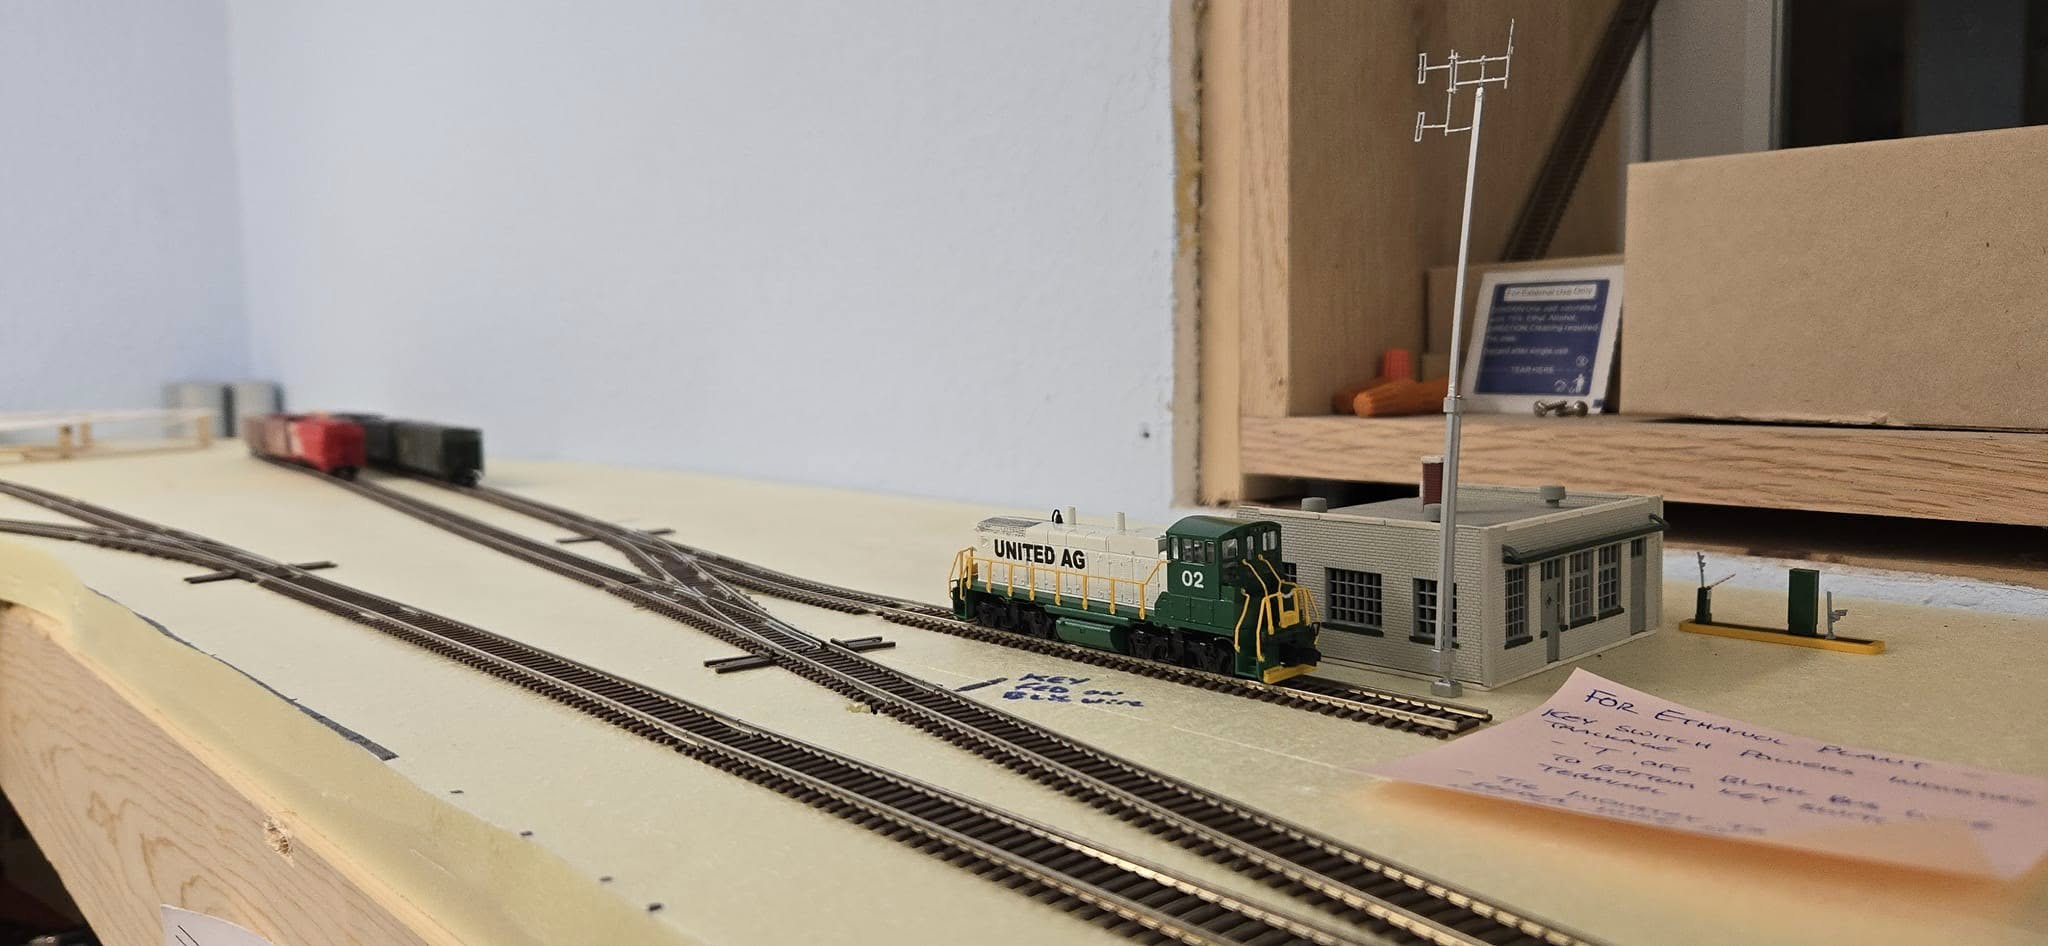
In addition to BNSF and TCW equipment, Mike’s layout also features some oddities such as this United Ag MP15DC switcher.
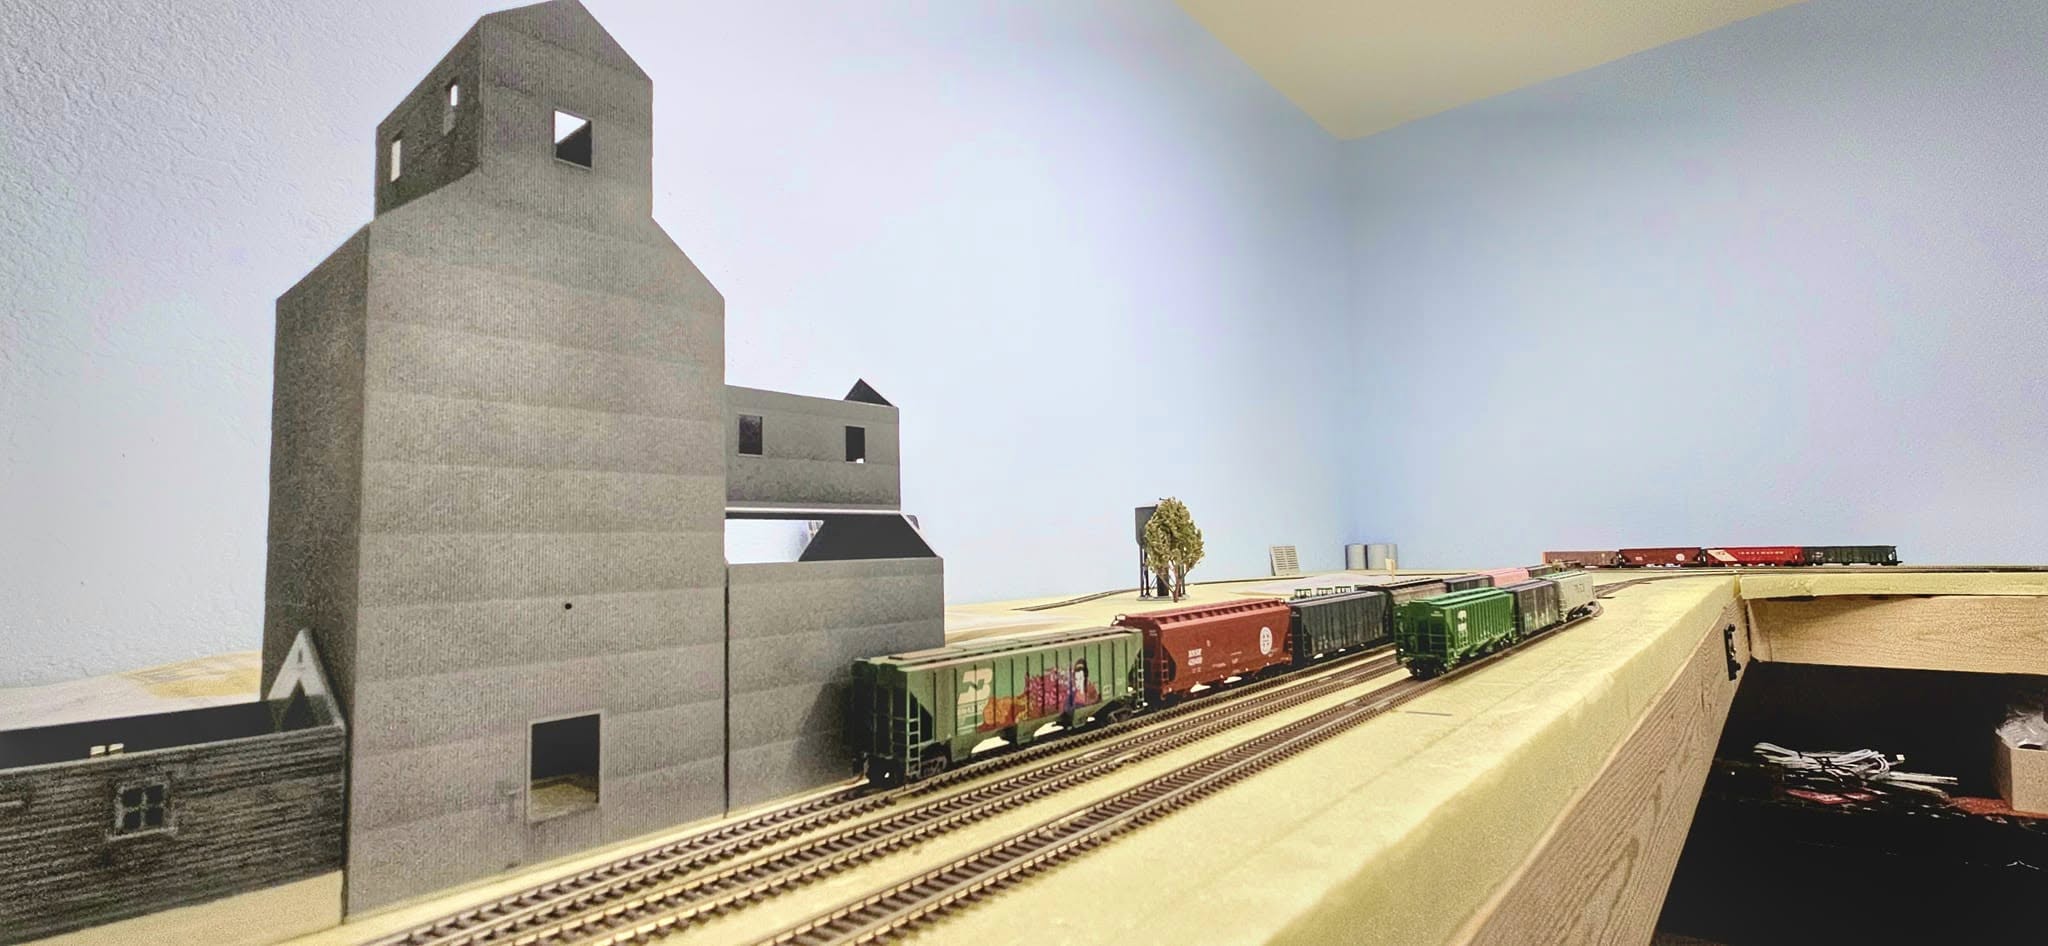
One of the larger industries on the layout will be a grain complex built around an old elevator. Such sights are common across the Midwestern prairie.
The “clean” look at the benchwork before Mike began laying track and placing structures. The benchwork is primarily made of 1x4s in an open grid pattern topped with 1 inch extruded insulation board.
Jordan Schmieg’s Milwaukee Road Layout
Jordan Schmieg also lives a busy life and his is just getting started! Graduating from the South Dakota School of Mines and Technology this spring, Jordan is looking forward to applying his degree in useful ways as well as finishing his home layout that depicts the Milwaukee Road transcontinental line in the 1970s. Like most model railroaders, Jordan prefers to model in HO scale since it gives him the opportunity to use prototypical equipment for his area and era. In this case, Jordan has a pair of SDL39s plus GP40s and SD40s. He also has some modern BNSF and steam locomotives on his roster as well. Jordan’s main operational interest is whole-train movements which presented him with a challenge in a 14×16 foot space. His solution was a double-track mainline that runs from staging at the back of the layout through the town of Andover, South Dakota where the layout is located. He also found room to model portions of a branch line that ran North to Britton, South Dakota. If you also prefer mainline train action but don’t have a lot of space, Jordan’s layout is proof that you can make it work!
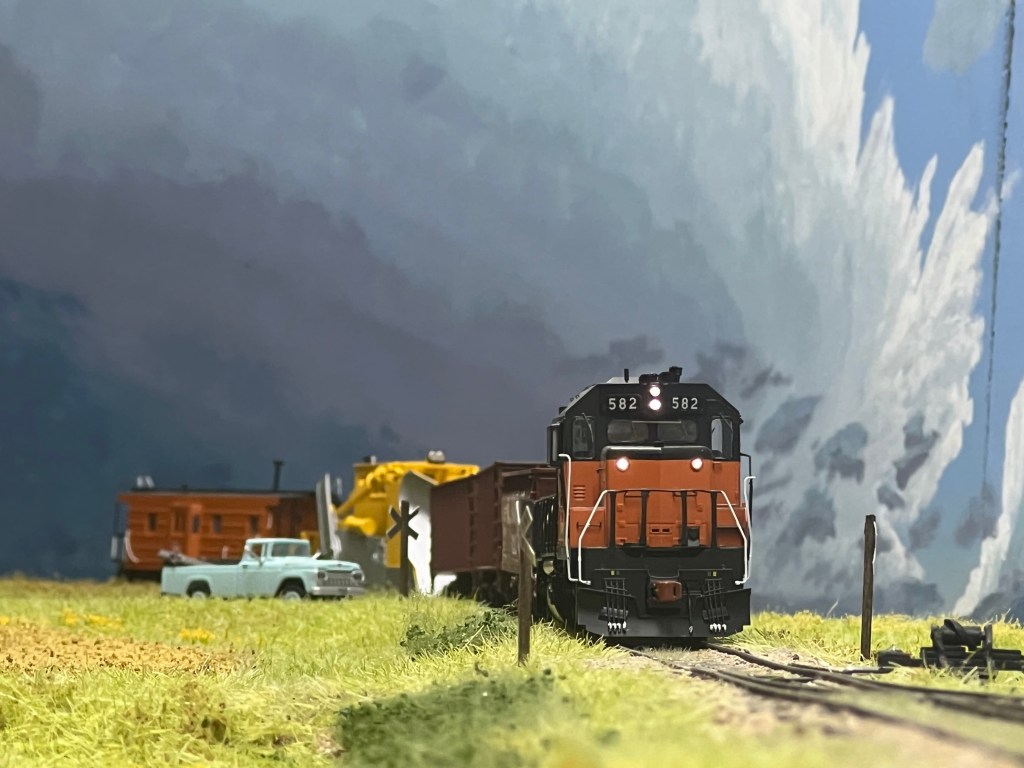
Engine 582 leads a northbound ballast train to fix a washout near Britton. This is one of the few times the line sees maintenance; most of the work done is to barely keep it open. In less than 5 years this line will be abandoned and the rails pulled.
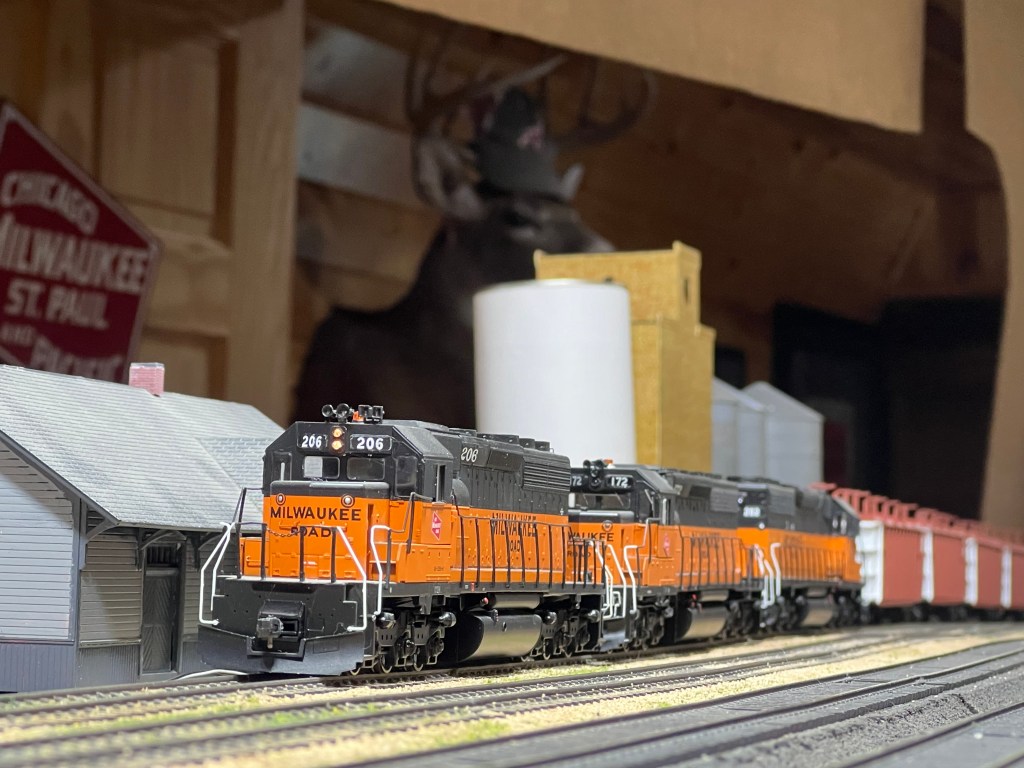
Engine 206 leads a loaded coal train eastbound through Andover. It is bound for the power station in Big Stone City, SD, on the Minnesota border.
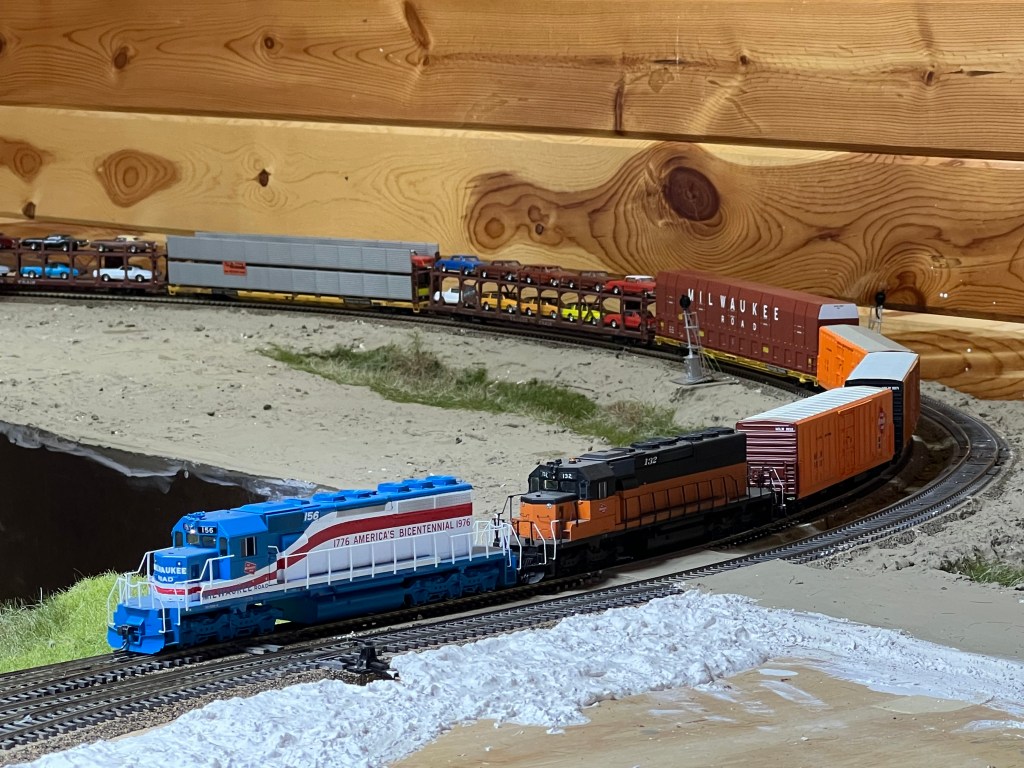
Milwaukee Road Bicentennial Unit 156 leads westbound hotshot #201 from Chicago. It will stop in Aberdeen for a new crew and fuel before continuing west to Tacoma.
As the Milwaukee’s extensive network of branchlines across the Dakotas deteriorated, derailments became a common occurrence. Here, a wreck is being cleaned up just south of Pierpont on the Andover-Brampton branch.
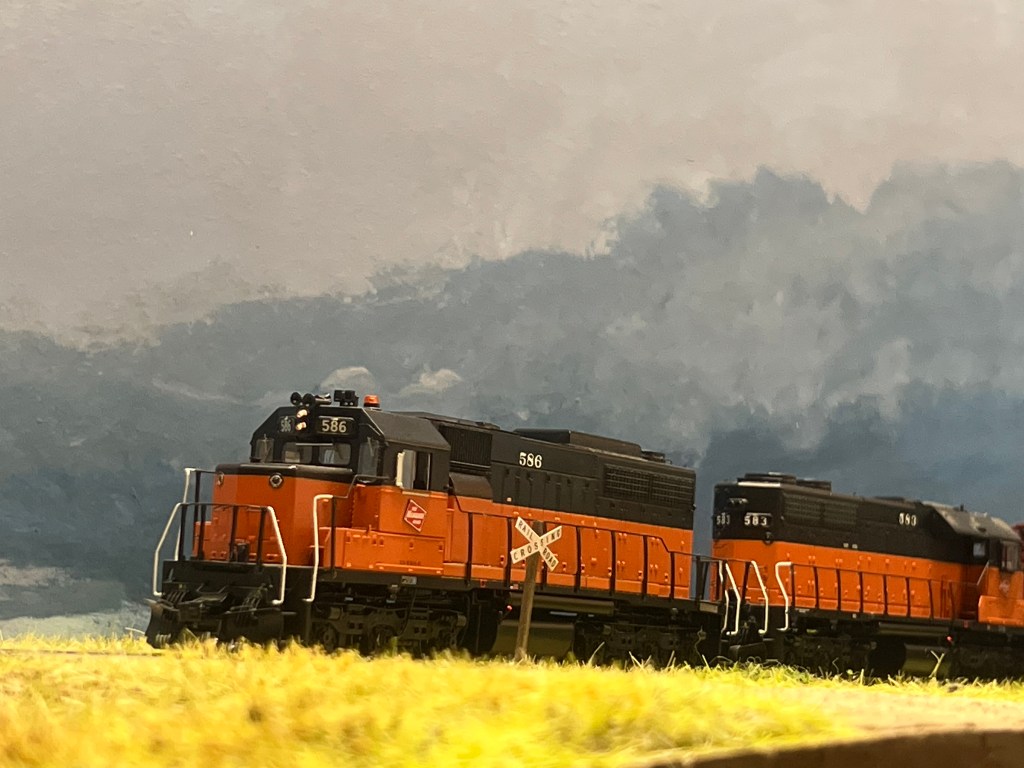
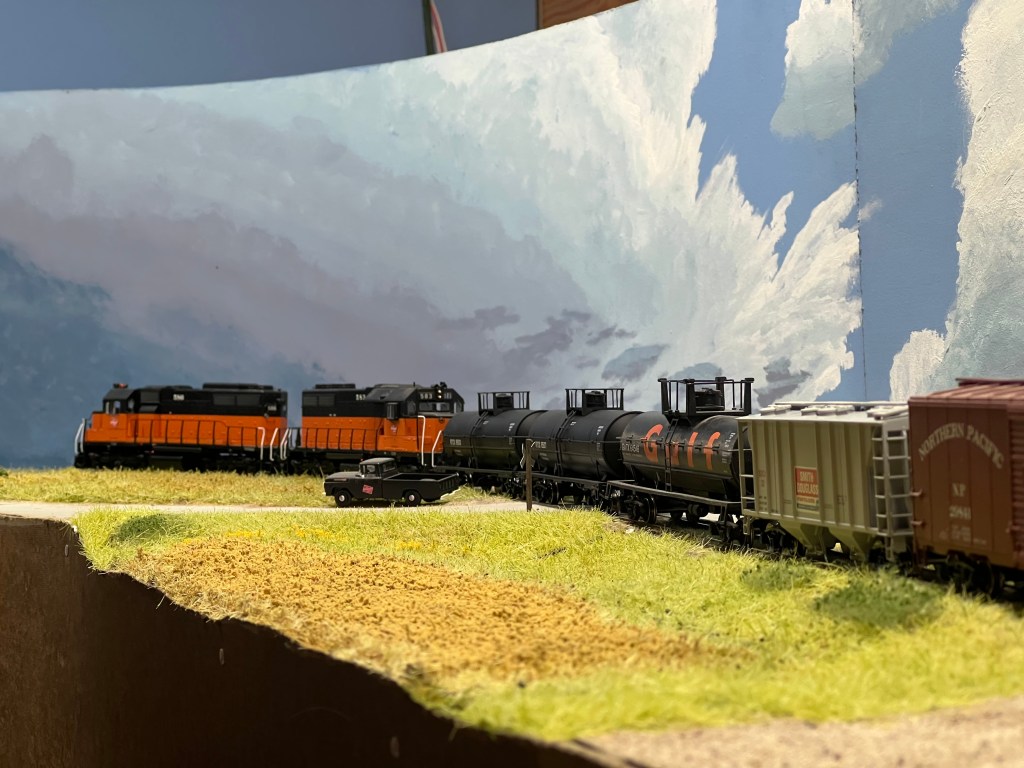
SDL39s 586 and 583 take the weekly branchline job south towards Andover.
After passing Pierpont Lake, the duo race a summer thunderstorm back to town.
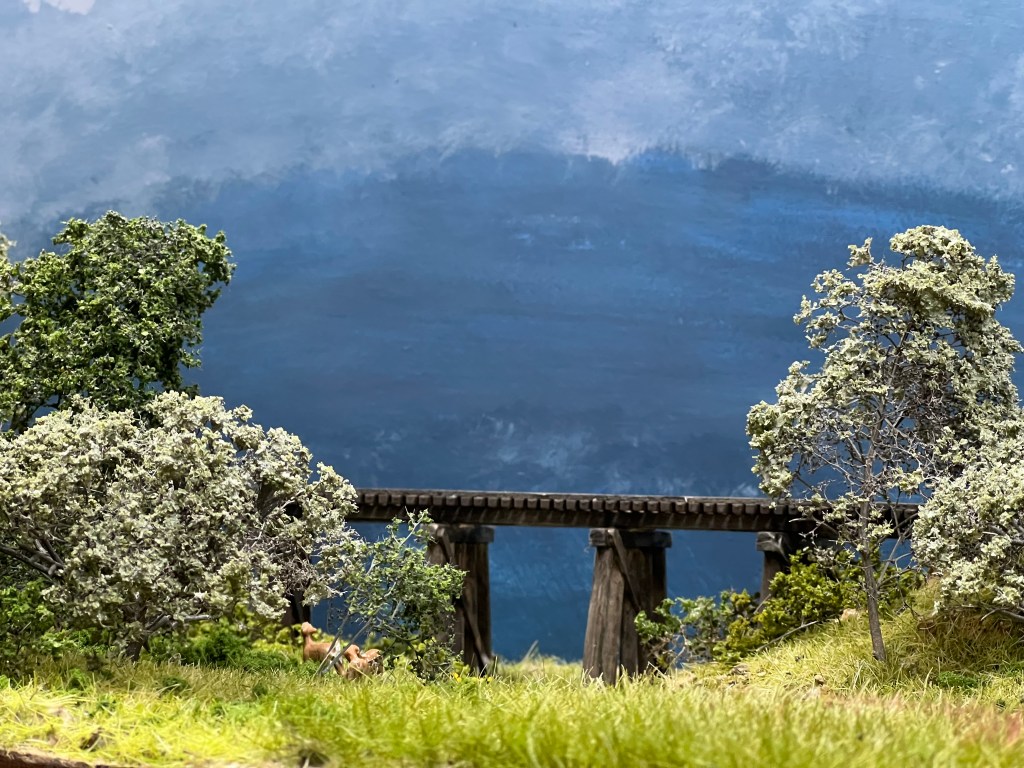
A doe and her twins take a quick glance at the trestle near Pierpont Lake. With the exception of the weekly train rolling over once each way, this spot is quiet most of the time.
The Black Hills and Fort Pierre in HOn3
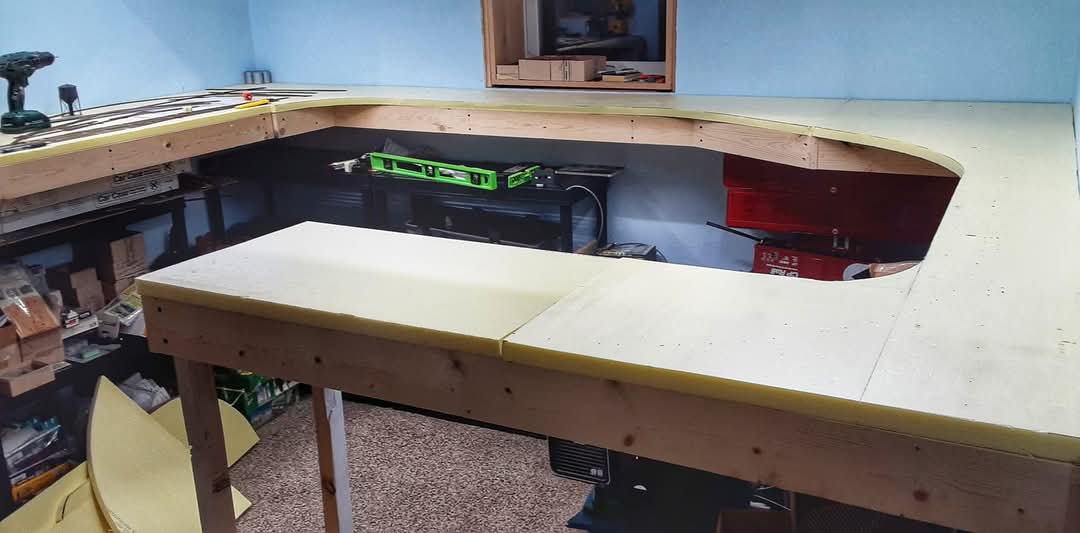
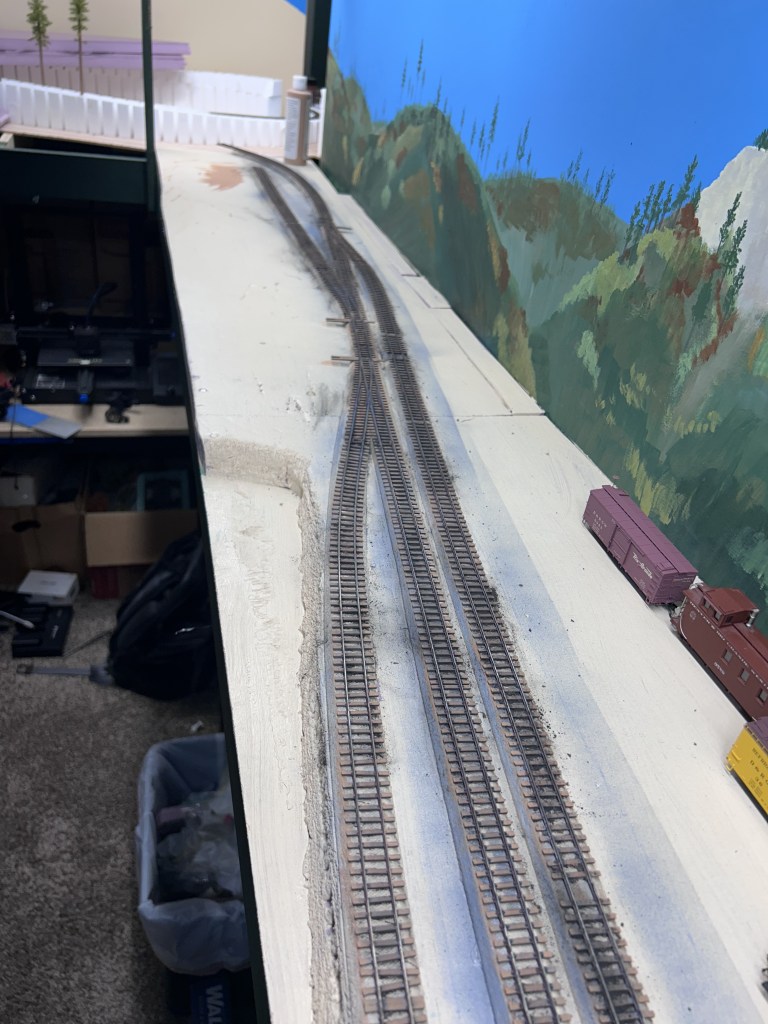
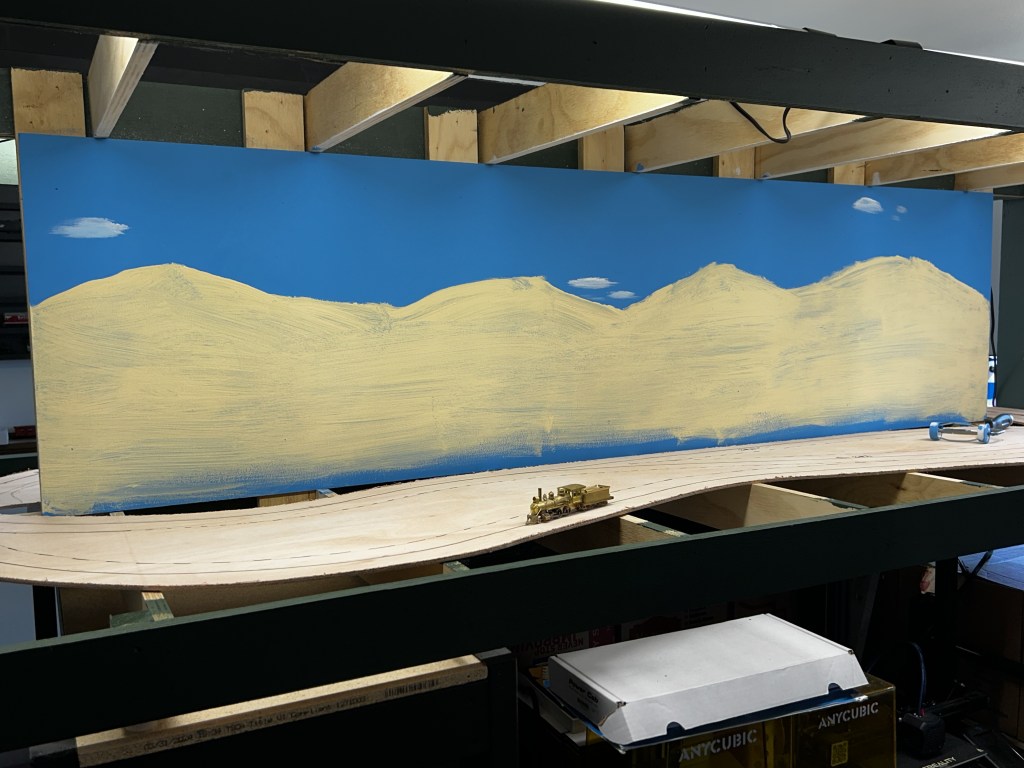
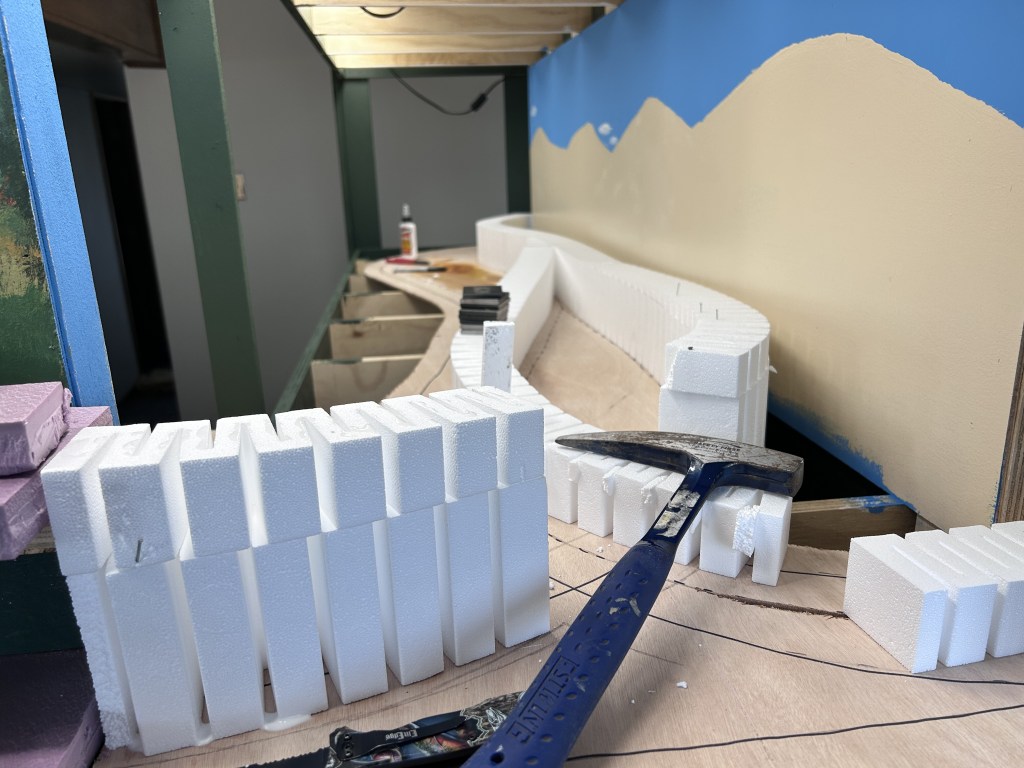
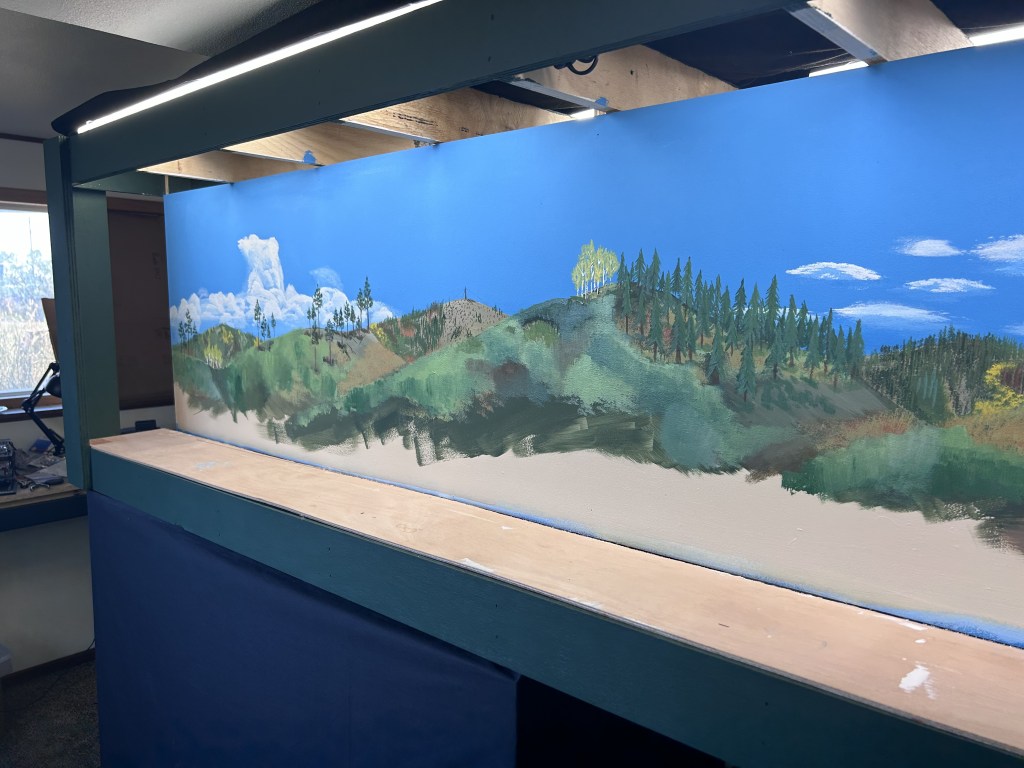
My own home layout takes yet another approach to building a model train layout in a small space. Unlike the other examples in this article I rent my house which excludes me from knocking down walls, painting, or making any hefty modifications. Due to the nature of the lease and the low cost of my rent I would rather not make my landlords angry by leaving them with a tremendous mess to clean up. Frankly, a lot of people find themselves in a similar position. The solution that I found was to design and build a sectional, free-standing layout in the middle of the room with its own integrated backdrop, lighting, and valence. After building four sets of shelves out of 2x4s and press-board, I went about constructing three boxes that work out to being 24 inches deep, 96 inches long, and 28 inches high. These three were then fed into the layout room through a basement window and bolted together. Building the benchwork saved me a massive headache in that I didn’t have to clean up sawdust in a carpeted basement. I am now at the stage where I am laying track and painting backdrops under temporary shop lights. Progress is slow but steady and as of right now I have the track 90% done on one section of the layout and half the backdrops painted!
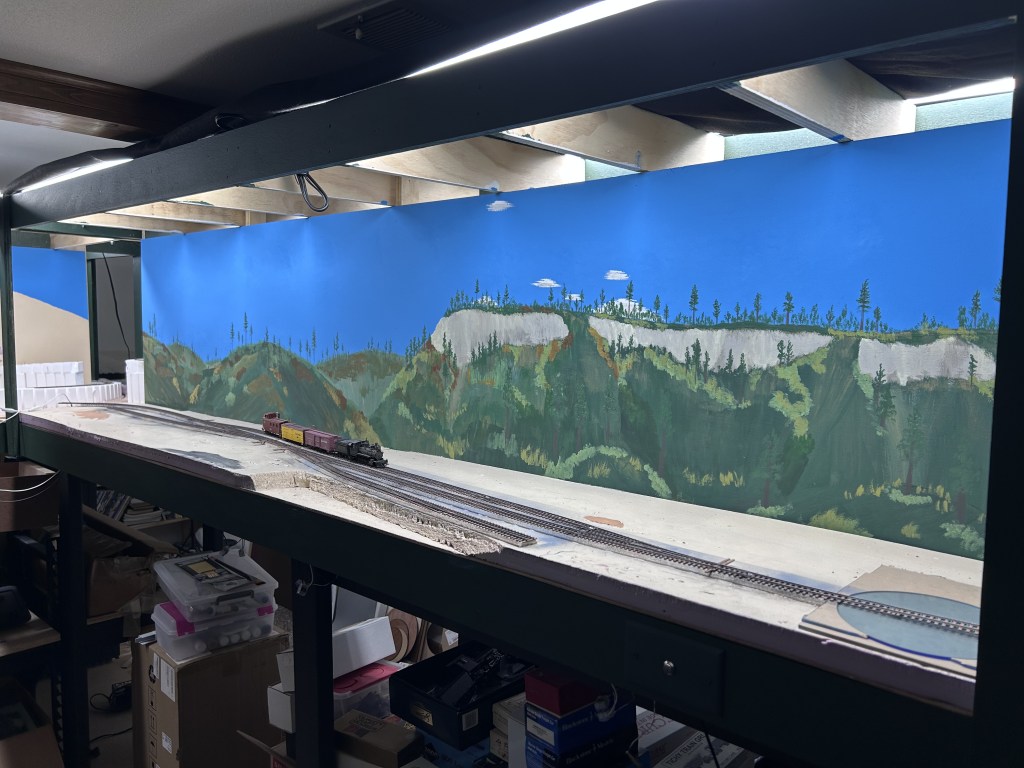
This section called “Nemo” has had the most progress in the last few months.
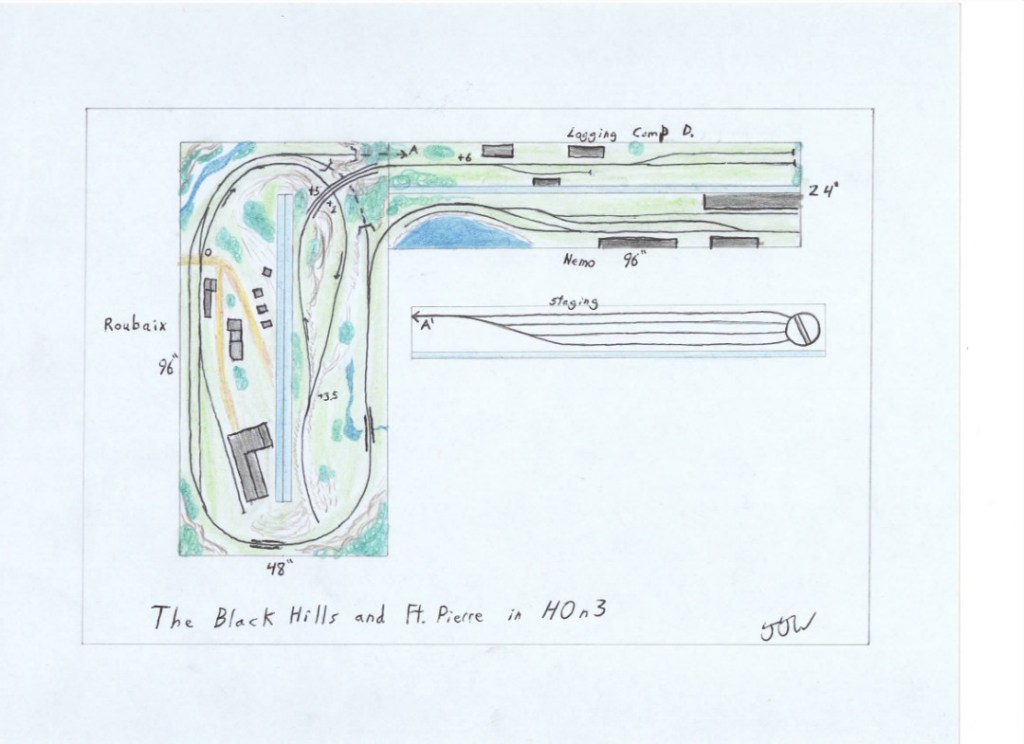
Here is the original track plan for the layout which features tight curves, steep grades, and a very narrow gauge feel to it.
I prefer slow speed switching to mainline train action and this layout is designed to meet that desire. Four turnouts make up an entire town and will serve a sawmill, general store, post office, and passenger station.
I’ve made substantially more progress from when this photo was taken, however it shows off the design of my benchwork quite well. It is composed of 3/4 inch plywood cut into strips then glued and nailed together into an open frame design that is (almost) square!
Steep grades and tight curves will be ever-present in the more mountainous sections of the layout. In this case, both the mainline and the lower leg of a switch back will cross under the upper leg of the switchback leading to the log landing out of frame to the left.
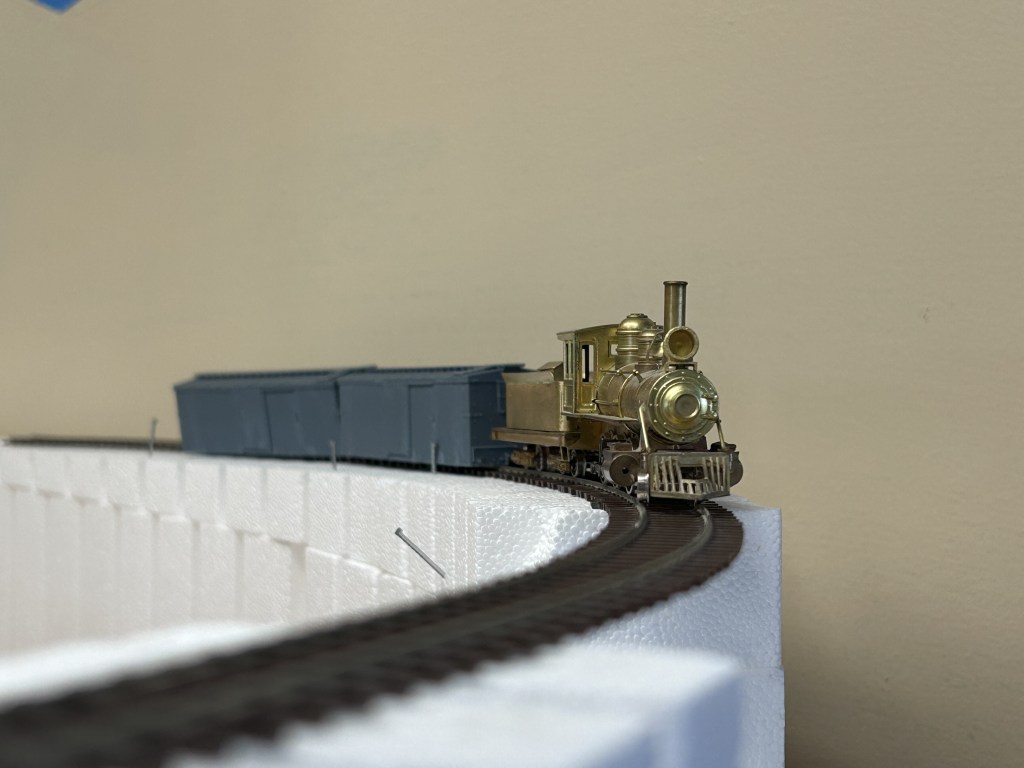
To go along with the compact nature of the layout is compact equipment. Narrow gauge trains are typically much smaller than their standard gauge counterparts. In fact, planning out the track for this HOn3 layout isn’t terribly different from N scale projects I’ve done in the past.
My layout features hand-painted backdrops which take time to finish. At the moment I have half the backdrops finished and this section is meant for the log landing that runs on a shelf about 5 inches off the lower deck, encasing the staging yard. My backdrops are depicting late summer or early autumn in the Black Hills right as leaves are beginning to turn.
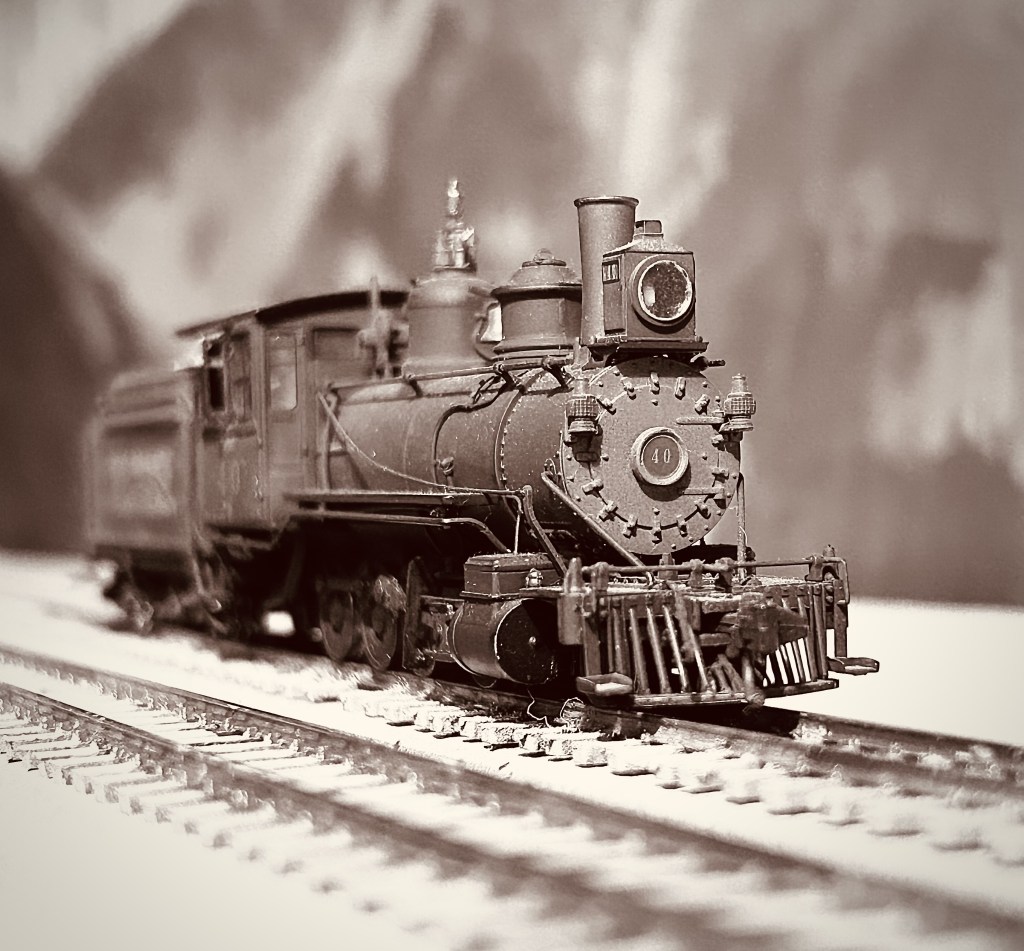
My one operating locomotive at the moment is a Blackstone RGS C-16. The Black Hills and Fort Pierre had a very similar locomotive but this one will be used for photography and testing out track. Things are starting to come together though as this photo shows.